Fix Grainy Photos: Pro Tips, AI Denoise & Camera Settings
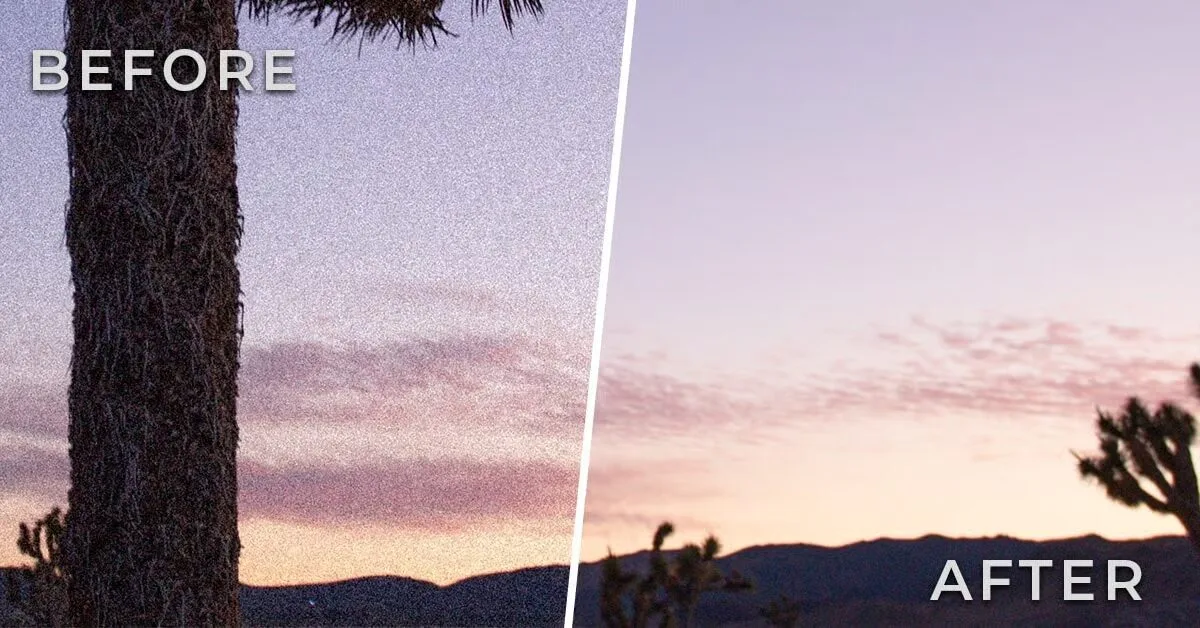
🎯 Quick Answer: Fix Grainy Photos in 30 Seconds
Run AI-powered noise reduction on a RAW file — Adobe Lightroom Denoise, DxO PureRAW 6, or Topaz Photo AI — after you correct exposure and white balance, then re-apply masked sharpening. For everyday shots, Lightroom’s Denoise slider at 40–50 removes 90%+ of visible noise instantly. To prevent grain, shoot RAW, expose to the right, open your aperture, and keep ISO as low as the scene allows.
By shooter type:
- Weddings & portraits → Lightroom Denoise (fast, free with Creative Cloud)
- Wildlife, astro, high-ISO → DxO PureRAW 6 with DeepPRIME XD3
- Old scanned prints & phone shots → Topaz Photo AI or Remini
- E-commerce product runs → ON1 NoNoise AI batch mode
- On the go → Snapseed (free) or Lightroom Mobile
Key Takeaways
- Grainy photos = digital sensor noise, driven mainly by high ISO, under-exposure, and small sensors
- AI Denoise is the single biggest fix, outperforming every legacy slider by a wide margin
- Correct exposure and color before denoising — lifting shadows afterwards re-introduces grain
- Prevent noise at capture with RAW files, faster apertures, tripods, and added light
- Some grain is good. Film-style grain is a legitimate look — use intent, not reflex
The Problem Every Photographer Faces
That perfect moment — golden-hour light on a face, a candlelit dinner, a concert bathed in stage color — you capture it, then open the file to find speckly, muddy, “sandpaper” texture crawling across every shadow. That texture is digital noise, and it ruins more otherwise-great photos than any other technical issue in photography.
Here’s what changes everything: grainy shots are rarely a lost cause. Modern AI-powered denoisers rescue images that would have gone straight to the trash a few years ago. This guide shows you exactly why photos look grainy, how to fix grainy photos using the best 2026 tools, and how to prevent grain at the moment of capture — whether you shoot with a DSLR, mirrorless, or smartphone.
✨ Struggling with grainy portraits or product shots? Let our editors rescue your images overnight — explore our professional photo retouching service and get gallery-ready results in 24 hours.
What Are Grainy Photos, Really?
A grainy photo is a digital image that shows visible speckles, blotches, or random texture caused by sensor noise instead of real subject detail. In everyday language, “grain” and “noise” mean the same thing — random signal errors that appear as gritty texture in the final file.
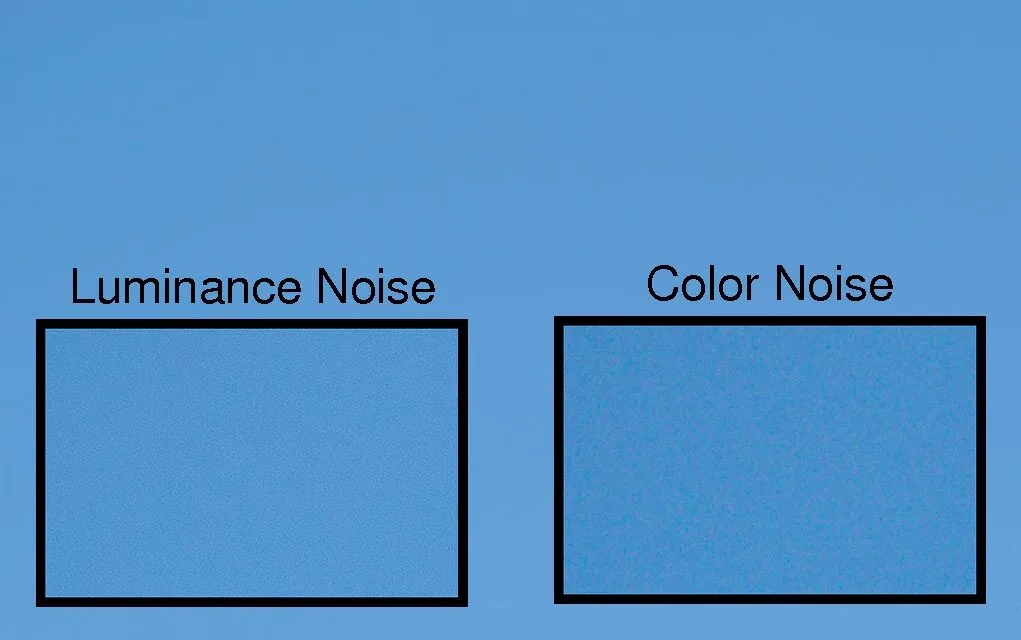
According to Adobe’s Lightroom documentation, noise is unwanted signal produced by a camera sensor when it struggles to gather clean light data. You need to recognize two distinct flavors:
- Luminance noise — grey-and-black brightness speckles that resemble film grain and often feel artistic
- Chrominance (color) noise) — random red, green, and blue splotches that appear mostly in shadows and always look unnatural
Knowing which type you’re fighting matters, because editing software treats each one with a different slider.
Noise vs. Grain: The Critical Difference
Digital noise and film grain look similar but come from completely different sources. Photographers use the terms interchangeably, yet the distinction shapes how you fix — or embrace — each one:
- Film grain is physical texture created by silver-halide crystals reacting to light. It looks organic, warm, and pleasingly random
- Digital noise comes from electronic signal errors on a CMOS or CCD sensor. It usually looks blotchy, colorful, and mechanical
The team at PetaPixel explains it perfectly: film grain is made of organic particles that build the image itself, while digital noise is interference layered on top of the image. That’s why film grain often looks intentional and beautiful, while high-ISO digital noise usually reads as a flaw.
Why Your Photos Turn Grainy: The 5 Root Causes
Photos turn grainy when the sensor doesn’t collect enough clean light — a shortfall driven by five stacked factors, not just ISO. Diagnose which one is hurting your shots before you touch a slider.
1. High ISO Settings
ISO controls how sensitive your sensor is to light. When you raise ISO, you amplify the signal — but you amplify sensor noise along with it. Most consumer cameras start showing visible grain above ISO 1600–3200, and older or smaller sensors show it much sooner.
2. Under-Exposure: The Hidden Killer
This is the biggest culprit and the most misunderstood. Under-exposing hides shadow detail; when you push exposure back up in Lightroom, you drag the buried noise into visible light. A correctly exposed ISO 3200 file almost always looks cleaner than an under-exposed ISO 400 file you had to lift in post.
3. Small Sensor Size
A full-frame body collects far more light per pixel than a phone or compact camera. Smaller sensors physically capture less light, so they lean on higher ISO and heavier processing — both of which amplify noise. If low-light work is a regular need, our roundup of the best mirrorless cameras shows why sensor size matters so much.
4. Long Exposures & Sensor Heat
Extended shutter times heat the sensor, producing “thermal” noise that appears as random bright pixels. Night, astro, and long-exposure landscape shooters run into this constantly, particularly on warm evenings.
5. Aggressive Post-Processing
Pulling shadows two stops, dialing Clarity to +80, or over-sharpening will drag hidden noise into the open. As detailed by Cambridge in Colour, the same file can look pristine or ruined depending purely on how it’s processed.
The Exposure Triangle: Your First Line of Defense
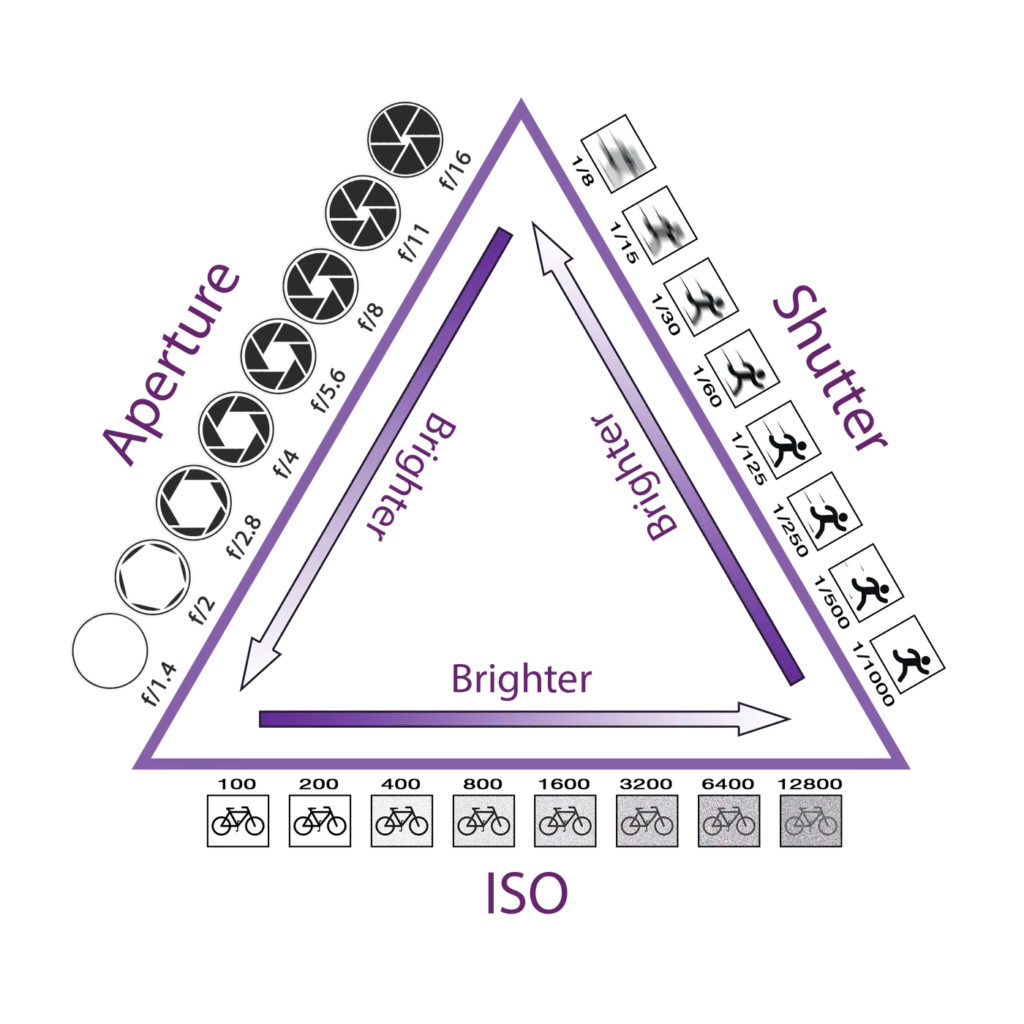
The exposure triangle is the relationship between ISO, aperture, and shutter speed — the three variables that decide how much clean light your sensor receives. Master the triangle and you stop grain before it starts.
- Aperture (f-stop): Widening the aperture (a lower number like f/1.8) lets in more light so you can drop ISO
- Shutter speed: A slower shutter gathers more light but risks blur — pair slow shutters with a tripod
- ISO: Boosts sensor sensitivity, but multiplies noise as it climbs
Modern full-frame bodies stay usable up to ISO 6400–12,800, mid-range APS-C bodies to about ISO 3200, and most smartphones to roughly ISO 800. If you shoot Auto mode, ISO can spike unexpectedly — flip to Aperture Priority or Manual and cap Auto ISO in the menu to stay in control.
How to Fix Grainy Photos in Lightroom: The Pro Workflow
Adobe Lightroom Classic is the most accessible tool for cleaning up grainy images, especially since Adobe’s AI-powered Denoise feature launched in 2023 and became roughly three times faster on Apple Silicon in the June 2026 update. Follow this exact four-step workflow used by professional editors.
Step 1 — Correct Exposure and Color First
Always fix exposure, contrast, and white balance before noise reduction. Brightening shadows later will only reveal more grain and undo your work. This ordering matters more than any single slider.
Step 2 — Run AI Denoise on RAW Files
For any RAW file, this is the single most effective click you can make:
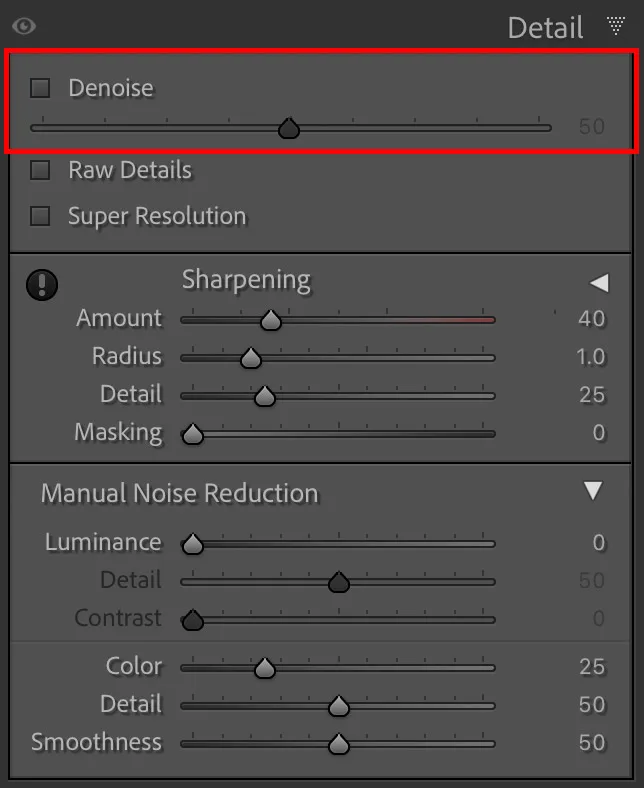
- Open the Detail panel in the Develop module
- Click Denoise
- Adjust the Amount slider (start around 40–50 and preview)
- Click Enhance — Lightroom outputs a new denoised DNG file alongside the original
Adobe’s model was trained on millions of noisy-versus-clean image pairs, which is why many professionals now treat it as the default first step for high-ISO work, as noted in this Digital Photography School review. The output DNG carries the same edit history, so any earlier Develop tweaks remain intact.
Step 3 — Use Manual Sliders for JPEGs
For JPEGs, HEIC, or scanned film, AI Denoise is greyed out. Reach for the manual Noise Reduction section:
- Luminance: 20–40 — the main slider for reducing brightness noise
- Detail: 50 — protects fine textures like eyelashes and hair
- Contrast: 30–50 — rebuilds micro-contrast lost during smoothing
- Color: 25–35 — removes red-green-blue chroma splotches
- Color Detail: 50 — keeps color edges sharp
Push Luminance only until noise vanishes — go further and skin looks plastic. New to editing? Our roundup of the best photo editing software is a great starting point.
Step 4 — Add Back Micro-Sharpening
Noise reduction always softens an image, so restore edge crispness carefully:
- Sharpening Amount: 40–70
- Radius: 1.0
- Detail: 25
- Masking: Hold Alt/Option and drag until only edges show (usually 50–70)
Masking ensures you sharpen edges while skipping smooth skin, sky, and shadow — exactly where grain would return if you got greedy. Always run Denoise before other adjustments, since Adobe’s tool sometimes refuses to operate after certain edits have been baked in.
✨ Have hundreds of noisy shots on deadline? Save days of retouching with our image masking service — pixel-precise cleanup by human editors, not just filters.
How to Fix Grainy Photos in Photoshop: 4 Proven Methods
Adobe Photoshop offers finer, layer-based control that suits portraits and product shots where you must protect specific textures. Four proven methods cover every situation.
Method 1: Camera Raw Filter (Recommended)
- Open the image in Photoshop
- Right-click the layer → Convert to Smart Object
- Go to Filter → Camera Raw Filter
- Open the Detail panel and click the AI Denoise button (same engine as Lightroom)
- Click OK — because the layer is a Smart Object, you can re-open the filter anytime
Method 2: The Classic Reduce Noise Filter
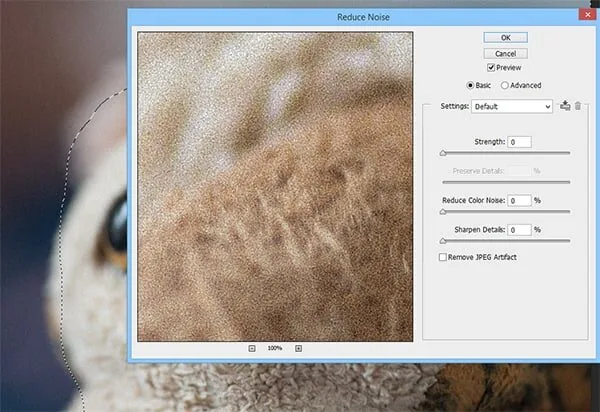
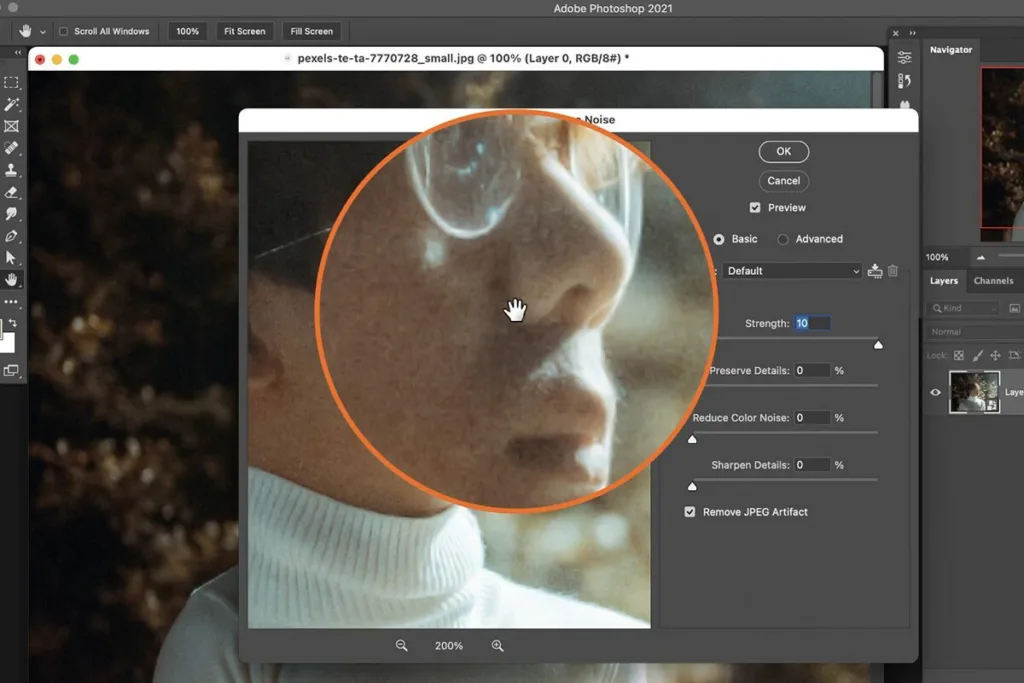
Head to Filter → Noise → Reduce Noise and adjust:
- Strength: 7–9 for most files
- Preserve Details: 30–50 (higher keeps edges sharp)
- Reduce Color Noise: 60–80 targets chroma speckles
- Sharpen Details: 15–25 restores crispness
- Tick Remove JPEG Artifact if the file is heavily compressed
Drop the layer’s opacity if the effect looks too aggressive.
Method 3: Blend Multiple Frames (Advanced)
If you shot several frames of the same static scene from a tripod, this trick is magic:
- Load all frames as layers in a single document
- Select every layer and convert to a Smart Object
- Go to Layer → Smart Objects → Stack Mode → Median
Photoshop averages random noise across frames, leaving only the real detail. Astro and cityscape shooters rely on this workflow constantly.
Method 4: The Blur + Layer Mask Trick
This works beautifully on skies and out-of-focus backgrounds:
- Duplicate the layer
- Apply Filter → Blur → Surface Blur (Radius 5, Threshold 15)
- Add a black layer mask
- Paint white over noisy areas only, so faces and textures stay sharp
If you also rely on tools like content-aware fill, always denoise first so healing algorithms don’t clone grainy patterns into clean areas.
The Best AI Noise Reduction Software in 2026: Ranked & Compared
The best AI noise reduction software in 2026 is DxO PureRAW 6 for extreme high-ISO work, Adobe Lightroom Denoise for everyday RAW files, and Topaz Photo AI for portraits and mixed workflows. All three use machine learning trained on massive datasets of noisy-to-clean image pairs, and all three now run several times faster than they did a year ago.
How We Compared Them
We evaluated each tool on five factors weighted by real-world workflow value: detail retention, chroma-noise removal, processing speed, batch support, and price. Ratings reflect current 2026 versions cross-referenced with independent testing by Fstoppers and community feedback from working photographers.
AI Denoiser Comparison Table
| Software | Best For | Detail Retention | Speed | Price (2026) |
|---|---|---|---|---|
| DxO PureRAW 6 (DeepPRIME XD3) | Wildlife, astro, extreme ISO | ★★★★★ | ★★★★ | ~$129 one-time |
| Adobe Lightroom Denoise | Everyday RAW, weddings | ★★★★ | ★★★★★ (June 2026 update) | Included with Creative Cloud |
| Topaz Photo AI | Portraits, upscaling, JPEGs | ★★★★ | ★★★ | ~$199 one-time |
| ON1 NoNoise AI | E-commerce batch runs | ★★★★ | ★★★★ | ~$89 one-time |
| Aiarty Image Enhancer | Old photos, JPEG restoration | ★★★ | ★★★★ | ~$69 one-time |
Quick Decision Guide
- Wedding, event, or portrait shooters → Adobe Denoise inside your existing subscription
- Wildlife, sports, and astrophotography → DxO PureRAW 6
- Old scanned photos, phone shots, upscaling needs → Topaz Photo AI
- Batch e-commerce processing → ON1 NoNoise AI
You can also explore our full breakdown of the best AI photo editing software if you want to compare toolboxes side by side.
✨ Running an online store? Turn grainy product images into crisp, conversion-ready photos with our expert clipping path service — quick turnaround, zero hassle.
Fix Grainy Photos on Your Phone: The Best Mobile Apps
Mobile denoise tools have caught up to desktop software for casual and social-media use, thanks to cloud-based AI models built into Lightroom Mobile, Google Photos, and Snapseed. You no longer need a laptop nearby to rescue a noisy shot.
- Adobe Lightroom Mobile — The Detail panel runs cloud-based AI Denoise for Premium users
- Snapseed (free) — Open Tools → Details, then reduce the Structure slider slightly negative and use the Selective tool to smooth noisy zones without softening faces
- VSCO — Great for aesthetic edits with a gentle grain-smoothing effect
- Remini — Aggressive AI restoration; excellent for old photos but can look “over-processed” on new ones
- Google Photos — The Enhance and Unblur tools now include automatic denoising on Pixel devices and Google One accounts
If mobile photography is a big part of your workflow, our roundup of the best photo editing apps in 2026 covers even more options tuned for grain and low-light rescue.
How to Prevent Grainy Photos at the Moment of Capture
Preventing grain always beats fixing it — a clean RAW file gives every downstream tool more data to work with. These seven field techniques keep noise low before you ever open Lightroom.
1. Keep ISO As Low As the Scene Allows
- Start at your camera’s base ISO (usually 100 or 200) whenever possible
- Raise ISO only to keep shutter speed fast enough to freeze motion
- Learn your camera’s noise ceiling — the highest ISO where images still look acceptable. On most 2026 full-frame bodies, that ceiling sits between ISO 6400 and ISO 12,800
2. Expose to the Right (ETTR)
Slightly overexposing your shot pushes more data into the bright end of the histogram, where noise is minimal. Watch the histogram lean right — but never let highlights clip. Correctly exposed images beat “safe” underexposed ones every single time.
3. Widen Your Aperture
A lens shot at f/1.8 gathers roughly ten times more light than at f/5.6 (a difference of ~3.3 stops). If you own a fast prime lens — 35 mm f/1.8, 50 mm f/1.8, or 85 mm f/1.8 — use it in low light so you can drop ISO dramatically.
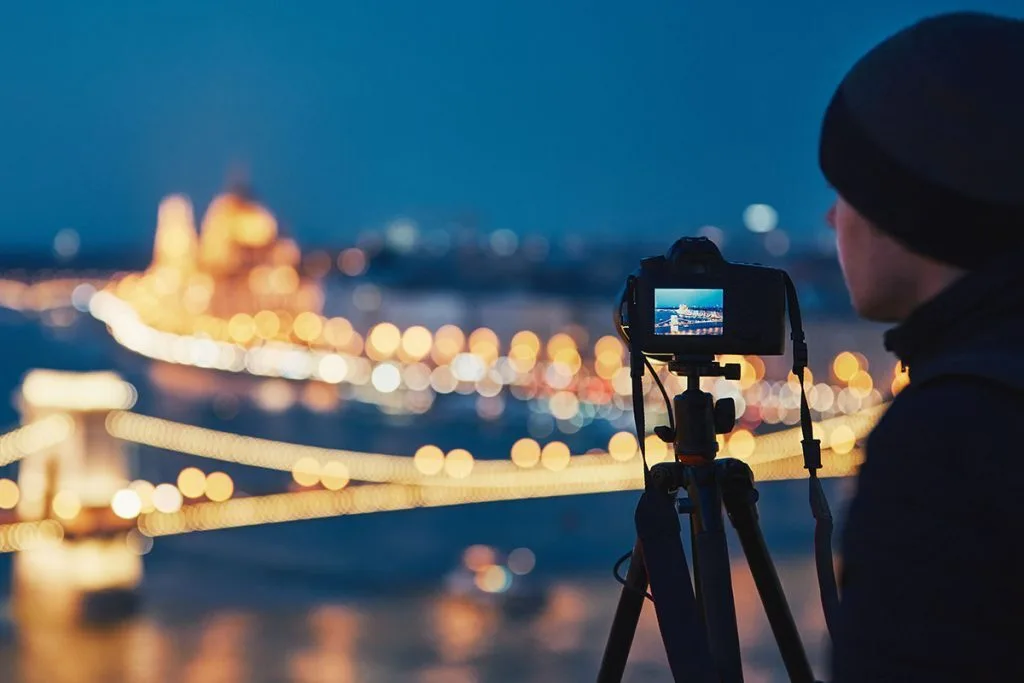
4. Slow the Shutter — On a Tripod
For landscapes, cityscapes, and still-life work, a tripod lets you use shutter speeds of one second, five seconds, or longer at ISO 100. You capture cinematic images with practically zero noise.
5. Shoot RAW, Not JPEG
RAW files store the sensor’s full 12-bit or 14-bit data. JPEGs discard most of it and apply harsh in-camera compression that can bake noise permanently into the file. RAW also unlocks Lightroom’s AI Denoise, Camera Raw, and third-party AI tools.
6. Add Light Whenever You Can
- Bounce a speedlight off a wall or ceiling
- Use a continuous LED panel for video-style lighting
- Position your subject near windows or doorways
- Even a phone flashlight can save an image indoors
7. Match the Camera to the Job
Small-sensor compacts and older phones will always struggle in dim rooms. If low-light shooting is a regular need, invest in a larger sensor — the physics of a bigger sensor beats software every time. Our beginner camera guide helps you pick a body that handles high ISO gracefully.
✨ Need mannequin shots that look flawless? Get invisible, symmetrical results with our ghost mannequin service — perfect for fashion brands scaling their catalog.
Recommended Settings by Photography Scenario
Different genres carry different noise budgets — matching settings to the scene is the shortest path to clean files. Use this table as a fast reference the next time you plan a shoot.
| Scenario | ISO Range | Aperture | Shutter | Denoise Tool |
|---|---|---|---|---|
| Product / e-commerce | 100–200 | f/8–f/11 | Tripod, 1/60 s+ | ON1 NoNoise AI |
| Portrait (indoor) | 400–1600 | f/1.8–f/2.8 | 1/125 s+ | Topaz Photo AI |
| Wedding reception | 1600–6400 | f/2.0–f/2.8 | 1/160 s+ | Lightroom Denoise |
| Concert / nightlife | 3200–6400 | f/1.4–f/2.8 | 1/200 s+ | DxO PureRAW 6 |
| Astrophotography | 1600–3200 | f/1.4–f/2.8 | 15–25 s | DxO PureRAW 6 + stacking |
| Old scanned photos | N/A | N/A | N/A | Topaz Photo AI or Remini |
Special Cases: Fixing Grain in Specific Situations
Old Scanned Family Photos
- Use Topaz Photo AI or Remini — both are trained on legacy image restoration
- Apply color noise reduction first, since chroma noise dominates most old scans
- Follow with light luminance smoothing and a subtle sharpen pass
Concert and Nightclub Shots
- Shoot RAW at ISO 3200–6400
- Nail exposure — never underexpose and rely on “fixing it later”
- Run through DxO PureRAW 6 before you even open Lightroom
Astrophotography
- Use the widest aperture (f/1.4 to f/2.8), 15–25 second exposures, and ISO 1600–3200
- Stack multiple frames using DeepSkyStacker or Sequator to average out random noise
- Finish with AI Denoise for the cleanest result
E-commerce Product Shots
Product images demand a higher standard than lifestyle work. Even a hint of noise on a white background looks like a stain, and buyers subconsciously downgrade the perceived quality of the product.
- Use continuous LED lighting to keep ISO at 100
- Shoot on a tripod at f/8–f/11 for maximum depth of field
- Denoise before background swaps or color changes — noise clones badly
- Batch-process through ON1 NoNoise AI, then send to your retoucher
8 Common Mistakes That Make Grain Worse
Most self-inflicted grain comes from a small set of avoidable habits. Skip these and you’ll skip half the problem:
- Over-editing the Luminance slider. Anything above 70 usually leaves skin looking waxy
- Denoising before color correction. Always fix exposure, contrast, and white balance first
- Cranking Clarity and Texture too high. Both sliders amplify existing noise
- Aggressive shadow recovery. Lifting shadows +80 drags hidden noise into visible tones
- Sharpening before denoising. Sharpening noise makes it more obvious — denoise first, sharpen second
- Trusting Auto ISO blindly. Set a maximum ISO limit in your camera’s Auto ISO menu
- Skipping color noise reduction. Chroma speckles are louder than luminance grain — tackle them first
- Denoising after up-sizing. Downscale first, then denoise; upscaling amplifies existing grain
For newcomers, our photography tips for beginners resource pairs nicely with this article.
Advanced Technique: Frequency Separation for Portrait Skin
Frequency separation is a Photoshop technique that splits an image into low-frequency (color, tone) and high-frequency (pores, texture) layers, so you can smooth noise on the low layer without touching real skin detail. It’s the workflow magazine retouchers have used for two decades.
For a 16-bit file:
- Duplicate the layer twice — name them “Low” and “High”
- Blur the “Low” layer with Gaussian Blur (Radius 4–8) to smooth color and tone
- Select the “High” layer and set its blend mode to Linear Light, then run Image → Apply Image with source layer “Low,” Blending Add, Scale 2, Offset 0, and Invert ticked
- Paint on the “Low” layer to smooth noise while pores stay perfectly intact on the “High” layer
For an 8-bit file, use Blending Subtract, Scale 2, Offset 128 in the Apply Image step (leave Invert unchecked). And for a deeper dive into pro-grade retouching, take a look at our post on the best photo retouching software.
✨ Want believable depth without the guesswork? Our shadow creation service adds natural, life-like shadows that make every product image feel three-dimensional.
When to Embrace Grain Instead of Fighting It
Not every grainy photo is a failure. Film-style grain is a legitimate aesthetic — moody portraits, street photography, and documentary work often benefit from a bit of texture. In Lightroom, you can even add grain intentionally via the Effects panel to unify shots taken at different ISOs or to give digital images a film feel.
The key is intention. Ask a single question: does this grain serve the image? If it suits the mood of the story you’re telling, keep it. If it distracts from the subject or product, remove it. That question should guide your decision more than any technical rule ever will.
When to Outsource Instead of Doing It Yourself
Outsource photo cleanup whenever the math works against you — a wedding gallery on deadline, an e-commerce catalog needing consistency, or hundreds of files piling up while clients wait. Professional retouching services can:
- Denoise, color-grade, and clean each image by hand
- Standardize skin tones and backgrounds across a full shoot
- Handle masking, background removal, and shadow work in one pass
- Deliver results in 12–24 hours — often cheaper than the hours you’d spend yourself
If your day is booked with clients or your Etsy store needs 200 clean listings by Monday, outsourcing is almost always the ROI-smart choice.
Quick Grainy-Photo Fix Checklist
Save this list. Run through it any time a photo comes off the card looking noisy.
Before you shoot
- Set the camera to Manual or Aperture Priority
- Cap Auto ISO at your camera’s known noise ceiling
- Charge batteries, pack a tripod, and add extra light
While shooting
- Shoot RAW
- Expose to the right without clipping highlights
- Use the widest usable aperture and slowest safe shutter first — raise ISO last
After the shoot
- ✅ Correct exposure and color before touching noise sliders
- ✅ Run AI Denoise (Lightroom, DxO PureRAW 6, or Topaz Photo AI) first
- ✅ Fine-tune with manual Luminance (25–50) and Color (25) sliders
- ✅ Set the Detail slider to 50–70
- ✅ Add masked sharpening back in (Masking > 50)
- ✅ Compare at 100% zoom — dial back if skin looks plastic
- ✅ Export at final size and re-evaluate once more
Glossary: Key Terms Every Photographer Should Know
- Digital noise — Random signal errors on a camera sensor that appear as speckles or blotches in a photo
- Luminance noise — Brightness-based noise that resembles film grain
- Chrominance (color) noise — Red-green-blue color speckles that appear mostly in shadows
- ISO — A camera setting that controls sensor sensitivity to light; higher ISO amplifies noise
- Base ISO — A camera’s native sensitivity (usually ISO 100 or 200) that produces the cleanest image
- Noise ceiling — The highest ISO at which a specific camera’s images remain acceptable
- ETTR (Expose to the Right) — A technique of biasing exposure slightly bright to gather more clean data
- RAW file — An unprocessed image file that stores all sensor data (typically 12- or 14-bit)
- AI Denoise — A machine-learning process that removes noise while preserving detail
- Frequency separation — A Photoshop technique that separates tone from texture on independent layers
Frequently Asked Questions (FAQ)
Why do my photos look grainy even at low ISO?
Underexposure is usually the culprit. Noise hides in shadows, and lifting them in post exposes that noise. Correct your exposure in-camera or open your aperture to let more light in.
Can grainy photos be fixed after the fact?
Yes, in most cases. Adobe Lightroom AI Denoise, DxO PureRAW 6, and Topaz Photo AI can recover detail from very noisy files. Extreme underexposure or motion blur, however, cannot always be reversed.
What is the best ISO to avoid grain?
Stay at your camera’s base ISO (typically 100 or 200) whenever possible. Full-frame cameras usually stay clean up to ISO 3200; APS-C bodies up to ISO 1600–3200; most smartphones up to ISO 800.
Is Lightroom AI Denoise better than Photoshop’s Reduce Noise filter?
Yes, significantly. AI Denoise uses machine learning trained on millions of images, while Photoshop’s Reduce Noise filter relies on an older mathematical algorithm.
Does shooting RAW really help with grain?
Absolutely. RAW files preserve all sensor data, giving noise-reduction algorithms more information to work with. JPEGs discard data and often bake noise permanently into the file.
How do I remove grain from an old scanned photo?
Use Topaz Photo AI or Remini — both are trained specifically on legacy image restoration. Apply color noise reduction first, then luminance smoothing, and finish with light sharpening.
What’s the difference between grain and pixelation?
Grain is random noise from sensor sensitivity. Pixelation is loss of detail when an image is enlarged beyond its native resolution. Different problems, different fixes.
Will noise reduction damage image quality?
Only if overused. At moderate settings, tools like Lightroom Denoise, DxO PureRAW 6, and Topaz Photo AI recover detail rather than destroy it. If skin looks waxy or hair loses strands, dial back the strength.
Final Thoughts: Take Control of Your Images
Grainy photos are one of the most fixable problems in modern photography. Between AI-powered software, smart camera settings, and a few solid editing habits, you can turn almost any noisy file into a clean, share-worthy image. Start with correct exposure, shoot RAW whenever possible, and lean on Lightroom Denoise or a dedicated AI tool for the heavy lifting.
More importantly, remember that noise isn’t always the enemy. A touch of grain can add mood, story, and character — but that choice should always be yours, not your camera’s. Whether you’re a wedding photographer trying to save reception shots, an e-commerce seller chasing cleaner catalog images, or a hobbyist rescuing family memories, the takeaway stays the same: you have far more control over grain than you think.
🚀 Ready to skip the tedious editing and get spotless, ready-to-publish images? Try our fast, reliable background removal service today and see the difference in your very next batch.