How to Sharpen Images: Photoshop, AI & Pro Tips for 2026
TL;DR: The Short Answer
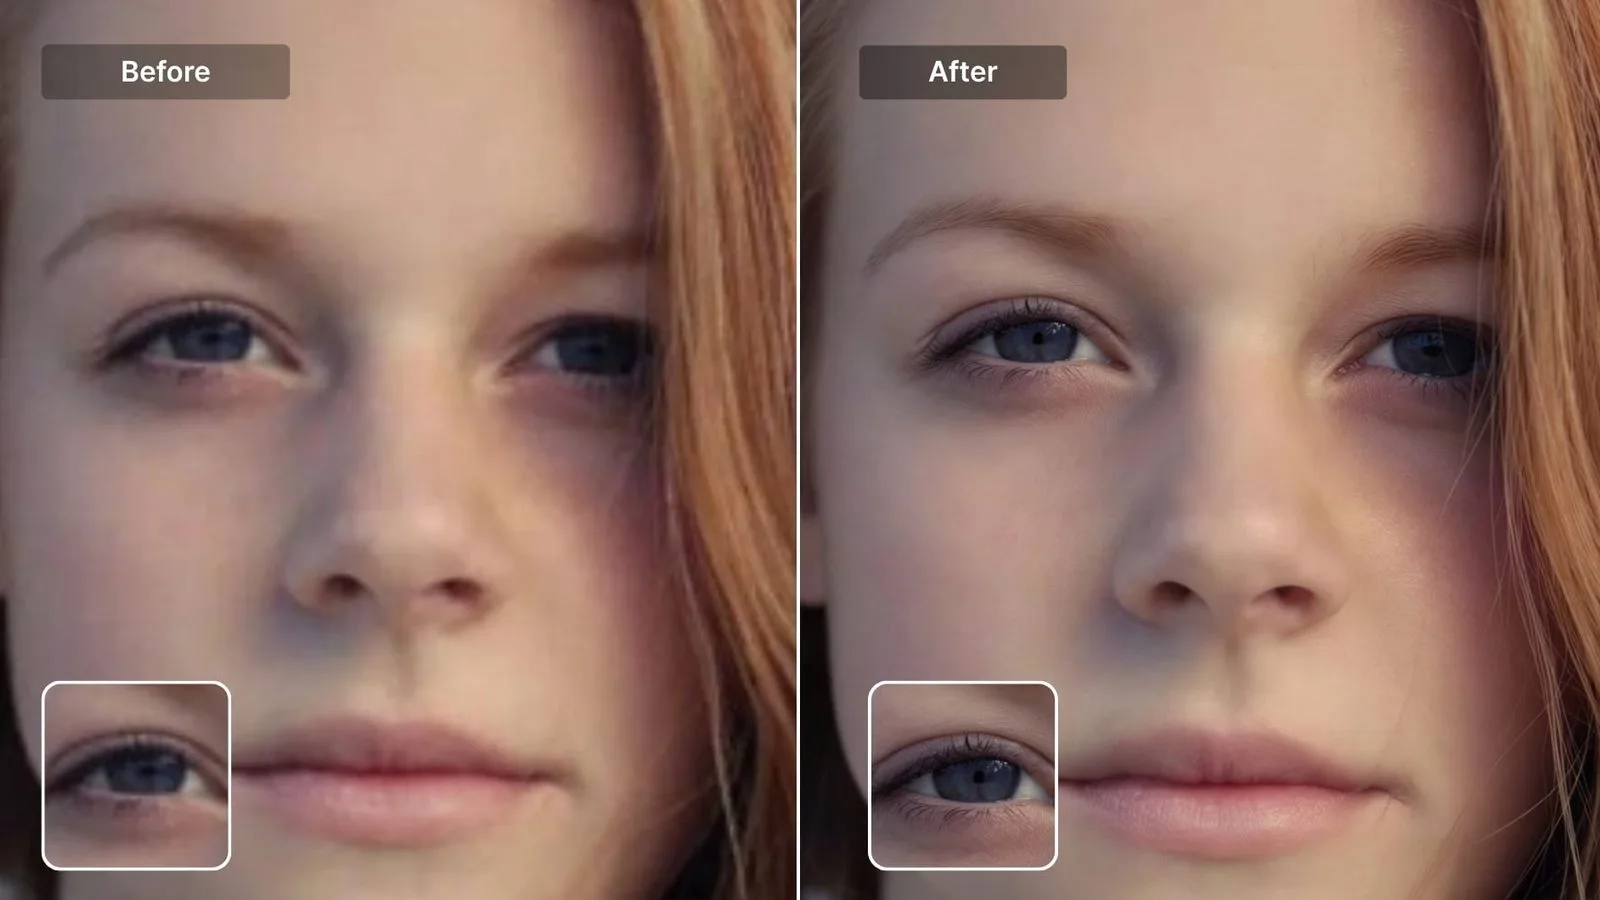
Sharpening works by increasing contrast along edges — it does not add detail that was never captured. The right way to sharpen is a three-stage workflow: subtle capture sharpening in RAW, selective creative sharpening on the subject (eyes, hair, product edges), and final output sharpening after resizing for screen or print. In Photoshop, start with Unsharp Mask at Amount 50–80%, Radius 0.5–1.5px, Threshold 2–4 for web; use Smart Sharpen if you need to remove motion or lens blur; and use the High Pass method for non-destructive control. Always mask out smooth areas (skin, skies, backgrounds), judge at 100% zoom, and stop before you see halos. For genuinely blurry photos, an AI deblur tool like Topaz Photo AI will beat any manual filter.
What Is Image Sharpening, and What Can It Actually Do?
Sharpening is a contrast trick. The software finds edges — places where light and dark meet — and it darkens the dark side and brightens the light side. Your eye reads that increased edge contrast as “sharper.” It does not recover detail that was out of focus or never recorded. If your subject’s eyes were soft because you missed focus, no amount of sharpening will make them crisp — you will just make the blur look crunchy. So sharpening improves a good photo; it cannot rescue a bad one. That single fact saves a lot of wasted effort.
If you are new to editing, a solid photo editing guide will cover the layer and mask skills you need to sharpen selectively.
The Three-Stage Sharpening Workflow (Do This, Not One Big Pass)
Beginners apply one heavy sharpening filter at the end and wonder why their photos look fake. Pros split sharpening into three separate, lighter passes:
- Capture sharpening — subtle, applied in your RAW editor (Lightroom, Camera Raw, Capture One) to offset the softness every camera sensor introduces through its anti-aliasing filter and demosaicing. Keep it gentle.
- Creative sharpening — selective, applied only to the parts that should look crisp: eyes, hair, eyelashes, product edges, text, architecture. Skin, skies, and smooth backgrounds get little or none.
- Output sharpening — the final pass, applied after you resize to your final dimensions and tailored to screen or print. A web file and a 16×20 print need different amounts.
If you remember only one rule: resize first, sharpen last. Resizing softens an image, so sharpening before resizing means you sharpen twice the amount you need — and that is where halos come from.
Method 1: Unsharp Mask — The Classic, Still the Best Control
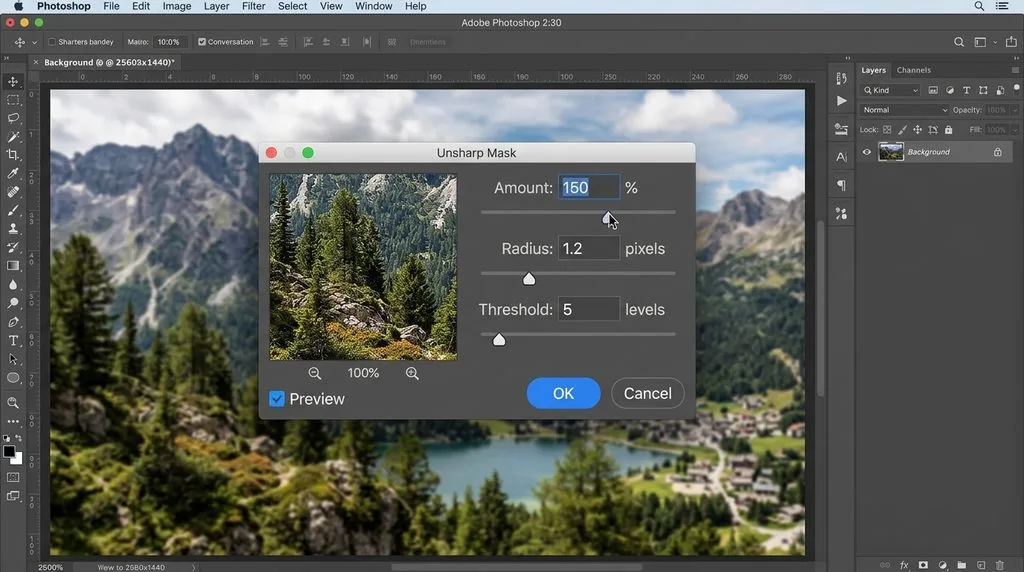
Unsharp Mask (USM) is Photoshop’s original sharpening filter, and it is still the one most pros reach for. It has three sliders, and once you understand them, sharpening stops feeling like guesswork. Adobe’s official Unsharp Mask guide confirms the ranges below.
| Slider | What it does | Web starting point | Print starting point |
|---|---|---|---|
| Amount | How much contrast is added to edges (1–500%) | 50–80% | 80–150% |
| Radius | How many pixels around each edge get affected (0.1–250px) | 0.5–1.5px | 1–2px |
| Threshold | How different a pixel must be from its neighbors before sharpening applies (0–255) | 2–4 | 2–20 |
How to use it: duplicate your layer (Ctrl/Cmd+J), convert it to a Smart Object so you can edit the settings later, then go to Filter > Sharpen > Unsharp Mask. Start with Amount 60%, Radius 1.0, Threshold 2. Zoom to 100%. Push Amount up until edges start to glow, then back off 10–20%. Raise Threshold if flat areas like skin start to get grainy.
Method 2: Smart Sharpen — When You Need to Fight Blur
Smart Sharpen does everything Unsharp Mask does, plus one thing Unsharp Mask cannot: it lets you choose what kind of blur to remove. Go to Filter > Sharpen > Smart Sharpen and set the Remove dropdown to Gaussian Blur (general softness), Lens Blur (out-of-focus), or Motion Blur (camera shake or subject movement). It also has separate Shadow and Highlight sliders so you can reduce sharpening in dark, noisy areas. If your photo has real motion blur or focus softness, start here — or skip straight to an AI tool.
Method 3: High Pass Filter — Non-Destructive and Easy to Mask
The High Pass method is the favorite of retouchers because it lives on its own layer, blends non-destructively, and is trivial to mask. Here is how it works:
- Duplicate your background layer (Ctrl/Cmd+J).
- Go to Filter > Other > High Pass. Set Radius to 1–3px — just enough to see faint gray edges. Click OK.
- Change that layer’s blend mode from Normal to Overlay (or Soft Light for a gentler effect, Hard Light for stronger).
- Lower the layer opacity to 30–70%.
- Add a black layer mask, and paint with white only where you want sharpness — eyes, hair, edges. Everything else stays soft.
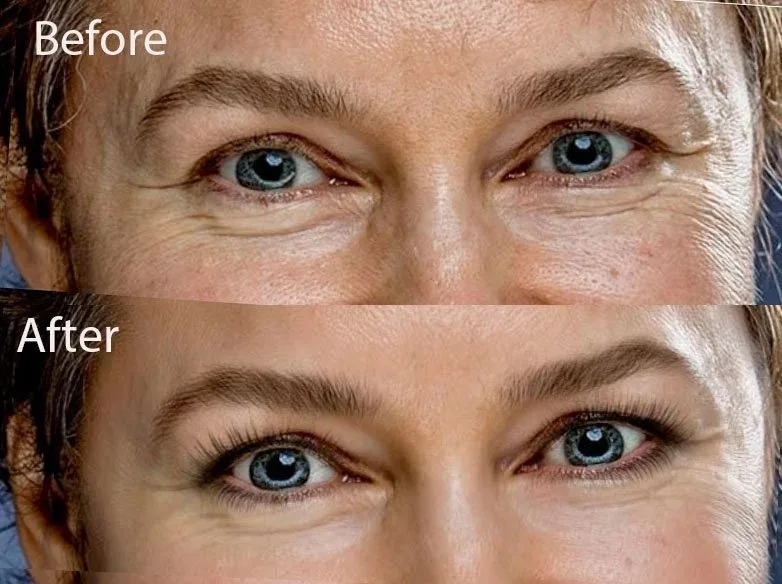
This method is perfect for portraits: sharpen the eyes and eyelashes, and leave the skin smooth. If you sharpen skin, you will bring out every pore and blemish — which is why a mask is non-negotiable. For skin work, pair it with frequency separation so texture and tone live on separate layers.
Method 4: AI Sharpeners — When the Photo Is Actually Blurry
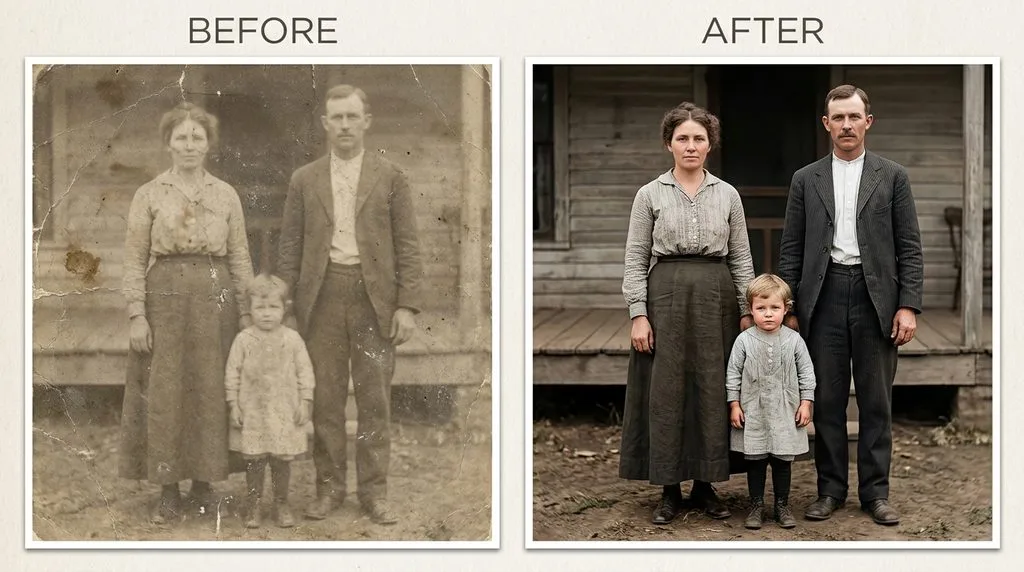
When a photo is genuinely soft — missed focus, camera shake, low-light noise — manual sharpening will amplify the blur. AI deblur tools were trained to reconstruct real detail, and they win in those cases. Here is how the top 2026 tools compare.
| Tool | Best for | Price | Standout |
|---|---|---|---|
| Topaz Photo AI | Genuinely blurry photos, motion blur | ~$199 perpetual or subscription | Best-in-class deblur + denoise + upscale in one |
| Adobe Lightroom / Camera Raw | Existing Adobe workflow | Included with CC | Denoise + Enhance, integrated into catalog |
| DxO PureRAW | RAW files, lens softness | ~$149 | Corrects lens softness before editing |
| Luminar Neo | Hobbyists, one-click | Subscription | Simple sliders, good for beginners |
| Photoshop Shake Reduction | Camera shake | Included with CC | Built-in, but weaker than dedicated AI |
Topaz Photo AI is the consensus pick for serious blur recovery, and it works as a plugin inside Photoshop and Lightroom. If you already pay for Creative Cloud, Lightroom’s built-in Enhance and Denoise will handle most soft photos before you need a separate tool. Our roundup of the best photo editing software covers these and more side by side.
How to Sharpen Without Halos: Masking Is the Secret
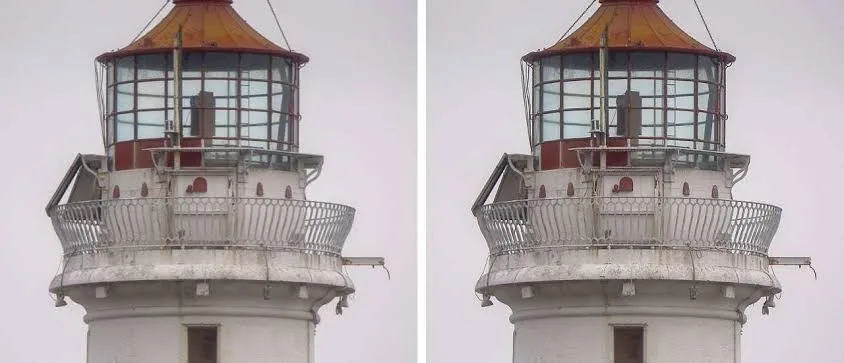
Halos — those bright white or dark lines along high-contrast edges — are the #1 sign of oversharpening. They appear when Radius is too high or Amount is too strong. Fix and prevent them like this:
- Mask, don’t blanket-sharpen. In Lightroom’s Detail panel, hold Alt (Windows) / Option (Mac) while dragging the Masking slider. The screen turns black and white — white means sharpening applies, black means it is protected. Drag until only real edges are white.
- In Photoshop, add a layer mask to your sharpening layer and paint black over skin, skies, walls, and smooth backgrounds. Paint white only on eyes, hair, text, and product edges.
- Reduce noise first. Sharpening amplifies noise. If your photo is grainy, run noise reduction before sharpening — our noise reduction guide walks through it.
- Judge at 100% zoom. A thumbnail always looks sharper than the full-size file. Zoom in to actual pixels before you decide you are done.
- If you see a halo, back off. Lower Amount first, then Radius. A subtle sharpen that nobody notices beats an obvious one every time.
6 Common Sharpening Mistakes (and How to Avoid Them)
- One heavy pass instead of three light ones. Split it into capture, creative, and output.
- Sharpening before resizing. Resize to final dimensions first, then apply output sharpening.
- Sharpening skin and skies. Mask them out — they should stay smooth.
- Sharpening noise. Denoise first, or the grain will jump out.
- Judging at thumbnail size. Always check at 100%.
- Trying to sharpen a missed-focus photo. Sharpening adds edge contrast, not detail. Use AI deblur or accept the shot.
Output Sharpening: Web vs. Print
Your final pass depends on where the photo will live:
- Screen / web: Lower values — Amount 50–80%, Radius 0.5–1.0px. Screens are forgiving.
- Glossy print: Moderate — Amount 100–150%, Radius 1–1.5px.
- Matte / fine-art print: Highest — ink spreads and softens on matte paper, so push Amount to 150–200% and Radius to 1.5–2px. Lightroom’s Print module can apply output sharpening automatically based on paper type.
Adobe’s unsharp masking guide walks through the same radius-and-amount logic with visual examples if you want a second reference.
Frequently Asked Questions
What is the best way to sharpen an image?
Use a three-stage workflow: subtle capture sharpening in RAW, selective creative sharpening with a mask, and final output sharpening after resizing. In Photoshop, Unsharp Mask or the High Pass method gives the most control; for blurry photos, use an AI deblur tool.
What are the best Unsharp Mask settings?
For web: Amount 50–80%, Radius 0.5–1.5px, Threshold 2–4. For print: Amount 80–150%, Radius 1–2px, Threshold 2–20. Matte paper needs more than glossy. Always judge at 100% zoom.
Can sharpening fix a blurry photo?
No. Sharpening increases edge contrast; it cannot recover detail that was out of focus. For camera shake or motion blur, try an AI deblur tool like Topaz Photo AI or Photoshop Shake Reduction. For missed focus, nothing will fully recover it.
Should I sharpen before or after resizing?
After. Resizing softens an image, so always resize to your final dimensions first, then apply output sharpening tailored to screen or print.
How do I avoid halos when sharpening?
Keep Radius low (under 2px for most web work), back off Amount as soon as you see a glow, and use a mask to protect smooth areas like skin and skies. In Lightroom, use the Masking slider with Alt/Option held down.
What is the difference between sharpening and clarity?
Sharpening increases contrast along fine edges. Clarity (in Lightroom) increases midtone contrast, adding punch and texture across larger areas. Stacking both heavily gives a crunchy, over-processed look — use one or the other, not both at full strength.
Should I sharpen every photo?
Almost every digital photo benefits from at least light capture sharpening, because camera sensors soften the image slightly. But not every photo needs creative or output sharpening — match the amount to the subject and the final use.
Final Verdict
Sharpening is the difference between a photo that looks soft and one that looks alive — but only when you do it lightly, selectively, and at the right stage of the workflow. Start gentle, mask aggressively, judge at 100%, and stop before anyone can tell you sharpened. If the photo is genuinely blurry, let AI do the heavy lifting — and if focus was missed, let that one go. The best sharpening is the one nobody notices.