How to Remove Shadows from Photos: Lighten, Don’t Erase (2026 Guide)
TL;DR: The Short Answer
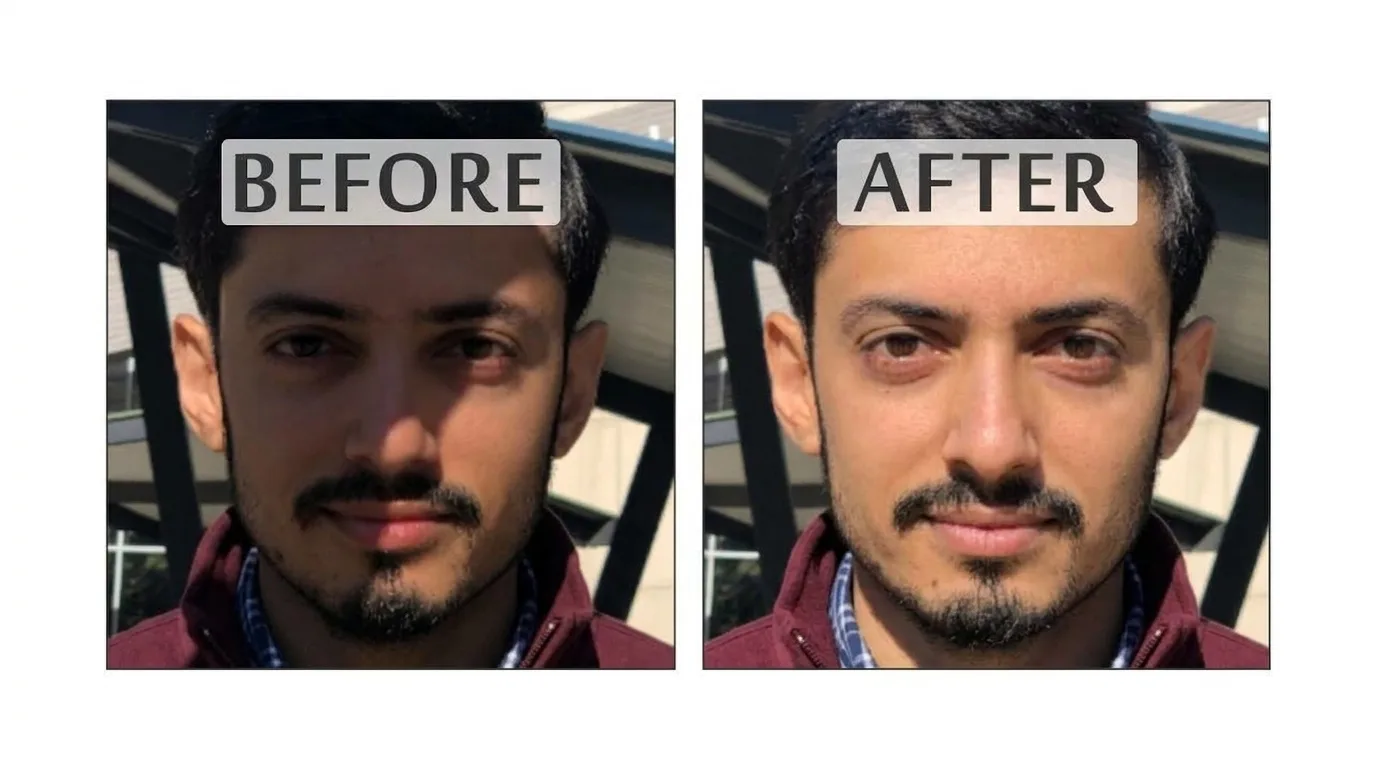
You remove a shadow by lightening it to match the surrounding light, not by erasing it. A face or object with zero shadow looks flat and fake. For harsh, defined shadows (a tree branch across a face or a hard shadow on a wall), select the shadow with the Lasso tool, click Generative Fill, leave the prompt empty, and choose the best variation. Soft, subtle shadows, such as those under the chin or on one side of a face, respond better to the Dodge tool set to Range: Midtones and Exposure 15–25%. When editing product photos, never fully remove the contact shadow under the object because it helps ground the subject; lighten it instead.
Shadows are often cooler (bluer) than the lit area. Warm up the corrected area afterward with Temperature or a warm Color layer, or it can look gray. Check the result at 100% zoom and keep some shadow—70% removal looks natural, while 100% removal can look plastic.
First: Decide — Lighten, Reduce, or Remove
Not every shadow should disappear. Shadows give objects dimension and ground them in the scene. Before you touch a tool, decide which kind of shadow you are dealing with:
| Shadow type | What to do | Best tool |
|---|---|---|
| Harsh, defined shadow (tree branch, window frame, hat brim across face) | Remove entirely | Generative Fill / Patch Tool |
| Soft facial shadow (one side of face, under nose) | Reduce, keep some | Dodge tool / Curves with mask |
| Contact shadow (under a product, under feet) | Lighten only, keep shape | Curves with mask, low opacity |
| Cast shadow on background (person’s shadow on wall) | Remove or reduce | Generative Fill / Clone Stamp |
| Ambient shadow (whole scene slightly dark) | Global exposure lift | Exposure / Shadows slider |
The golden rule: shadows are often cooler than lit areas. When you brighten a shadow, you reveal a blue-gray cast. Warm it up afterward — +5 to +15 Temperature on the corrected area, or a warm Color fill layer set to Color blend mode at low opacity. A corrected shadow that stays blue-gray is the #1 giveaway that editing happened.
A guide to ecommerce product photo editing covers the contact-shadow rule for product shots in depth.
Method 1: Generative Fill — Harsh, Defined Shadows (Fastest)
For example, a shadow with a hard edge — a tree branch across a face, a window frame on a wall, a hat brim shadow — Generative Fill removes it in seconds.
- Duplicate the layer (Ctrl/Cmd+J).
- Select the Lasso Tool (L). Draw a loose selection around the shadow — include a little clean area around it so the AI understands the context. Do not trace tightly.
- In the Contextual Task Bar, click Generative Fill.
- Leave the prompt box empty. An empty prompt tells Photoshop: “make this area look like it would without the shadow.” Typing “remove shadow” sometimes confuses the model.
- Click Generate. Photoshop returns three variations. Cycle through them — Variation 2 is often the cleanest, but check all three.
- Apply the best one. Zoom to 100%. If the AI changed skin texture or invented a detail, add a black layer mask and paint white to restore original texture where needed.
Adobe’s official remove shadows guide confirms the same workflow and notes that for facial shadows, Generative Fill achieves 85–95% realism in under 30 seconds — far faster than manual Curves work.
Method 2: Dodge Tool — Soft, Subtle Shadows (Most Natural)
In contrast, shadows without a hard edge — one side of a face, under the chin, a slightly dark corner — the Dodge tool gives you the most natural result because it preserves all original texture. It just brightens.
- Duplicate the layer.
- Select the Dodge Tool (O). In the options bar: set Range to Midtones (not Shadows — Midtones preserves more natural color), Exposure to 15–25%.
- Paint over the shadow in multiple light passes. Do not hold and scrub — click, release, click again. Each pass brightens a little.
- Stop when the shadow is 70–80% gone. Leave some — a fully even face looks flat.
- If the corrected area looks gray or blue, add a Color Balance adjustment layer clipped to the layer (Alt-click between layers) and nudge toward red/yellow in the midtones.
For precise skin work, a guide to portrait retouching covers Dodge & Burn and frequency separation techniques that pair well with shadow removal.
Method 3: Curves Adjustment Layer + Mask — Full Control, Non-Destructive
When you want maximum control and a fully editable result, use a Curves layer with a mask. This is the pro method for product photos and high-end retouching.
- Add a Curves adjustment layer.
- Click the middle of the curve and drag it up slightly — this brightens the whole image. Ignore that for now.
- Select the layer mask. Press Ctrl/Cmd+I to invert it to black (the brightening is now hidden).
- Select a soft white brush at 20–30% opacity. Paint over the shadow areas. Each brush stroke brightens a little more.
- Lower the layer opacity to 50–70% — you want to reduce the shadow, not eliminate it.
- Double-click the Curves layer to open Blend Options. Alt-drag the Underlying Layer black slider to split it and pull the right half to the right (~10–20). This protects the darkest tones from being brightened — essential for keeping contact shadows and natural depth.
Method 4: Patch Tool & Content-Aware Fill — Shadows on Textured Backgrounds
For a cast shadow on a wall, floor, or textured background — where the shadow covers a surface, not a face — the Patch Tool often works better than Generative Fill, because it copies real texture rather than inventing it.
- Select the Patch Tool (J). Set it to Normal mode, Source: Source.
- Draw a loose selection around the shadow.
- Drag the selection to a nearby clean area with matching texture and lighting. Photoshop shows a live preview.
- Release. The shadow is replaced with the sampled texture.
- Use Clone Stamp at 30% opacity to clean up any visible seams along the edge.
For AI-based editing workflows, a guide to ChatGPT photo editing prompts covers how to describe shadow removals precisely to AI tools.
Method 5: Phone & Online Tools — No Desktop Needed
If you are on a phone or don’t have Photoshop, these tools handle most shadows:
| Tool | Platform | How it works | Best for |
|---|---|---|---|
| Snapseed (Selective + Healing) | iOS/Android | Tap shadow, raise Brightness; or paint with Healing | Free, precise, no account |
| YouCam Perfect | iOS/Android | AI face lighting, one-tap shadow removal | Portraits and faces |
| Toybox AI / Pixelbin | Web (browser) | Upload, paint shadow, AI removes | Harsh shadows on any photo |
| removeshadow.com | Web | Dedicated shadow remover | Quick one-off fixes |
| Lightroom Mobile | iOS/Android | Shadows slider + selective brush | Adobe workflow, subtle lifts |
Snapseed’s Selective tool is the hidden gem: tap the shadow, pinch to size the red overlay, swipe up to choose Brightness, and swipe right to increase. It lightens only that area, with a feathered edge that blends invisibly. A guide to AI upscaler tools covers the same AI-vs-manual tradeoff.
The Contact Shadow Rule — Never Erase It Fully
Here is the mistake that gives away every amateur shadow removal: removing the shadow under an object. The contact shadow — the dark crescent under a product, under a person’s feet, under a vase — is what tells the viewer “this object is sitting on this surface.” Remove it fully, and the object looks like it is floating.
- Lighten, don’t erase. Reduce the contact shadow’s opacity by 30–50%, never 100%.
- Keep the shape. A contact shadow is darkest directly under the object and fades outward. Preserve that gradient.
- Match the direction. If you remove a cast shadow but leave light coming from the wrong direction, the photo looks impossible. Check the light direction and keep all shadows consistent.
A solid photo editing guide covers layer masks and blending options if you want more control.
5 Common Shadow-Removal Mistakes
- 100% removal. A face with no shadow looks flat and plastic. Aim for 70–80% reduction.
- Forgetting to warm up. Corrected shadows are blue-gray. Add +5 to +15 Temperature or a warm Color layer.
- Erasing the contact shadow. Objects float. Lighten it, keep the shape.
- Tight selection with Generative Fill. The AI needs context. Select loosely, include clean surrounding area.
- Dodge on Shadows range. Use Midtones at 15–25% exposure. Shadows range produces muddy, desaturated results.
Frequently Asked Questions
How do I remove a shadow from a photo?
For harsh, defined shadows: select with the Lasso tool, use Generative Fill with an empty prompt, and pick the best of three variations. For soft shadows: use the Dodge tool (Range: Midtones, Exposure 15–25%) in multiple light passes. Always warm up the corrected area afterward — corrected shadows are often blue-gray.
Can you remove shadows from faces?
Yes. Generative Fill handles harsh facial shadows (hat brim, tree branch) in seconds. For soft side-lighting shadows, use Dodge & Burn to reduce them while keeping dimension. Never remove all shadow from a face — it will look flat. Aim for 70–80% reduction.
What is the best free app to remove shadows?
Snapseed (Google, free) is the best free option. Use the Selective tool — tap the shadow, pinch to size, swipe to raise Brightness. For one-tap face shadow removal, YouCam Perfect works well. For online fixes, Toybox AI or removeshadow.com handle harsh shadows.
Should I remove the shadow under a product?
No — lighten it, don’t erase it. The contact shadow grounds the object and makes it look like it sits on the surface. Reduce it by 30–50%, keep the darkest part directly under the object, and preserve the fade. Fully removing it makes the product look like it is floating.
Why does my removed shadow look gray or blue?
Shadows are cooler (bluer) than lit areas. When you brighten a shadow, you reveal that blue-gray cast. Fix it by warming the corrected area: +5 to +15 Temperature, or a Color Balance adjustment nudged toward red/yellow in midtones, clipped to the corrected layer.
Does Generative Fill really remove shadows?
Yes. Select the shadow loosely (include surrounding clean area for context), click Generative Fill, leave the prompt empty, and generate. Photoshop returns three variations. It works best on harsh, defined shadows. For soft shadows, Dodge & Burn gives a more natural result.
How do I remove a shadow without Photoshop?
Use Snapseed (Selective tool, free) on a phone, or Toybox AI / removeshadow.com / Pixelbin in a browser. Upload the photo, paint or select the shadow, and the AI removes it. For faces, YouCam Perfect has a one-tap lighting fix. Always check the result at full size — free tools can leave halos.
Final Verdict
Shadow removal is less about erasing and more about balancing. Generative Fill kills harsh shadows in seconds; Dodge & Burn softens subtle ones with natural texture; Curves with a mask gives you full control. But the real skill is knowing when to stop — keep some shadow, warm up the corrected area, and never erase the contact shadow under an object. Do that, and the light will look like it was even from the moment the shutter clicked.