How to Blur Background in Photos: Realistic Bokeh & Depth (2026 Guide)
TL;DR: The Short Answer
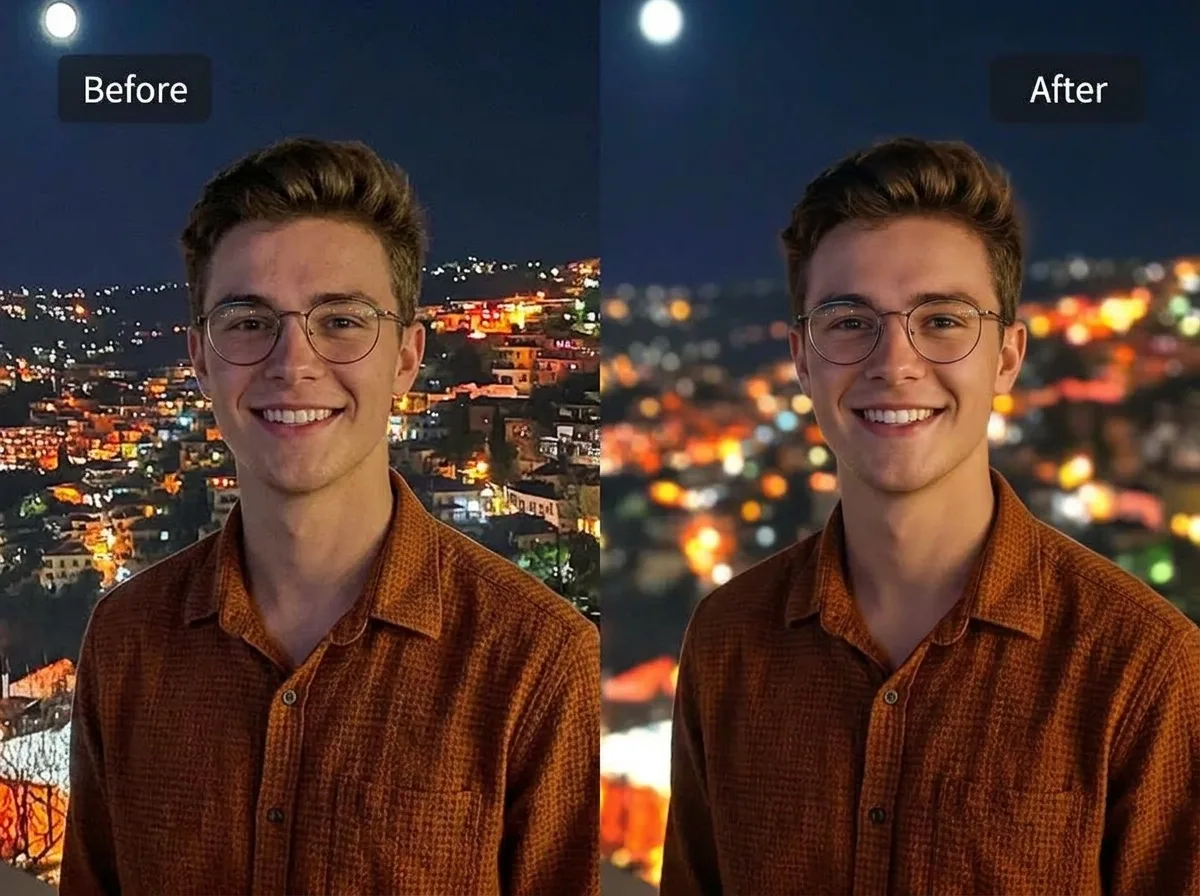
You blur a photo background by separating the subject from the background, then applying a blur that increases with distance from the subject — not a uniform blur. The fastest method in 2026 is Camera Raw Lens Blur. Open the photo in Camera Raw (Filter > Camera Raw Filter), find the Lens Blur panel, and click Apply. Adobe’s AI detects the subject and blurs the background automatically. You can then adjust the Focal Range and blur amount.
For more control in Photoshop, use Select > Subject, expand the selection by ~5px, and add a layer mask so the subject stays sharp. Then apply Lens Blur or Gaussian Blur to the background layer. For the most realistic result, use a depth map so the blur is weakest near the subject and strongest farther away. Finally, refine hair edges with Select and Mask or paint the mask manually at 100% zoom.
First: The Realism Rule — Blur Must Increase With Distance
A fake blur is instantly recognizable because it treats the whole background the same. In a real photo with a wide aperture, blur is not uniform: the background just behind the subject is only slightly soft, while objects far away are heavily blurred. Recreate that gradient, and nobody can tell it was added in post. Ignore it, and the photo looks like a cutout pasted on a blurry sheet.
Three realism rules to always follow:
- Blur increases with distance. Near background (a wall 1 foot behind the subject) = light blur. Far background (trees 50 feet away) = heavy blur.
- Highlights become circles (bokeh). Real lens blur turns bright points — streetlights, window reflections, sun through leaves — into soft circles. Gaussian blur turns them into smudges. Use Lens Blur, not Gaussian, when bright highlights are present.
- The subject edge stays clean. A 1px halo or a strand of blurred hair gives the whole edit away. Spend 80% of your time on the mask, 20% on the blur.
A guide to AI upscaler tools covers the same AI-vs-real tradeoff if you want to go deeper.
Method 1: Camera Raw Lens Blur — One Click, 2026’s Fastest Method
Adobe added one-click background blur to Camera Raw in 2024, and it is now the fastest method by far.
- Open the photo in Photoshop. Go to Filter > Camera Raw Filter (or open the RAW file directly in Lightroom/Camera Raw).
- In the right-hand panel, find the Lens Blur section (under Optics or Effects, depending on your version).
- Click Apply. Adobe’s AI detects the subject, generates a depth map, and blurs the background automatically.
- Adjust the Blur Amount slider — start at 30–50 for a natural look. Higher = f/1.2 dreamy look; lower = subtle separation.
- Use the Focal Range slider to move the focal plane forward or backward — useful if the AI focused on the wrong eye.
- If the AI missed part of the subject (common with hair or transparent objects), use the Restore brush to paint sharpness back, or the Blur brush to add blur where the AI missed.
This method handles 70% of portraits and product shots in under 30 seconds. For the other 30% — complex hair, glass, or overlapping subjects — use Method 2 or 3.
Method 2: Select Subject + Lens Blur — Full Control, Still Fast
When you need control over the mask and the blur type, this is the standard pro workflow.
- Duplicate the background layer (Ctrl/Cmd+J). You will blur the bottom layer and mask the top layer to keep the subject sharp.
- With the top layer selected, go to Select > Subject. Photoshop’s AI outlines the person or main subject in seconds.
- Expand the selection by ~5 pixels: Select > Modify > Expand > 5px. Adobe’s official blur background guide specifically recommends this — it prevents gauzy, ghostlike edges where the subject meets the blurred background.
- Click the Add Layer Mask icon at the bottom of the Layers panel. The selection becomes a mask: the subject is sharp, the mask hides everything else on this layer.
- Select the bottom (background) layer. Go to Filter > Blur Gallery > Lens Blur (for realistic bokeh) or Filter > Blur > Gaussian Blur (for simple softness). Lens Blur Radius: 15–30px. Gaussian Radius: 8–20px.
- Zoom to 100%. Select the layer mask and paint with black (to remove blur from the subject) or white (to add blur to missed background areas) with a soft brush. Hair edges will need manual work.
For product photos where the background must be clean and uniform, a guide to ecommerce product photo editing covers the full product workflow.
Method 3: Depth Map Blur — The Most Realistic Look
For photos where you want true depth-of-field falloff — near background slightly soft, far background heavily blurred — use Photoshop’s AI-generated depth map.
- Duplicate the layer. Go to Filter > Blur Gallery > Lens Blur.
- In the Lens Blur panel, set Source to Depth Map Blur. Photoshop generates a depth map via AI — lighter areas = closer to camera, darker = farther.
- Click on the point in the image you want sharp (the subject’s eyes). Photoshop sets the focal plane there.
- Adjust the Blur slider and the Focal Range — the focal range controls how much depth stays sharp. Narrow range = only the subject sharp; wide range = subject and near background sharp.
- Use the Bokeh sliders (Highlight Bokeh, etc.) to turn bright background points into soft circular highlights — this is what sells the realistic look.
- Click OK. The result is a gradient blur that mimics a real f/1.4 lens.
This method takes the longest but produces the most convincing fake depth of field. For AI-based editing workflows, a guide to ChatGPT photo editing prompts covers how to describe depth-of-field effects precisely.
Method 4: Phone Portrait Mode & Apps — No Desktop Needed
If you are on a phone, you have two paths: shoot in Portrait mode at capture time, or add blur afterward in an app.
At capture (best quality):
- iPhone: Open Camera > swipe to Portrait. Keep subject 2–8 feet away. After shooting, open the photo in Photos > Edit > adjust the f-stop (f) slider — lower f = more blur. You can change it anytime because depth data is saved with the photo.
- Android: Open Camera > Portrait or Live Focus mode. Adjust blur intensity in the gallery editor afterward.
After capture (app-based):
| App | Platform | Strength | Best for |
|---|---|---|---|
| Focos | iOS | Adjustable aperture + lighting, realistic bokeh | Pro-level phone bokeh |
| AfterFocus | iOS/Android | Manual depth selection | Precise control |
| Snapseed (Lens Blur) | iOS/Android | Free, manual focal point | Quick, no account |
| Lightroom Mobile | iOS/Android | Masking + selective blur | Adobe workflow |
| Lensa / Fotor / YouCam | iOS/Android | One-click AI portrait blur | Fast social media posts |
The #1 phone portrait mode problem: hair. Fine strands confuse the depth algorithm, and you get partially blurred hair or a halo around the head. Fix it by shooting with more distance between subject and background — the algorithm works better when there is clear depth separation. A solid photo editing guide covers masking and selection fundamentals if you want to refine on desktop later.
The Hair Problem — And How to Fix It
Hair is where 90% of background blurs fail. The AI cannot tell whether a fine strand is part of the subject or the background, so it blurs half of it, leaving a dissolving halo. Fix it:
- After Select Subject, click Select and Mask (button in the options bar).
- Use the Refine Edge Brush (second tool down) and paint over hair edges — Photoshop re-analyzes those strands and adds them to the mask.
- Set Smooth to 2–4, Feather to 0.5–1.5px, Contrast to 5–10%. This cleans up the mask edge.
- Output to New Layer with Layer Mask, then apply blur to the layer below.
- At 100% zoom, manually paint the mask — white to keep hair sharp, black to blur stray strands. A 2px soft brush works best.
If hair is still wrong after all that, the cleanest fix is to shoot with the subject farther from the background — real depth separation beats every digital fix.
5 Common Background-Blur Mistakes
- Uniform blur everywhere. Real blur increases with distance. Use a depth map or Field Blur with multiple pins.
- Too much blur. 30px+ on a portrait looks fake. Keep it 15–25px and let the subject separation do the work.
- Forgetting to expand the selection 5px. Leaves a ghostly halo around the subject. Expand before masking.
- Using Gaussian Blur on highlights. Streetlights and window reflections become smudges. Use Lens Blur for circular bokeh.
- Not checking hair at 100%. Every blur looks clean at thumbnail size. Zoom in and refine the mask edges.
Frequently Asked Questions
How do I blur the background of a photo?
The fastest 2026 method: open in Camera Raw, find the Lens Blur panel, click Apply — AI detects the subject and blurs the background automatically. For more control: Select > Subject, expand 5px, add a layer mask, then apply Lens Blur or Gaussian Blur (15–25px) to the background layer below.
What is the best blur for a realistic background?
Lens Blur (Filter > Blur Gallery > Lens Blur) — it mimics real camera depth of field and turns bright highlights into soft circular bokeh. For the most realistic look, use a depth map so blur increases with distance from the subject. Gaussian Blur is simpler but looks flatter.
How much blur should I use?
For portraits, 15–25px radius is natural — equivalent to roughly f/2.8–f/1.4. For product photos, 8–15px. More than 30px usually looks fake. You can always add more; start subtle and increase.
Why does my blurred background look fake?
Usually one of three things: uniform blur across the whole background (real blur increases with distance), Gaussian instead of Lens Blur (no circular bokeh on highlights), or a bad mask edge around hair (halo or blurred strands). Fix all three and the blur becomes invisible.
How do I blur a background on my phone?
Shoot in Portrait mode at capture time (iPhone or Android) — depth data is saved, and you can adjust blur intensity later in the editor. If the photo is already taken, use Focos, Snapseed (Lens Blur), or Lightroom Mobile to add it afterward. Keep subject far from the background for the cleanest result.
How do I fix hair edges when blurring the background?
After Select Subject, open Select and Mask, use the Refine Edge Brush on hair strands, set Smooth 2–4 and Feather 0.5–1.5px, output to a layer mask, then manually paint the mask at 100% zoom with a 2px soft brush. If it still fails, reshoot with more subject-to-background distance.
Can I blur just part of the background?
Yes. Use Field Blur (Filter > Blur Gallery > Field Blur) and place multiple pins — set blur to 0 on the subject, low blur near the subject, high blur far away. Or use a depth map in Lens Blur, which does this automatically.
Final Verdict
Background blur went from a pro-only, hour-long masking job to a one-click effect — but the last 10% still decides whether it looks real or fake. Use Camera Raw Lens Blur for the 70% of shots where it just works. For the rest, select the subject, expand 5px, refine the hair, and apply a depth-aware Lens Blur that falls off with distance. Keep the radius under 25px, check every edge at 100%, and remember: the cleanest blur is always the one you shot in-camera with a wide aperture and a subject standing far from the wall.