How to Fix Blurry Photos: Unblur with AI & Photoshop (2026 Guide)
TL;DR: The Short Answer
A blurry photo can sometimes be fixed — but only if you first diagnose what kind of blur it is. Motion blur (streaks in one direction) and camera shake (soft double image) are the most recoverable: use Photoshop’s Shake Reduction filter or an AI deblur tool. Lens softness and JPEG compression blur respond well to Smart Sharpen. Out-of-focus blur (circular bokeh haze) is the hardest — if the focus was missed, the detail was never captured, and AI can only invent plausible detail, not restore it. The correct workflow: denoise first, choose the deblur/sharpen tool that matches the blur type, mask the sharpening to edges only, and always judge at 100% zoom. If you see halos or plastic skin, you went too far.
First: Diagnose the Blur — Not All Blur Is Equal
This is the step almost everyone skips, and it determines everything. Look at the photo at 100% zoom and identify what you see. Each blur type has a signature shape, a cause, and a different recovery rate.
| Blur type | What it looks like | Cause | Recoverability | Best tool |
|---|---|---|---|---|
| Motion blur | Streaks/smearing in one direction | Subject or camera moved during exposure | Good (mild), poor (severe) | Shake Reduction / AI deblur |
| Camera shake | Soft double image across whole frame | Shutter speed too slow for handholding | Good (mild) | Shake Reduction / AI |
| Out-of-focus (defocus) | Circular bokeh haze, no direction | Focus point missed, shallow depth of field | Poor — detail never captured | AI focus recovery (invents detail) |
| Lens softness | Overall hazy, no directional smear | Cheap lens, wide aperture, edge of frame | Very good | Smart Sharpen / AI sharpen |
| Compression blur | Blocky, smeared fine detail | JPEG saved at low quality | Good | AI denoise + upscale |
| Low-res blur | Pixelated, jagged edges | Image too small for its use | Good | Super Resolution / upscale |
The single most important truth: sharpening adds edge contrast, it does not add detail. If the camera never recorded the detail — because focus was missed or the subject moved too far — no tool can truly restore it. AI can make it look sharper by inventing plausible texture, but that is reconstruction, not recovery. Know which one you are getting.
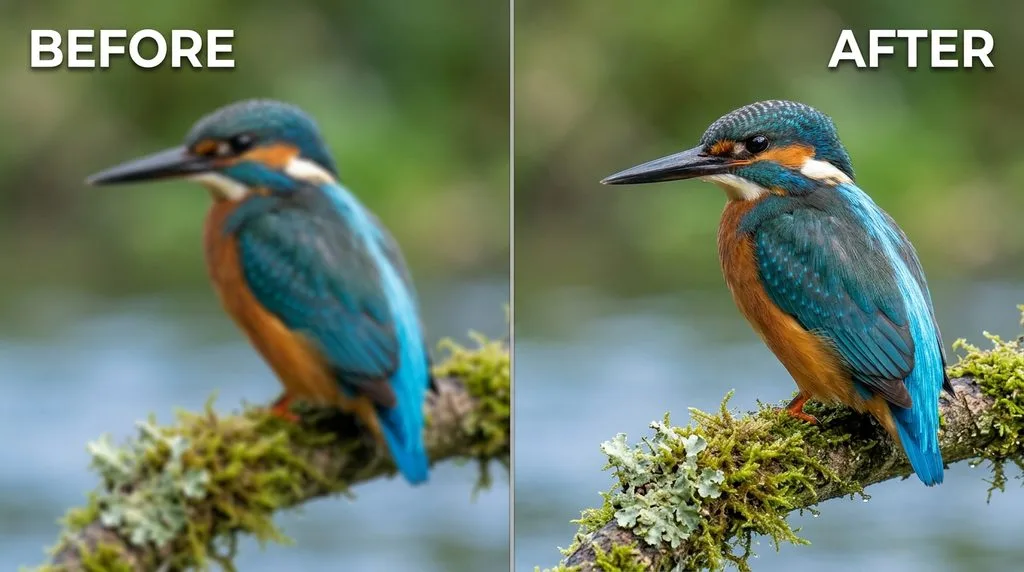
Step 1: Denoise First — Before Any Sharpening
Sharpening amplifies noise. If your photo is grainy — common in low light, which is also where blur happens — run noise reduction first. A light noise reduction pass (strength 10–30) removes the grain that would otherwise become crunchy halos. Keep some grain; a perfectly smooth photo looks plastic and fake.
In Lightroom or Camera Raw: Luminance noise reduction 15–30, Color noise reduction 20–40. In Photoshop: Filter > Noise > Reduce Noise, or the Camera Raw Filter’s Detail panel.
Step 2: Photoshop Method A — Shake Reduction for Motion Blur & Camera Shake
If you see streaks or a soft double image, Photoshop’s Shake Reduction is built for exactly this. It analyzes the blur trail in your image and reverses the camera motion.
- Duplicate your layer (Ctrl/Cmd+J). Convert it to a Smart Object so you can edit the settings later.
- Go to Filter > Sharpen > Shake Reduction.
- Photoshop auto-analyzes the image and picks the region best suited for shake detection. Wait for it to process.
- In the Advanced panel, you can Add suggested blur trace — multiple traces cover different blur patterns across the image.
- Adjust Blur Trace Bounds (how far the camera moved — start at 20–50 pixels) and Smoothing (higher = fewer artifacts, less sharpening).
- Zoom to 100% and check faces and text. If you see ringing or ghosting around edges, lower the strength.
Adobe’s official Shake Reduction guide confirms the same workflow and notes it works best with uniform motion blur — the kind you get from hand-holding at 1/15s. For subject movement (a running child, a moving car) rather than camera movement, results vary; AI deblur tools often handle those better.
Step 3: Photoshop Method B — Smart Sharpen for General Softness
For lens softness, mild focus miss, or general lack of crispness, Smart Sharpen gives you the most control. It is superior to Unsharp Mask because it lets you choose the blur type.
- Go to Filter > Sharpen > Smart Sharpen.
- Set Remove to match your blur: Gaussian Blur (general softness), Lens Blur (out-of-focus, finer detail), or Motion Blur (set the angle to match the streak direction).
- Amount: 80–150%. Radius: 1–3px (match to blur severity — bigger blur needs bigger radius).
- Reduce Noise: 10–20%. This slider is why Smart Sharpen beats Unsharp Mask for blurry photos.
- Click OK, then add a black layer mask and paint white only on edges — eyes, hair, clothing texture, text. Leave skin and smooth backgrounds soft.
For a refresher on masking and layer workflows, a solid photo editing guide covers the fundamentals.
Step 4: AI Deblur — When Manual Isn’t Enough
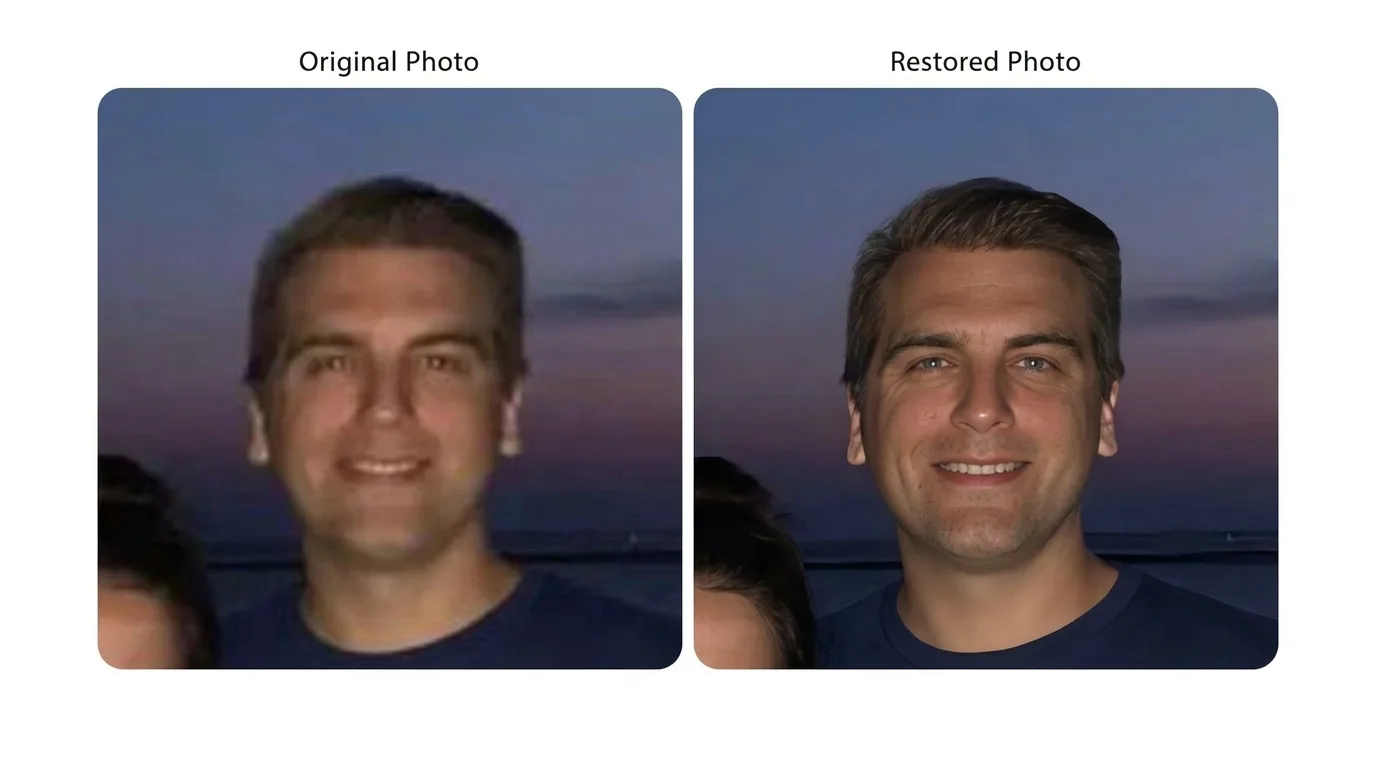
When blur is moderate to heavy, AI deblur tools do in seconds what manual sharpening cannot. They were trained on millions of blurry/sharp pairs and reconstruct detail statistically. Run them as a first pass, then hand-correct faces.
| Tool | Best for | Price | Strength |
|---|---|---|---|
| Topaz Photo AI | Desktop, all blur types, privacy | ~$199/yr subscription | Best detail preservation, runs locally, no upload |
| Remini | Mobile, faces | ~$9/mo or credits | Strongest face recovery on phone |
| Photoshop Neural Filters | Integrated workflow | ~$10–23/mo | Photo Restoration + Super Resolution in one |
| Fotor / Hotpot / VanceAI | Fast online fixes | Free + paid tiers | No login, one-click, good for quick jobs |
| Camera Raw Super Resolution | Low-res upscaling | Included with CC | Doubles linear resolution with AI detail |
Two critical cautions. First, AI invents detail — especially on faces. If great-grandmother suddenly has different eyes or a stranger’s nose, the AI reconstructed from its training data, not from your photo. Compare side by side and dial it back. Second, AI can over-sharpen into a “plastic” look. If skin looks like wax, reduce the enhancement strength. A comparison of best photo editing software covers these tools in more depth.
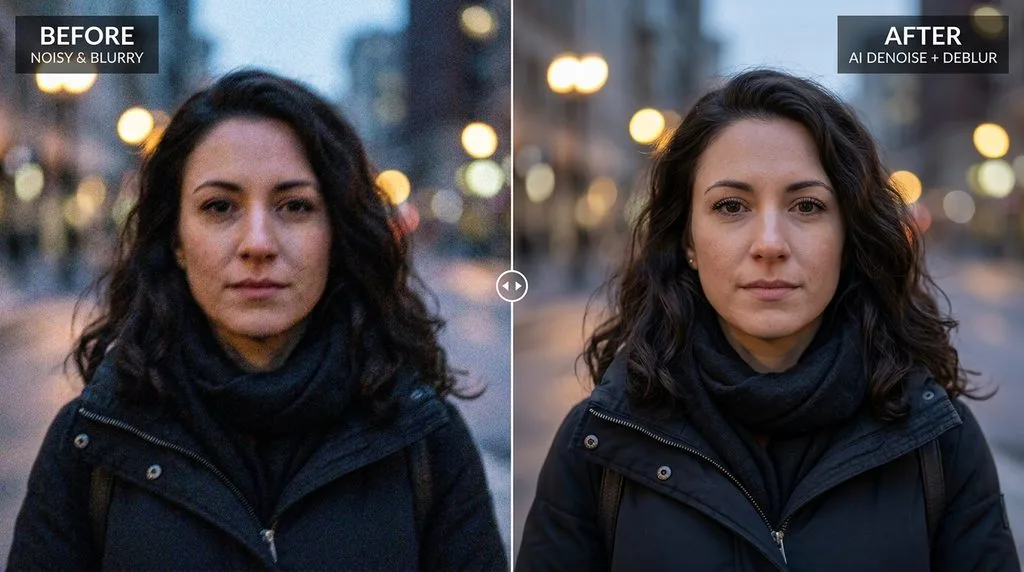
Step 5: Upscale Low-Resolution Blur
If the photo is blurry because it is simply too small — a thumbnail, a screenshot, a WhatsApp-compressed image — the fix is upscaling, not sharpening.
- Camera Raw Super Resolution (included with Photoshop/Lightroom): right-click the image in Filmstrip > Enhance > Super Resolution. Doubles the linear resolution (4x pixels) with AI detail reconstruction. Best for photos that need to print.
- Topaz Gigapixel AI or Upscale.media: dedicated upscalers with more control over detail recovery.
- Never just resize up in Image Size with Bicubic — that just stretches pixels and makes blur bigger. Always use an AI upscaler.
After upscaling, apply a gentle Smart Sharpen (Amount 50–80%, Radius 0.5–1px) to crisp the edges.
Step 6: Final Check — Know When to Stop
When you think you are done:
- Zoom to 100% and pan across the whole image. Halos and artifacts invisible at thumbnail size jump out at actual size.
- Check faces first — skin should have pores and texture, not a plastic sheen. If it looks like a wax figure, reduce sharpening.
- Check text and straight edges — ringing or ghosting around letters means you over-sharpened.
- Toggle the effect layer on and off. If the “before” looks more natural than the “after,” you went too far.
- The goal is to sharpen a photo so subtly that nobody can tell you sharpened it. Obvious sharpening is always worse than slight softness.
The Hard Truth: When a Blurry Photo Cannot Be Fixed
Be honest with yourself. These are not fixable:
- Severe motion blur where the subject is fully streaked across >50 pixels. The information was never recorded. AI can clean it up, but the detail is invented.
- Missed focus on the main subject. If the eyes are soft because focus landed on the ear, the eye detail does not exist in the file. AI face recovery can produce a plausible face, but it is not the person’s actual face.
- Extreme low resolution. A 200×200 pixel photo cannot become a sharp 16×20 print. Upscaling helps, but it cannot create detail that was never there.
For these cases, the best outcome is often a smaller display size — share it at web size, where the softness is less visible. Or accept it as a memory with character. For one-of-a-kind heirlooms, a professional retoucher can do more than any automated tool, but even they cannot recover what the sensor never captured.
5 Common Blur-Fix Mistakes
- Sharpening before denoising. Grain becomes crunchy halos. Denoise first.
- One global sharpen pass. Mask it — skin and skies should stay soft, edges get sharp.
- Using the wrong blur type in Smart Sharpen. Match Gaussian/Lens/Motion to what you see, or results look off.
- Trusting AI face recovery blindly. AI invents detail. Compare side by side; if identity changed, dial it back.
- Judging at thumbnail size. Always check at 100%. Phones apply screen sharpening that hides softness — the same photo looks soft on a desktop.
Frequently Asked Questions
Can you fix a blurry photo?
Sometimes. Mild motion blur, camera shake, lens softness, and compression blur are very fixable with Shake Reduction, Smart Sharpen, or AI deblur. Severe motion blur and missed focus are not truly recoverable — the detail was never captured, and AI can only invent plausible detail.
What is the best tool to unblur a photo?
For desktop quality and privacy: Topaz Photo AI. For motion blur specifically: Photoshop Shake Reduction. For general softness: Photoshop Smart Sharpen. For mobile faces: Remini. For quick online fixes: Fotor or Hotpot.
What is the difference between sharpening and deblurring?
Sharpening increases edge contrast to make an image look crisper — it adds no detail. Deblurring (AI or Shake Reduction) attempts to reverse the mathematical blur kernel and reconstruct lost detail. For mild blur, sharpening is enough; for heavier blur, you need deblurring.
How do I fix motion blur in Photoshop?
Use Filter > Sharpen > Shake Reduction. It analyzes the blur trail and reverses the camera motion. For subject movement (not camera movement), an AI deblur tool often works better. Severe streaking is generally not recoverable.
Can AI fix an out-of-focus photo?
AI can make it look sharper by inventing plausible texture and detail, but it cannot restore the actual focus point — that detail was never recorded. For faces, AI may change the person’s identity, so always compare side by side and dial it back if needed.
Why does my photo look sharp on my phone but blurry on my computer?
Phone screens are small and apply screen sharpening that hides softness. At full size on a desktop monitor, the same image shows its true softness. Always judge sharpness at 100% zoom on a decent-sized display.
What settings should I use for Smart Sharpen?
For general softness: Remove Gaussian, Amount 80–150%, Radius 1–2px, Reduce Noise 10–20%. For out-of-focus: Remove Lens Blur. For motion blur: Remove Motion Blur and set the angle to match the streak direction. Always mask the result.
Final Verdict
A blurry photo isn’t always lost — but the type of blur determines how you should fix it.Diagnose it first, denoise, choose the tool that matches the blur, mask the sharpening, and stop before halos and plastic skin appear. AI is a remarkable assistant for heavy blur, but remember: it reconstructs, it does not resurrect. When the detail was never captured, the honest move is to display the photo smaller, or accept it as it is. For everything else — and that is most blurry photos — a few minutes of the right tool will bring back a surprising amount of clarity.