How to Repair Damaged Scanned Photos: Fix Dust, Moiré & Color Casts (2026 Guide)

TL;DR: The Short Answer
A damaged scan is usually fixable — but only if you repair the artifacts in the right order. Straighten and crop first, fix the color cast second, remove dust and scratches third, kill moiré/halftone patterns with descreening fourth, and sharpen last. Do it in any other order and you sharpen the dust into the photo forever. The most common scan damages are dust on the scanner glass, Newton rings (rainbow concentric circles), moiré patterns from printed photos, yellow/blue color casts, and JPEG compression artifacts. Each has a matching fix — and most can be prevented by changing one scanner setting before you scan.
First: Identify the Damage — Match the Fix to the Artifact
Scans fail in predictable, identifiable ways. Before you touch a slider, look at the scan and name the problem. Each damage type has a specific cause and a specific fix — using the wrong one blurs real detail.
| What you see | Likely cause | Best fix | Can it be prevented? |
|---|---|---|---|
| White/black specks, streaks | Dust on scanner glass or print | Spot Healing / Dust & Scratches (masked) | Yes — wipe glass, clean print |
| Concentric rainbow rings | Newton rings (film/glass contact) | Re-scan; digital fix is limited | Yes — anti-Newton-ring glass |
| Wavy dot pattern, grid | Moiré / halftone (scanning a printed photo) | Descreening + gentle blur | Yes — enable descreen in scanner |
| Uniform yellow/blue/green tint | Color cast from scanner or aged print | White Balance / Curves eyedropper | Partly — scan in color, turn off auto |
| Blocky texture, smeared detail | JPEG compression | AI denoise; work from TIFF | Yes — scan as TIFF/PNG |
| White glow around edges | Scanner auto-sharpening | Reduce sharpening, rescan | Yes — turn off auto-sharpen |
| Tilted, skewed, border showing | Misaligned on scanner bed | Straighten + crop | Yes — align with corner marks |
The single most important rule: repair in order, from structural to fine. Straighten, then color, then dust, then moiré, then sharpen. Sharpening first locks every speck of dust into the image permanently.
Step 0: Prevent Damage Before You Scan
Half of scan repair is unnecessary if you set up the scanner correctly. Do this before every batch:
- Wipe the scanner glass with a microfiber cloth. One speck of dust on the glass appears as a long white streak across every scan in the batch.
- Clean the print gently with a soft, dry brush. Never use water or cleaning solution on the emulsion.
- Scan at 600 DPI minimum (1200 DPI for small prints). More pixels give repair tools real texture to sample from.
- Scan in color even for black-and-white prints. Color mode captures three channels of data; grayscale throws two away.
- Turn OFF all auto-enhance — auto color, auto contrast, auto sharpen, auto dust removal. Faded photos confuse auto algorithms, which often make them worse.
- Save as TIFF or PNG, never JPEG. JPEG compression adds blocky artifacts that look like new damage.
- For printed photos (newspaper clippings, magazine pages), enable descreening in the scanner software before you scan. This one setting prevents moiré entirely.
- For film or slides, use anti-Newton-ring glass or a film holder that lifts the film slightly off the glass. Direct contact causes Newton rings.
If the original print is still available and the scan is badly damaged, re-scanning with the right settings almost always beats hours of digital repair.
Step 1: Straighten and Crop — Structural First
A tilted scan with a visible scanner-bed border is the easiest fix — and doing it first means every later repair works on the actual photo, not the border.
- Open the scan in Photoshop. Duplicate the layer (Ctrl/Cmd+J).
- Select the Crop tool (C). Click Straighten in the top toolbar.
- Drag a line along an edge that should be horizontal — the top of a frame, a horizon, a table edge. Photoshop rotates the image automatically.
- Crop to remove the scanner border, but leave a small margin if the edges contain damage clues or paper tone you may need later. Deselect “Delete Cropped Pixels” to crop non-destructively.
- If the scan has perspective distortion (common with phone scans), use Edit > Transform > Perspective or the Camera Raw Geometry panel to square it up.
Never crop tightly before repair — corners and edges often hold the cleanest texture for cloning later.
Step 2: Fix the Color Cast — Before Any Detail Work
A color cast makes every other repair look wrong. Fix it second, before you touch dust or sharpening.
The fastest method — the gray eyedropper:
- Open a Levels or Curves adjustment layer.
- Select the gray (midtone) eyedropper.
- Click on something in the image that should be neutral gray — a road, a wall, a shadow on white clothing.
- The entire cast neutralizes in one click. If it overcorrects, click a different neutral spot.
Adobe’s official color cast correction guide walks through this exact Levels method. If no neutral gray exists, use White Balance in Camera Raw: drag Temperature toward blue to kill yellow, toward yellow to kill blue, then fine-tune Tint for green/magenta.
For aged prints with stubborn yellowing, go to HSL and desaturate the Yellows and Oranges channels slightly — this removes the cast without turning skin blue. A guide to color grading covers the theory of balancing channels if you want to go deeper.
Step 3: Remove Dust and Scratches — The Right Tool for the Right Size
Dust and scratches come in three sizes, and each needs a different tool. Using the heavy filter on fine dust blurs the whole photo.
Small specks and spots — Spot Healing Brush (J):
- Brush slightly larger than the spot, check Content-Aware, click. Handles 80% of dust in seconds.
Long streaks and scratches — Healing Brush + Clone Stamp:
- For a long streak from glass dust, use the Healing Brush with Alt-sampled clean texture, painted along the streak. For wider damage, switch to Clone Stamp at 0–30% hardness, 30–50% opacity, multiple light passes.
Fine scattered dust everywhere — Dust & Scratches filter (masked):
- Go to Filter > Noise > Dust & Scratches. Set Threshold to 0, raise Radius (1–3) until fine dust disappears, then raise Threshold (8–15) until grain and detail return.
- Critical: apply this filter on a duplicate layer, then add a black layer mask and paint white only over the dusty areas. Never apply it to the whole image — it blurs faces and hair.
If you do this regularly, a solid photo editing guide covers layer masks and healing tools in depth. For heavy dust covering most of the image, an AI restoration tool (see Step 5) beats manual work.

Step 4: Kill Moiré and Halftone Patterns — Descreening
If you scanned a printed photo — a newspaper clipping, magazine page, or book illustration — you will see a wavy dot pattern or grid across the image. That is moiré, caused by the scanner’s pixel grid interfering with the print’s halftone dot grid. It is the hardest scan artifact to remove without blurring.
Best fix — prevent it: Enable descreening in your scanner software before scanning. The scanner applies a slight blur at scan time that kills the pattern while preserving real detail.
If the scan is already done:
- Duplicate the layer. Go to Filter > Blur > Gaussian Blur at a tiny radius (0.5–1.5px) — just enough to merge the dots.
- Immediately follow with Filter > Noise > Add Noise (2–4%, Gaussian, monochromatic) to restore a natural film-grain texture that the blur removed.
- Or use an AI denoiser (Topaz Photo AI, Lightroom Denoise, or the free Noiseware community edition) — neural networks distinguish repetitive moiré from real texture and remove only the pattern. These work better than manual blur.
- For stubborn moiré, try Filter > Blur > Surface Blur or work in the Lab color space and blur only the a/b channels (where moiré lives), preserving detail in the Lightness channel.
Moiré never disappears completely — you reduce it to invisibility at normal viewing size. Accept that, and don’t over-blur chasing 100% removal.
Step 5: AI Restoration for Heavy Damage
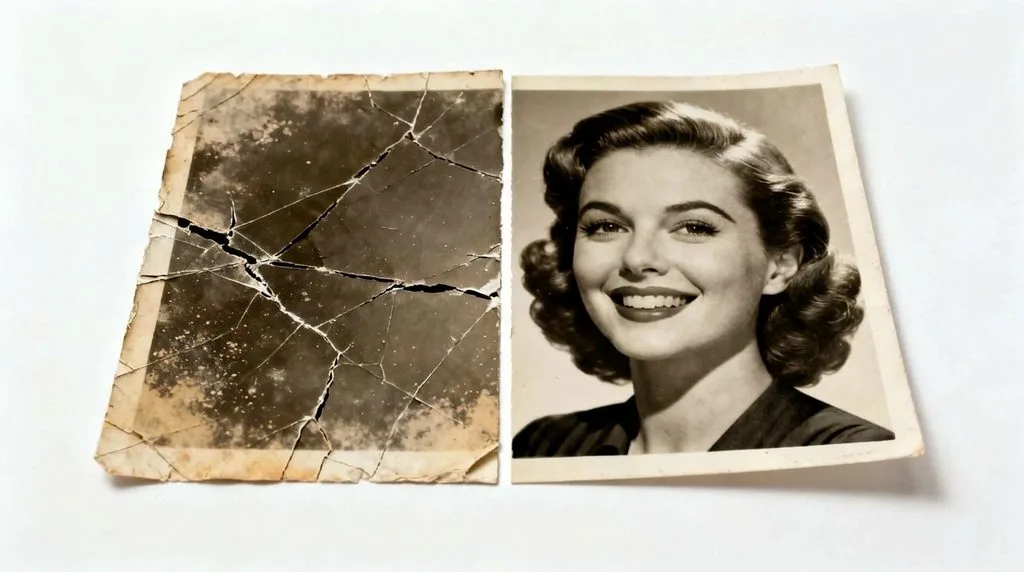
When a scan has multiple problems at once — dust, scratches, fading, soft detail — manual repair takes hours. AI restoration tools do in seconds what used to take an afternoon. Run them as a first pass, then zoom to 100% and hand-correct what they missed.
| Tool | Best for | Price | Strength |
|---|---|---|---|
| Photoshop Photo Restoration (Neural Filter) | Integrated workflow | ~$10–23/mo | Scratch reduction + face enhancement in one |
| Topaz Photo AI | Desktop, local, privacy | ~$199/yr subscription | Best detail preservation, no upload |
| Pict.AI / Fotor | Fast online free fixes | Free + paid | One-click, no login needed |
| SoftOrbits Photo Retoucher | Windows offline | ~$50–100 one-time | Auto-detects scratches, works locally |
| Remini | Mobile, faces | ~$9/mo or credits | Strongest face recovery on phone |
Two cautions. First, AI can erase real texture along with damage — always compare side by side with the original scan. Second, AI changes a person’s identity if pushed too hard on a face. If great-grandmother suddenly looks like a stranger, the enhancement went too far. A comparison of best photo editing software covers these tools in more depth.
Step 6: Sharpen Last — and Only the Real Detail
Sharpening is the final step, never the first. At this point the scan is clean, color-correct, and free of artifacts — now you can add crispness without amplifying damage.
- Use Unsharp Mask or a High Pass layer. Start gentle: Amount 50–80%, Radius 0.5–1.5px.
- Mask the sharpening to edges only — eyes, hair, clothing texture, text. Leave skin and smooth backgrounds soft.
- Judge at 100% zoom. A thumbnail always looks sharper than the full-size file.
- If you see white halos around edges, you over-sharpened — back off the Amount.
Newton Rings: The One Damage You Cannot Fully Fix Digitally
Newton rings — concentric rainbow or dark circles — appear when film or a glossy print sits directly on the scanner glass and light waves interfere. They are the one scan artifact that digital tools cannot cleanly remove, because they sit on top of real detail with the same frequency.
- Best fix: re-scan. Use anti-Newton-ring glass, a film holder, or place a thin sheet of anti-Newton-ring material between the print and glass. Even a slight air gap eliminates them.
- If you cannot re-scan: try a gentle blur localized to the ring area, or an AI inpainting tool. Results vary. For a one-of-a-kind original, a professional scan service with the right hardware is worth the cost.
5 Common Scan-Repair Mistakes
- Sharpening first. Locks dust and scratches into the image forever. Always sharpen last.
- Dust & Scratches filter on the whole image. Blurs faces and hair. Always mask it.
- Scanning as JPEG with auto-enhance on. Compression and wrong color from the start. Scan TIFF, raw settings.
- Cropping too tight before repair. Removes the clean edge texture you need for cloning.
- Trying to fix Newton rings digitally instead of re-scanning. Wastes hours. Re-scan with the right hardware.
Frequently Asked Questions
How do you fix a damaged scanned photo?
Repair in order: straighten and crop, fix color cast with the gray eyedropper, remove dust with Spot Healing and a masked Dust & Scratches filter, kill moiré with descreening or gentle blur, then sharpen last. Never sharpen first.
Why does my scanned photo have dots or a wavy pattern?
That is moiré — the scanner’s pixel grid interfering with the halftone dots of a printed photo. Prevent it by enabling descreening in the scanner software. If already scanned, use a tiny Gaussian blur plus AI denoise, or work in Lab color and blur only the a/b channels.
How do I remove dust specks from a scan?
Small specks: Spot Healing Brush, one click each. Fine dust everywhere: the Dust & Scratches filter (Radius 1–3, Threshold 8–15) applied on a masked layer so it touches only dusty areas. Heavy dust: an AI restoration tool.
Why is my scanned photo yellow or blue?
A color cast — from aged print dyes or scanner white balance. Fix it with the gray midtone eyedropper in Levels or Curves, clicking on something that should be neutral gray. Or adjust Temperature in Camera Raw.
Can you fix Newton rings on a scan?
Not cleanly digitally. Newton rings come from film/print touching the scanner glass. Re-scan with anti-Newton-ring glass or a holder that creates an air gap. If you cannot re-scan, try localized blur or AI inpainting, but results vary.
What DPI should I scan at for repair?
600 DPI minimum, 1200 DPI for small or heavily damaged prints. Scan in color, save as TIFF, turn off all auto-enhance, and leave a small border.
Should I use auto dust removal on the scanner?
Usually no. Scanner auto dust removal works by blurring anything it thinks is a defect — including fine facial detail. Scan raw and remove dust manually or with AI afterward, where you control the mask.
Final Verdict
A bad scan is almost never a lost cause — it just needs the right fix in the right order. Wipe the glass, scan raw at high resolution, straighten first, fix the cast, clean the dust, descreen the moiré, and sharpen only at the end. If the original print still exists, re-scanning with the right settings beats every digital repair. Do that, and a scan that looked like a rainbow-dotted, dust-covered mess will come back looking like it was captured by a pro.