How to Fix Underexposed Photos: Recover Dark Shadows (2026 Guide)
TL;DR: The Short Answer
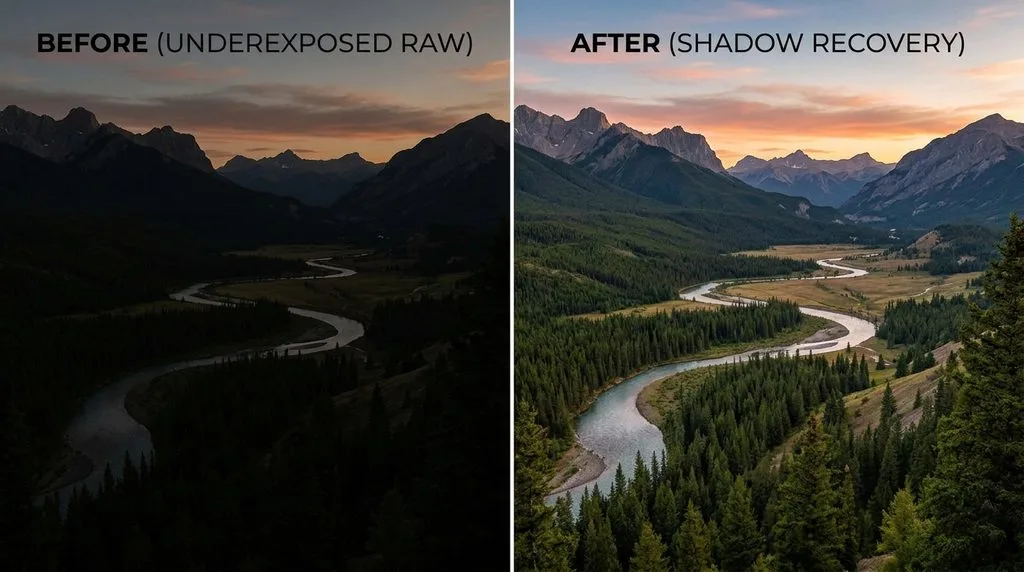
Underexposed photos are easier to fix than overexposed ones — shadows hold hidden detail, and RAW files recover 2–3 stops of brightness. The correct order matters: fix White Balance first (brightening amplifies any color cast), then raise Exposure (+1 to +2 stops), then lift Shadows (+40 to +100), then Blacks (+10 to +40), pull Highlights down if they clip, add a gentle S-curve for contrast, and denoise last — because lifting shadows always amplifies noise, and color noise is the first thing that shows. Pure black (0,0,0) contains no data and cannot be recovered. For JPEGs, use targeted dodging and Screen blend mode with a mask — global brightening on a JPEG adds noise fast. For heavy shadow lift, run an AI denoiser (Lightroom AI Denoise or Topaz) on the RAW file before heavy tonal work.
First: Check What Is Actually Lost — The Histogram Test
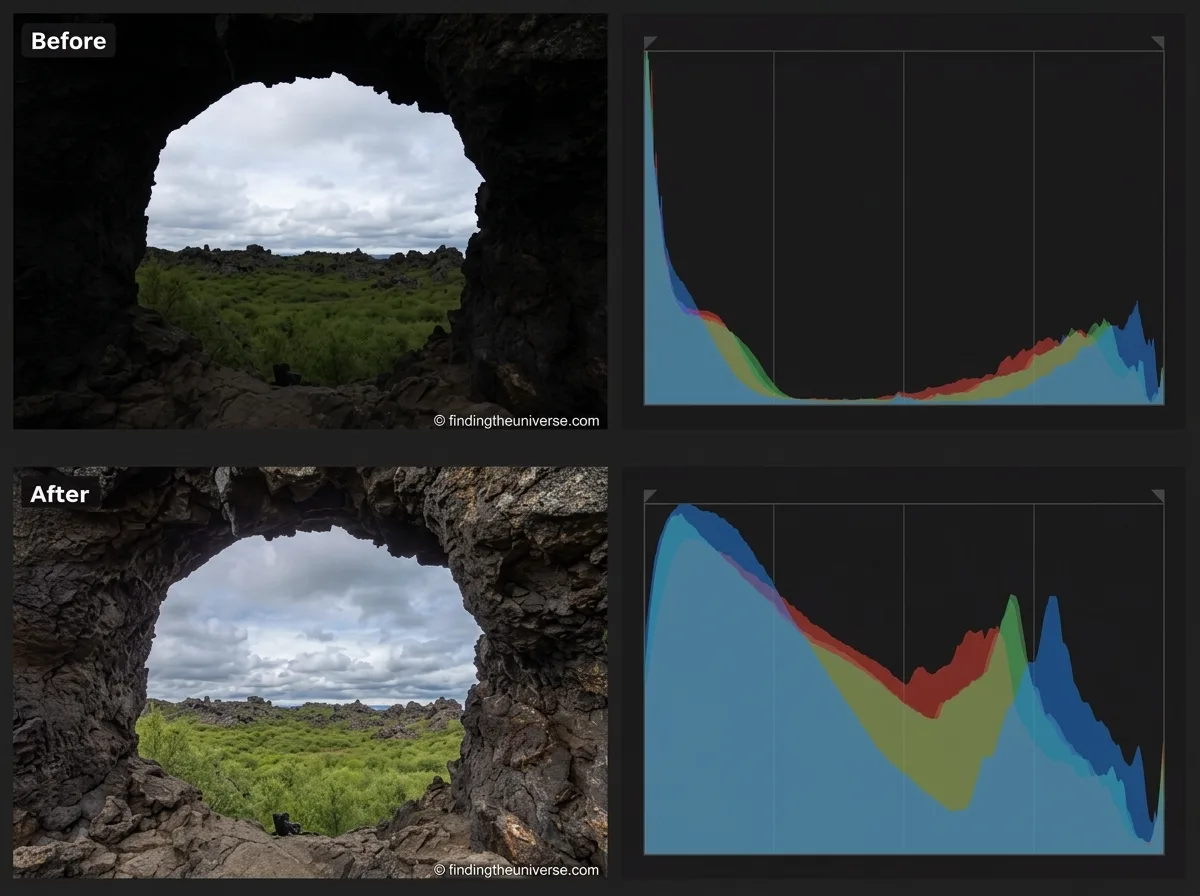
Before you touch a slider, look at the histogram. Underexposure is not one problem — it is a spectrum, and where your photo falls determines the fix.
The clipping test (Lightroom / Camera Raw):
- Open the photo. Look at the histogram in the top-right.
- If the histogram is piled against the left edge with a tall spike, you have clipped shadows — pure black with no detail.
- Hold Alt/Option and drag the Blacks slider slowly right. The screen turns white, and any colored or black patches that appear are the clipped areas. Black = fully clipped in all channels (gone); colored = clipped in one channel only (recoverable).
- Do the same with the Shadows slider. If the Alt/Option view shows large black areas, those pixels are gone. No tool can bring them back — they can only brighten surrounding tones.
| File type | Shadow recovery latitude | What you can expect |
|---|---|---|
| RAW / ProRAW / DNG | 2–3 stops hidden detail | Most underexposure recoverable; noise manageable |
| JPEG / HEIC (standard) | ~0.5–1 stop | Mild underexposure only; heavy lift = heavy noise |
| Screenshot / compressed | Almost none | Brightening only; noise appears immediately |
| Fully clipped (pure black) | Zero | Nothing to recover; brightening just lifts gray |
Key truth: underexposure is more forgiving than overexposure. A dark photo usually still has data in the shadows; a bright photo often has nothing in clipped highlights. But that data comes with a cost — noise. Every stop you lift, you amplify the noise that was hiding in the dark. Adobe’s official Camera Raw tonal adjustments guide confirms the same slider logic and the histogram-based clipping check.
Step 1: White Balance First — Before Any Brightening
This is the step almost everyone skips, and it ruins more dark photos than anything else. Brightening is a multiplicative operation — it amplifies everything, including any color cast. If your photo is too dark and too yellow, and you brighten first, the yellow becomes a deep orange that is much harder to fix.
Fix white balance first:
- In Lightroom/Camera Raw: use the White Balance eyedropper (the W key) and click on something that should be neutral gray — a road, a wall, a shadow on white clothing.
- Or drag Temperature (blue/yellow) and Tint (green/magenta) until skin and whites look natural.
- On a phone: use the WB tool in the native editor or Snapseed.
Once white balance is correct, every later brightening step stays clean. A guide to color grading covers the tonal theory behind why this order matters, if you want to go deeper.
Step 2: The Correct Slider Order — Exposure, Shadows, Blacks, Highlights, Contrast
The order matters more than the values. Most beginners grab Exposure and drag it up until the photo looks bright — that works, but it also clips highlights and crushes the tonal range. Professionals use this exact sequence:
1. Exposure (+1.0 to +2.0 stops). This is the master brightness control. Raise it until the main subject — usually a face — sits at a natural brightness. Stop before highlights (windows, lamps, pale walls) clip. Hold Alt/Option while dragging to see clipping in real time.
2. Shadows (+40 to +100). This targets only the dark midtones and shadows — backlit faces, dark clothing, room interiors — without brightening the whole image. This single slider does most of the recovery work. For backlit portraits, +80 to +100 is common.
3. Blacks (+10 to +40). This opens the deepest shadows — pure black areas that still hold detail. Do not overdo it; some pure black adds depth and prevents a flat, washed-out look. Lift Blacks only until clipped detail returns.
4. Highlights (−20 to −60). After brightening, any bright areas in the original (sky, window, lamp) may now be clipped. Pull Highlights down to recover them.
5. Contrast / gentle S-curve (+10 to +25). Lifting shadows flattens contrast. Add a gentle S-curve in the Tone Curve panel — pull the shadow end down slightly and the highlight end up slightly — to restore separation and punch.
This sequence fixes about 90% of salvageable underexposed photos. For precise masking of bright areas, a solid photo editing guide covers layer masks and selection tools in depth.
Step 3: Denoise — The Step That Makes or Breaks a Shadow Lift
Here is the hard truth: lifting shadows amplifies noise. The signal-to-noise ratio in dark areas is inherently low — there are are fewer photons, so the sensor’s random noise is proportionally larger. Brighten those pixels, and the noise jumps out. Two types appear:
- Luminance noise — grainy, speckled gray. Fix with Luminance noise reduction (20–40).
- Color (chroma) noise — blotchy red/green/blue speckles, most visible in flat dark areas. Fix with Color Noise Reduction (30–50). This is the one that makes a lifted shadow look “dirty.”
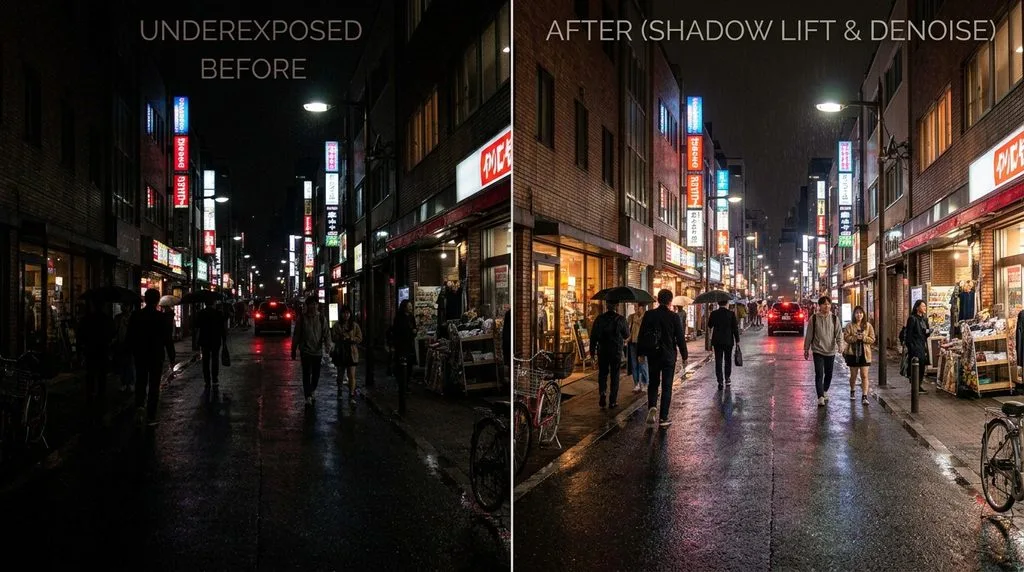
The AI denoise advantage: Lightroom’s AI Denoise (right-click > Enhance > Denoise) and Topaz Photo AI were trained on millions of noisy/clean pairs. They distinguish noise from real detail far better than slider-based denoise. For heavy shadow lifts (2+ stops), run AI Denoise on the RAW file before heavy tonal adjustments — it works best on raw sensor data. A guide to noise reduction walks through the full denoise workflow.
Order rule: Denoise after tonal recovery, before sharpening. If you sharpen first, you sharpen the noise into the image.
Step 4: Photoshop Methods — When You Don’t Have Lightroom
If you only have Photoshop (or a JPEG), four methods work, from simplest to most controlled.
Method A — Camera Raw Filter (easiest, same sliders):
- Open the photo, duplicate the layer (Ctrl/Cmd+J).
- Go to Filter > Camera Raw Filter.
- Use the exact same slider order: White Balance, Exposure, Shadows, Blacks, Highlights, Contrast.
- Click OK. Because you worked on a duplicate layer, you can mask the effect or lower opacity later.
Method B — Curves adjustment layer (most control):
- Add a Curves adjustment layer.
- Click the bottom-left point (the shadows end) and drag it up — this brightens only the darkest tones, leaving midtones and highlights less affected.
- Add a second point in the lower quarter and pull it up slightly for a gentler rolloff.
- Add a black layer mask and paint white only over the dark areas — this lets you brighten a dark face without brightening an already-correct sky.
Method C — Screen blend mode (fast, aggressive):
- Duplicate the background layer.
- Change the duplicate’s blend mode from Normal to Screen. The image instantly brightens — Screen multiplies luminosity values upward.
- Lower the layer opacity to 30–60% until brightness looks right.
- Add a black layer mask and paint white only where you want the brightening — typically faces and subjects, not already-bright areas.
Method D — Shadows/Highlights tool (targeted):
Go to Image > Adjustments > Shadows/Highlights. Drag the Shadows slider up (0–50%) and the Highlights slider down if needed. This tool is built for exactly this problem, but it works destructively — duplicate the layer first.
Step 5: JPEGs and Phone Photos — Lower Expectations, Targeted Fixes
If you only have a JPEG or a phone photo, set expectations lower. JPEGs discard most shadow data in-camera; a 2-stop lift on a JPEG produces heavy color noise and banding. The better approach for JPEGs:
- Local dodging, not global brightening. Use the Dodge tool (Range: Shadows, Exposure: 5–10%) on a separate layer to brighten only faces and subjects. Leave dark backgrounds dark — they add mood.
- Screen blend mode with a tight mask. Brighten only the subject, not the whole frame.
- AI denoise aggressively. Topaz or Lightroom AI Denoise can salvage more shadow detail from a JPEG than manual sliders.
- Embrace the dark. A slightly dark, moody photo with a bright subject is often better than a noisy, flat, fully-brightened one.
For heavy reconstruction work, a comparison of best photo editing software covers the leading AI denoise and recovery tools side by side.
Prevention: Never Let It Happen Again
The best fix is not needing one. Underexposure is preventable:
- Expose to the right (ETTR). Expose as bright as you can without clipping highlights. This gives you the cleanest shadow detail — the noise in a properly exposed shadow is far lower than in a lifted one.
- Raise ISO rather than underexpose. Counterintuitively, a photo at ISO 3200 exposed correctly is cleaner than a photo at ISO 800 underexposed by 2 stops and lifted in post. Modern sensors handle high ISO well; shadow lift does not.
- Bracket exposures for high-contrast scenes: shoot one normal, one +2 stops, one −2 stops. Merge to HDR or pick the best.
- Use exposure compensation +0.3 to +0.7 EV in backlight or dark scenes. Cameras underexpose in these situations by default.
- Shoot RAW for any important photo. The 2–3 stops of hidden shadow detail are worth every megabyte.
5 Common Underexposure-Fix Mistakes
- Brightening before fixing white balance. Amplifies the color cast into something much harder to fix. Fix WB first.
- One global Exposure lift on a JPEG. Adds noise everywhere. Use local dodging and masked Screen layers instead.
- Forgetting to denoise after a shadow lift. Lifted shadows always show noise — color noise first. Denoise before sharpening.
- Lifting Blacks too far. Removes all pure black, leaving a flat, washed-out image. Some black adds depth.
- Sharpening before denoising. Sharpens the noise into the image. Always denoise first, sharpen last, masked to edges.
Frequently Asked Questions
Can underexposed photos be fixed?
Most can — underexposure is more recoverable than overexposure. RAW files hold 2–3 stops of hidden shadow detail. Fix white balance first, raise Exposure, lift Shadows and Blacks, pull Highlights, then denoise. Pure black (0,0,0) contains no data and cannot be recovered.
What is the correct order to fix underexposure?
White balance first (brightening amplifies color casts), then Exposure (+1 to +2 stops), then Shadows (+40 to +100), then Blacks (+10 to +40), then Highlights down if clipped, then contrast/S-curve, then denoise, then sharpen. Never brighten before fixing white balance.
Why do my lifted shadows look noisy?
Dark areas have a low signal-to-noise ratio — fewer photons mean proportionally more sensor noise. Brightening them amplifies that noise. Color (chroma) noise appears first as blotchy red/green speckles. Run AI Denoise (Lightroom or Topaz) on the RAW file, or use Color Noise Reduction 30–50 + Luminance 20–40.
Can you fix a very dark JPEG?
Only mildly — JPEGs discard most shadow data in-camera. A heavy lift produces banding and color noise. Use local dodging (Dodge tool, 5–10% exposure on shadows) and masked Screen blend mode to brighten only the subject, and accept that dark backgrounds add mood. AI denoise helps more than manual sliders.
What is the difference between Exposure and Shadows?
Exposure brightens the entire image uniformly — it moves every tone at once. Shadows targets only the dark midtones and deepest shadows, leaving highlights and midtones alone. Use Exposure to set base brightness, then Shadows to recover dark detail without clipping highlights.
Should I raise ISO or underexpose and fix later?
Raise ISO. A correctly exposed photo at high ISO is cleaner than an underexposed photo lifted in post. Modern sensors handle ISO 3200–6400 well; shadow lift always amplifies noise more than high ISO does.
How do I know if shadows are clipped beyond recovery?
Hold Alt (Windows) or Option (Mac) while dragging the Blacks slider in Lightroom or Camera Raw. The screen turns white; any black patches show fully clipped areas with no data. Colored patches mean one channel is clipped but recoverable. If large areas show black, those pixels are gone.
Final Verdict
A dark photo is almost never a lost photo — it is just a shy one, holding detail in the shadows waiting to come out. Fix white balance first, lift in the right order, denoise aggressively, and accept that some black belongs in the frame. If you shot RAW, you have 2–3 stops of brightness you never knew you had. If you shot JPEG, brighten only what matters and let the rest stay dark — mood beats noise every time. And next time, expose to the right, raise the ISO instead of underexposing, and shoot RAW: the best shadow recovery is the one you never need.