How to Fix Faded Photos: Restore Lost Color & Contrast (2026 Guide)
TL;DR: The Short Answer
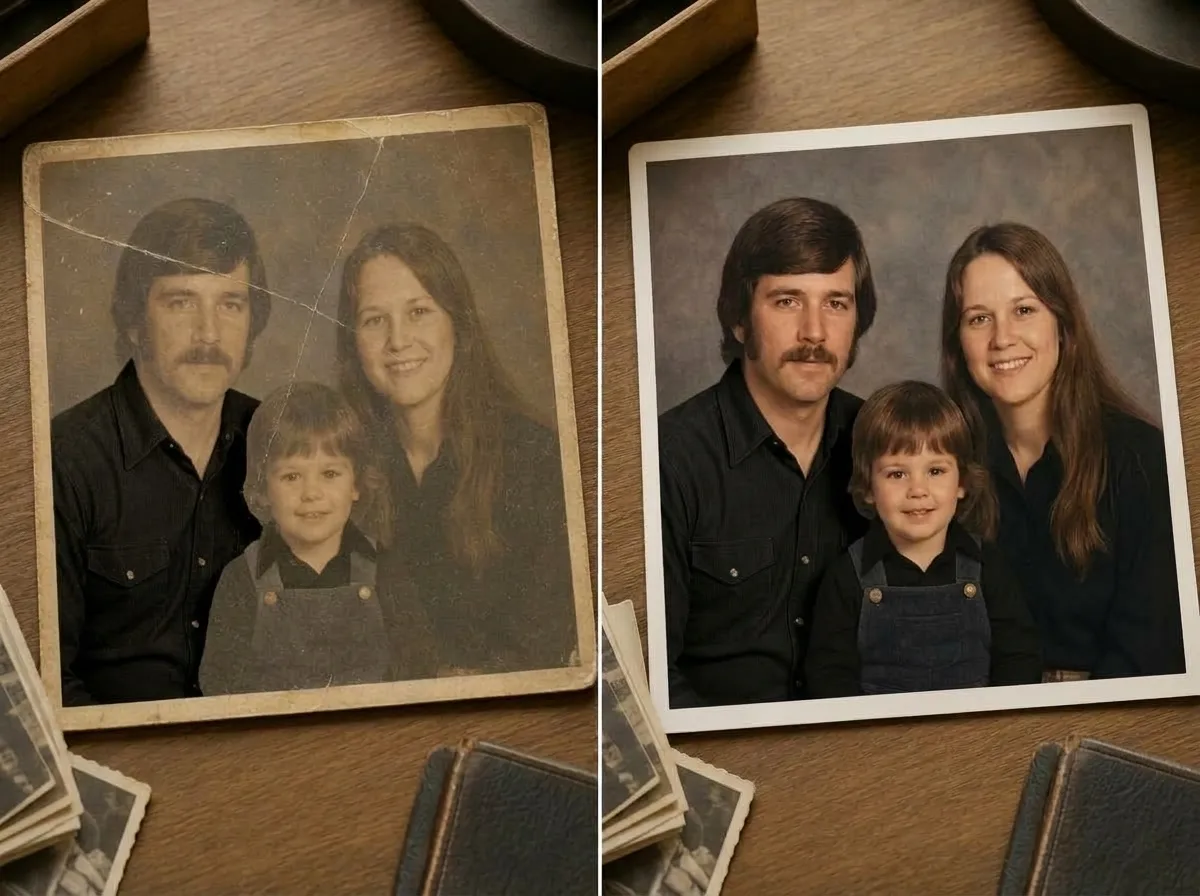
Fading follows predictable patterns — and you fix it by resetting what time removed. Scan at 600 DPI as a TIFF, then open Curves or Levels and drag the black slider right until it hits real black, and the white slider left until it hits real white. That single step revives most faded photos. For yellowing/sepia shift, push Temperature toward blue. For lost specific colors (reds, blues), use HSL or channel-by-channel Curves. AI tools (Topaz, Remini, Photoshop Neural Filters) work well for heavy fading — but always verify they didn’t invent hues that never existed. Prevention matters most: store prints in dark, cool, low-humidity areas behind UV-filter glass, and keep digital backups off-site.
First: Why Do Photos Fade? (Match the Fix to the Cause)
Fading is not random — it follows physics and chemistry. Knowing which type you have tells you exactly which slider to pull.
| Fade type | Cause | What you see | Primary fix |
|---|---|---|---|
| Dark fading | Emulsion ages, blacks lift toward gray | Hazy, flat, washed-out darks | Reset black point in Curves |
| Light fading | UV exposure bleaches dyes from highlights | Whites turn gray, overall dim | Reset white point in Curves |
| Color shift | Three dye layers fade at different speeds | Yellow/magenta cast, reds vanish | White Balance + HSL per channel |
| Sepia toning | Silver oxidation in old prints | Uniform warm brown tone | Color balance toward blue/cyan |
| Contrast compression | Long-term chemical drift | Narrow midtones, no depth | S-curve in Curves |
The most common combination: dark fading + yellow shift — blacks are gray, whites are cream, and everything looks like it sat in sunlight for decades. That is exactly what happened.
Step 1: Scan It Right — Start Before You Edit
A faded photo has less contrast to begin with — bad scanning makes it unrecoverable.
- Scan at 600 DPI minimum, 1200 DPI for small prints. More pixels mean more tonal data to work with.
- Scan in color even if the photo is black and white. Color mode captures three channels of information; grayscale throws two away, and one of them might hold the best detail.
- Turn OFF all scanner auto-enhance — auto-contrast, auto-color, dust removal. Faded photos confuse auto algorithms, which often make them worse.
- Save as TIFF, never JPEG. JPEG compression flattens the faint remaining tonal gradations into ugly bands.
- If the print is stuck to glass or an album page, do not force it — refer to water-damage separation steps or consult a conservator.
Step 2: The “One-Click” Cure — Set Black & White Points
This single step fixes 70% of faded photos. It is so effective that Adobe’s official photo restoration tutorial leads with it. Do it on an adjustment layer, never directly on the image.
In Photoshop (Curves):
- Open Curves (Ctrl/Cmd+M).
- Select the black eyedropper, click directly on the darkest true black in the photo — hair, suit, shadow corner.
- Select the white eyedropper, click directly on the brightest true white — collar, cloud, shirt cuff.
- Done. Watch the photo snap back into contrast.
In Lightroom / Camera Raw:
- Go to the Basic panel.
- Hold Alt (Windows) / Option (Mac) and drag the Blacks slider right — stop when pure black pixels just appear.
- Hold Alt/Option and drag the Whites slider left — stop when pure white pixels just appear.
- Adjust Exposure slightly if the whole image is still too dark or bright.
If you don’t see a true black or white anywhere — common in heavily faded prints — drag the sliders manually:
- Black point slider → right edge of the histogram, until it touches the first cluster of pixels.
- White point slider → left edge of the histogram, same rule.
- Midtone (Gamma) slider → slightly left to brighten faces, or right to deepen shadows.
Step 3: Fix Yellowing, Sepia & Color Cast
Once contrast returns, the color cast becomes obvious — usually yellow, sometimes magenta or red. Fix it in this order:
1. White Balance first — the big lever
- In Lightroom/Camera Raw: pull Temperature toward blue until the cream/yellow cast fades. Do not overcorrect to blue — skin should look warm, not cold.
- In Photoshop: use a Color Balance adjustment layer. Midtones: add Blue − Yellow. Highlights: slight Blue + Cyan. Shadows: slight Yellow + Red to keep depth.
2. HSL for specific lost hues
Yellowing often wipes out reds and oranges — lipstick, fabric, wood tones. Go to HSL / Color tab:
- Raise Saturation and Luminance for Reds, Oranges, Yellows separately.
- If blues and greens look dull, boost those gently too.
- Never boost everything at once — faded photos need selective recovery, not global saturation.
3. Channel-by-channel Curves (advanced, powerful)
Old color prints fade one dye layer faster than others — usually blue first, then red, leaving yellow dominant. Fix per channel:
- In Curves, switch from RGB to Red channel → slightly raise curve to restore lost reds.
- Switch to Blue channel → raise curve to counter yellowing.
- Switch to Green channel → fine-tune for natural skin.
- Back to RGB → gentle S-curve for final punch.
This is the pro secret: the channel-by-channel fix recovers colors that a global White Balance adjustment cannot reach. If you want to master layers and adjustment workflows, a solid photo editing guide covers these techniques in depth.
Step 4: Advanced Contrast & Tone Refinement
After the first two steps, your photo looks good — but you can make it great.
- Gentle S-curve: In the RGB channel of Curves, nudge the midpoint up slightly, then anchor the shadow end and pull it down just a touch. This adds the missing “snap” without clipping.
- Blacks vs Shadows distinction: Lower Blacks for depth; raise Shadows to reveal detail in faces and clothing. They are not the same slider — use both.
- Vibrance over Saturation: Vibrance boosts muted colors more than already-saturated ones, so it revives faded areas without turning skin orange. Always try Vibrance first.
- Masked brightness: If faces are still dim after the general fix, use a Dodge tool (exposure 3–5%) on a separate layer to brighten eyes and foreheads only. For portrait work, portrait retouching principles apply here — keep it natural.
Step 5: AI Restoration for Severe Fading
When the original dyes are mostly gone — the photo looks like a single brown sheet — manual recovery hits a wall. AI tools excel here, but they work best as a starting point, not the final word.
| Tool | Best for | Price | Strength |
|---|---|---|---|
| Photoshop Photo Restoration Neural Filter | Integrated workflow | ~$10–23/mo | Scratch reduction + color recovery + face fix in one |
| Topaz Photo AI | Desktop, local, privacy | ~$199/yr subscription | Best detail preservation, no upload |
| Remini | Mobile, faces | ~$9/mo or credits | Strongest face recovery on phone |
| Palette.fm | Color-only revival | Free preview + paid | Text prompts: “1960s Kodachrome family portrait” |
| MyHeritage | Genealogy photos | Free with account | Tuned specifically for historical portraits |
The critical rule for AI color recovery: AI guesses colors based on training data. It does not know that dress was actually green — it sees a dark shape and picks a statistically likely color. Always compare the AI result side by side with your best manual attempt. If the family car turns bright red and you know it was blue, trust your knowledge over the AI. Our roundup of the best photo editing software covers these tools in more depth.
Step 6: Prevent Fading — So This Never Happens Again
The best restoration is stopping the next one. Fading is reversible digitally; the physical print cannot be un-faded. Follow these archival standards:
- Display away from direct sunlight. UV is the #1 fade cause. Use UV-filtering glass or acrylic (99%+ block rate) in frames.
- Store in dark, cool, dry conditions. Ideal: 60–70°F (15–21°C), 30–50% relative humidity. Attics, garages, and bathrooms destroy photos.
- Use archival materials only. Acid-free sleeves, lignin-free backing boards, cotton mats. Regular plastic sleeves can trap moisture; PVC sleeves leach chemicals.
- Digitize everything. Scan at high resolution and save to at least three locations: working drive + cloud backup + external drive off-site. The digital copy is the permanent archive now.
- Handle by edges with clean hands. Skin oils accelerate chemical breakdown.
5 Common Faded-Photo Mistakes
- Cranking Saturation to 100. Everything turns neon orange. Use Vibrance, then HSL selectively.
- Over-correcting white balance. Blue-tinted faces look as unnatural as yellow ones. Stop when neutral grays look neutral.
- Judging on a phone screen. Laptops and phones have inaccurate color. Edit on a calibrated monitor or at least a decent desktop display.
- One-size-fits-all Curves. Every photo faded differently. Click the black and white points on that specific photo, not a preset.
- No backup after restoration. You fixed it — now save it in three places.
Frequently Asked Questions
Can you restore a photo that has faded completely?
Yes, usually. Even a heavily faded print retains faint channel-by-channel detail. Start with Curves black/white points, then use HSL or AI for color. If detail is truly gone, AI can invent plausible tones — but treat those as artistic interpretation.
Why do old photos turn yellow?
Old color prints use three dye layers that fade at different rates: blue fades fastest, then red, leaving yellow dominant. Sepia prints turn yellow as silver particles oxidize. Both are fixed by pushing White Balance toward blue and boosting the blue channel in Curves.
What is the difference between Vibrance and Saturation?
Saturation boosts every color equally — it revives the already-bright and over-saturates skin. Vibrance targets muted, faded colors first — exactly what you want for old photos. Always try Vibrance first.
Should I edit the original scan?
Never. Duplicate the layer or use adjustment layers so the original stays untouched. If you make a mess, you start fresh without re-scanning.
Can faded prints be restored physically?
Not really. Fading is chemical breakdown of the dyes or silver — you cannot reverse it in the paper. The “restoration” is always digital: capturing what remains and amplifying it.
How do I keep new photos from fading?
Use archival paper and inks, frame with UV-blocking glass, avoid direct sunlight, and digitize everything. Even “archival” prints fade over decades — the digital backup is permanent.
Is it too late to save my faded collection?
Almost certainly not. Unless the paper itself is crumbling, the image is still there, dim but recoverable. Scan them all before they degrade further — once scanned, they are safe forever.
Final Verdict
A faded photo is not gone — it is just whispering when it used to shout. Reset the black and white points first, because that single step brings back most of what time stole. Then gently guide the colors home — cool the yellow, wake the reds, keep the skin honest. AI is a wonderful assistant, but you are the one who knows what these people actually looked like. Scan them, save them, keep them off the wall in direct sun — and the faces that looked like they were slipping away will be back, bright and clear.