E-Commerce Product Photo Editing: 12-Step Pro Workflow
E-commerce product photo editing is the post-production process that turns a raw studio capture into a listing-ready image — clean background, accurate color, natural shadow, sharp detail, and the exact file dimensions each marketplace demands. In 2026, this work sits at the intersection of craft and commerce: the same picture that inspires a “buy” on Amazon can get suppressed on Walmart if it misses a specification, and the same edit that wins on desktop can look muddy on the phone screen where most shoppers actually browse. This guide walks through the twelve-step professional workflow, the current 2026 marketplace specs, category-specific techniques for apparel, jewelry, food, and cosmetics, and the AI tools now doing the heavy lifting.
TL;DR — Key Takeaways
- Shoot RAW, edit in 16-bit ProPhoto or Adobe RGB, and convert to sRGB at export for web browsers.
- Follow a repeatable 12-step workflow so a 400-SKU drop does not turn into 400 tiny creative decisions.
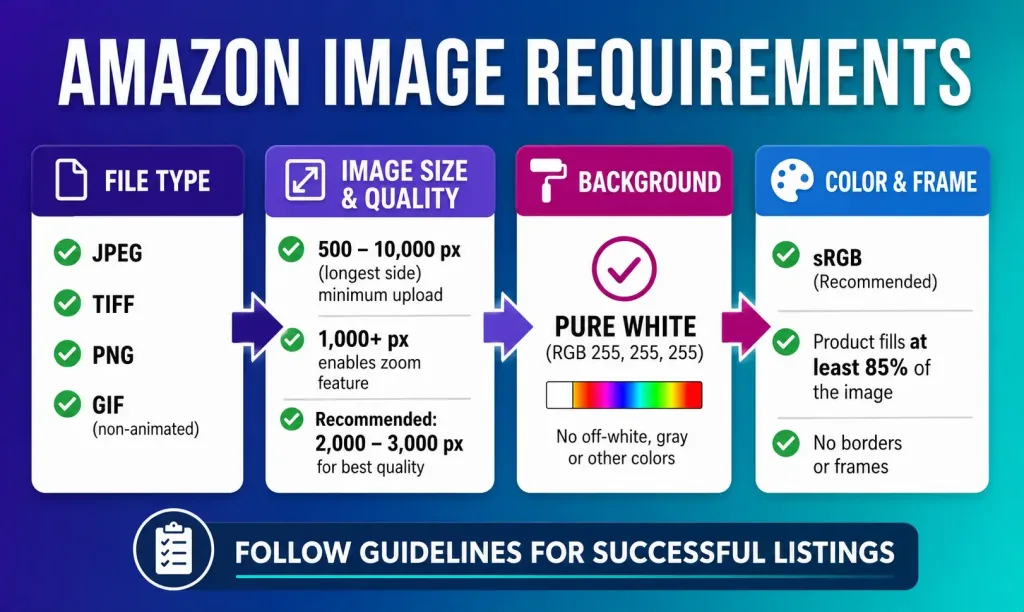
- Marketplaces enforce hard specs: Amazon needs pure white RGB 255,255,255 with the product filling 85%+ of the frame, per the official Amazon Seller Central product image guide.
- Nearly 78% of ecommerce traffic now arrives on mobile, so every edit must survive small-screen viewing and lazy-load compression.
- 360° spin sets and short video have added 5–40% conversion lifts across categories in independent tests published by Practical Ecommerce.
- Honest retouching wins long-term; over-polished images drive returns and “not as described” disputes.
Why Product Photo Editing Decides the Sale in 2026
Shoppers cannot touch what you sell online, so they buy — or bounce — based on pixels alone. Roughly 83% of U.S. shoppers say product images influence their purchase decisions “extremely” or “very much,” and 45% will abandon a listing outright when photos look poor. Baymard Institute’s ongoing product-page research, referenced in its public Baymard product page benchmarks, finds that up to 62% of leading ecommerce sites still deliver “mediocre” or worse product-page UX — most of it rooted in weak imagery.
Editing also protects margin. Better visuals cut returns by as much as 40%, and pages with high-quality product images show bounce rates about 25% lower than pages with weak imagery. Meanwhile the global ecommerce conversion rate hovers between 1.4% and 3% depending on the tracker, which means every basis point of trust matters. A well-edited catalog is therefore not decoration — it is a revenue lever, a compliance shield, and a cost-of-returns brake, all in one.
Before You Open Photoshop: Pre-Edit Setup
Great editing starts long before the first slider moves. Shoot in RAW rather than JPEG, because RAW preserves 12–16 bits of color and gives generous latitude for exposure, white balance, and color correction later. Choose a working color space by intended use: for print-plus-web workflows retouch in 16-bit ProPhoto RGB or Adobe RGB, then convert to sRGB IEC61966-2.1 as the final export step for browsers. Retouching a wide-gamut file and delivering wide-gamut to the web pushes colors outside what browsers can render, so blues drift teal and reds go orange on unmanaged displays.
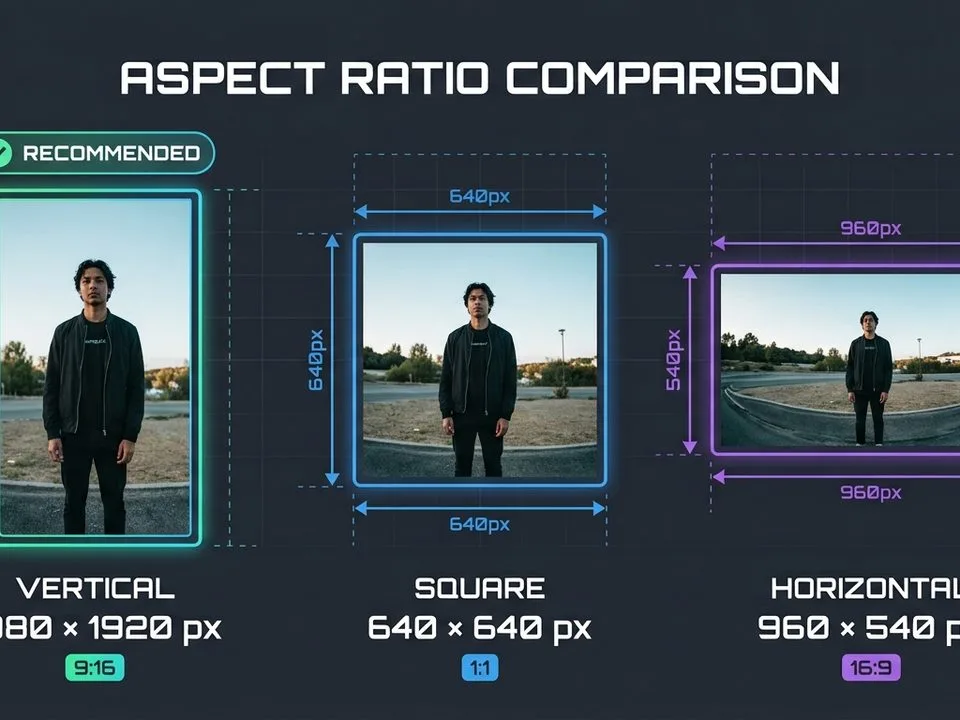
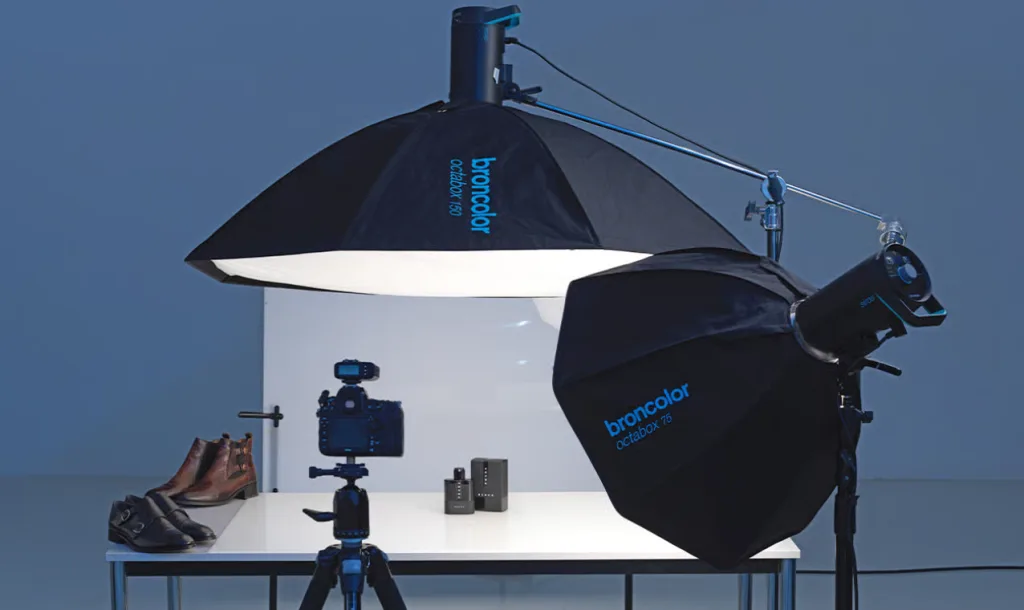
Calibrate your monitor with a Datacolor SpyderX or X-Rite i1Display before every campaign. Uncalibrated screens are the fastest route to catalog drift, where every editor unintentionally warms or cools files in their own direction. Also lock in a catalog aspect ratio early — 1:1 square works on Amazon, Shopify, Walmart, and Instagram, and prevents hours of re-cropping later. A short lighting setup, a clean sweep, a color checker in the first frame, and a locked white balance in-camera reduce the editing load by roughly half before a single file opens.
The 12-Step Product Photo Editing Workflow
Every professional retoucher works from a checklist because muscle memory beats improvisation at scale. Here is the twelve-step workflow used across major studios, refined for 2026 tools and marketplace rules. Understanding the exposure triangle at capture makes each of these steps faster and cleaner.
Step 1 — Lens Corrections and Chromatic Aberration
Wide-angle lenses barrel-distort the frame edges and paint purple or green fringes along high-contrast lines. Open the file in Adobe Camera Raw or Lightroom, toggle Enable Profile Corrections, and check Remove Chromatic Aberration. The whole step takes two clicks and disappears once done, but its absence shows up painfully on chrome, glass, and jewelry.
Step 2 — Straighten the Horizon
Even a two-degree tilt makes a product look amateur. Use the crop tool’s Straighten function against a bottle edge, table line, or the back wall of the sweep. For shoes and bags this matters especially, because human eyes register lopsided silhouettes instantly.
Step 3 — Crop and Composition
Center the product with consistent negative space — roughly 10–15% padding on each side works across most marketplaces. Amazon explicitly requires the product to occupy at least 85% of the primary image frame, so crop tight but leave the shadow room to breathe. Batch-crop the whole set in Lightroom so every SKU aligns visually on the storefront grid.
Step 4 — Fix Exposure
Pull highlights back if they are blown; lift shadows if the product looks muddy. Trust the histogram over your eye: clipped whites read as blown pixels, and clipped blacks lose detail forever. A gentle S-curve in Curves adds midtone punch without crushing shadows, and Dodge & Burn on a 50%-gray overlay sculpts three-dimensional depth on shoes, bags, and cosmetics.
Step 5 — Correct White Balance
Shoot with a grey card or X-Rite ColorChecker in the first frame of every lighting setup. In post, click the neutral swatch with the Levels or Camera Raw eyedropper to set true white in seconds. Learn how to lock this at capture in our full white balance guide. Wrong white balance is the number-one reason returns cite “color not as shown,” and it is entirely preventable.

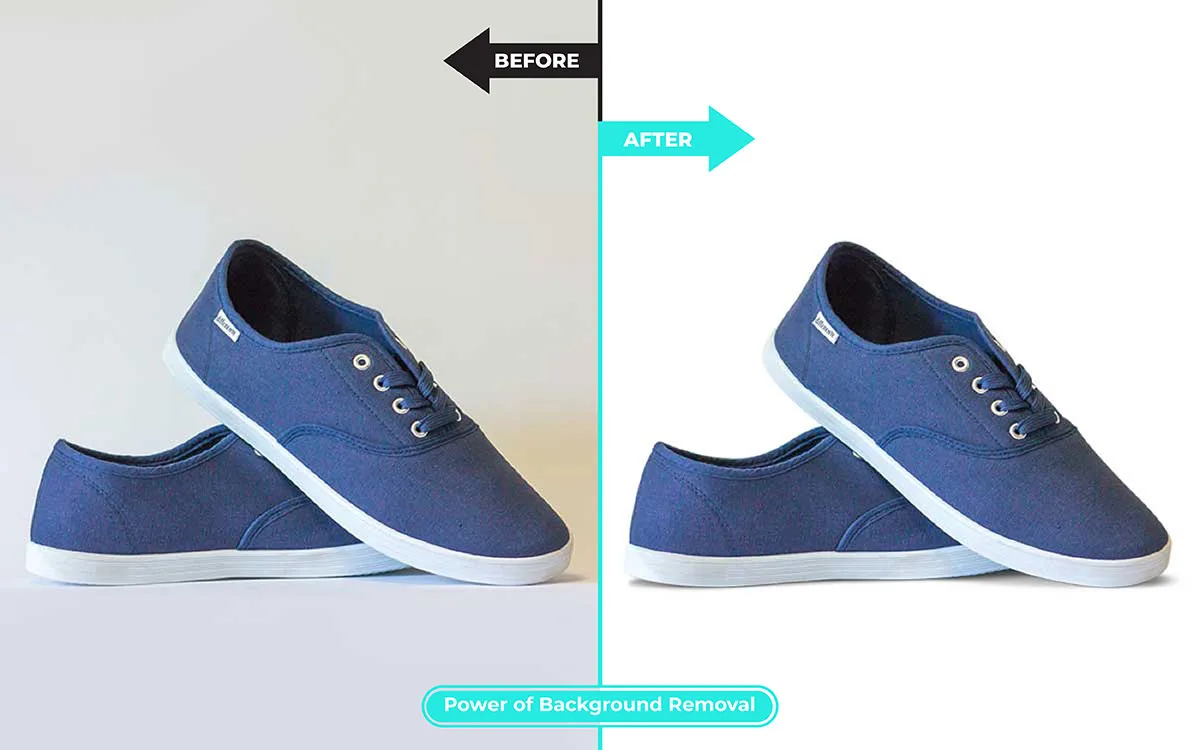
Step 6 — Remove the Background
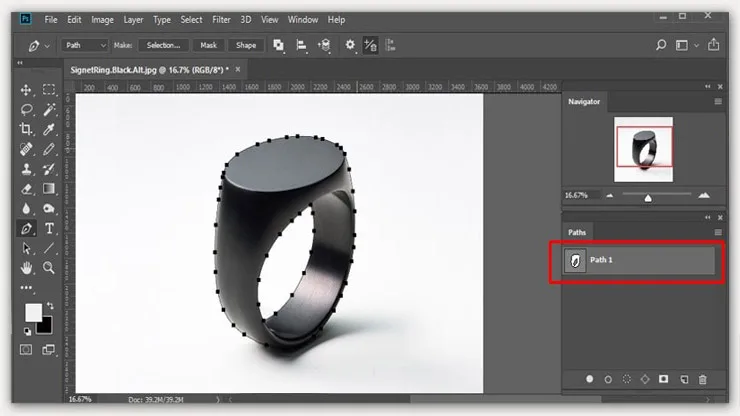
Background removal is the pivot point of the workflow because shadows, color, and composition all sit on top of the cutout. Choose the technique by edge type:
- Hard, defined edges (bottles, boxes, electronics) → use a clipping path drawn with the Pen tool for vector-precise outlines.
- Soft or complex edges (hair, fur, lace, mesh, glass) → use image masking with channel or luminosity masks so translucent details survive.
- Multi-color garments or products needing individual color swaps → apply a multi-clipping path so each region sits on its own layer.
AI cutout tools now handle roughly 80% of straightforward silhouettes in one click, but always zoom to 200% and manually inspect hair, glass, and thin metal strands. Save cutouts on a hidden layer so you can drop them back onto white, gradients, or lifestyle scenes without redoing the work.
Step 7 — Color Correction and Color Grading
Color correction restores accuracy; color grading builds mood. Start with accuracy: Curves per channel or Selective Color neutralize color casts, and matching every SKU against an approved hero image keeps the whole catalog visually coherent. For lifestyle shots, layer a subtle warm split-tone into the shadows for a lived-in feel — but never at the expense of true product color. A red dress that photographs as burnt orange because of a warm split-tone earns instant returns.
Step 8 — Retouching: Dust, Scratches, Wrinkles
This step separates a hobby shoot from a commerce shoot. Zoom to 100% and remove dust specks, lint, fingerprints, softbox reflections, sticker residue, and stray threads with the Spot Healing Brush, Clone Stamp, and Healing Brush. Apply Frequency Separation for skin on model shots and for fabric wrinkles that need smoothing without killing texture. Keep the retouching honest — the goal is “product on its best day,” not fantasy — because deceptive retouching fuels “not as described” disputes and platform strikes.
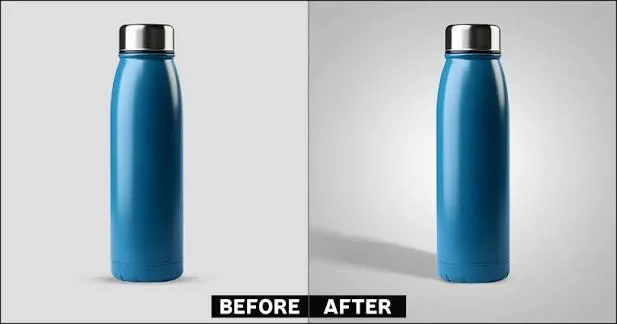
Step 9 — Create Realistic Shadows
Cutouts on pure white look like they are floating in a void. Ground them with one of three shadow types:
- Natural shadow preserved from the original shoot — most authentic, best for premium.
- Drop shadow — clean and symmetrical, ideal for boxes and cosmetics.
- Cast or reflection shadow — long, angled, or mirrored beneath the product for a premium editorial feel.
Match the shadow’s direction and softness to the light source in the set, and keep the opacity between 20–40% so it grounds without going heavy. Our step-by-step tutorial on realistic shadows walks through blend modes, feathering, and Gaussian blur values.
Step 10 — Ghost Mannequin (Apparel Only)
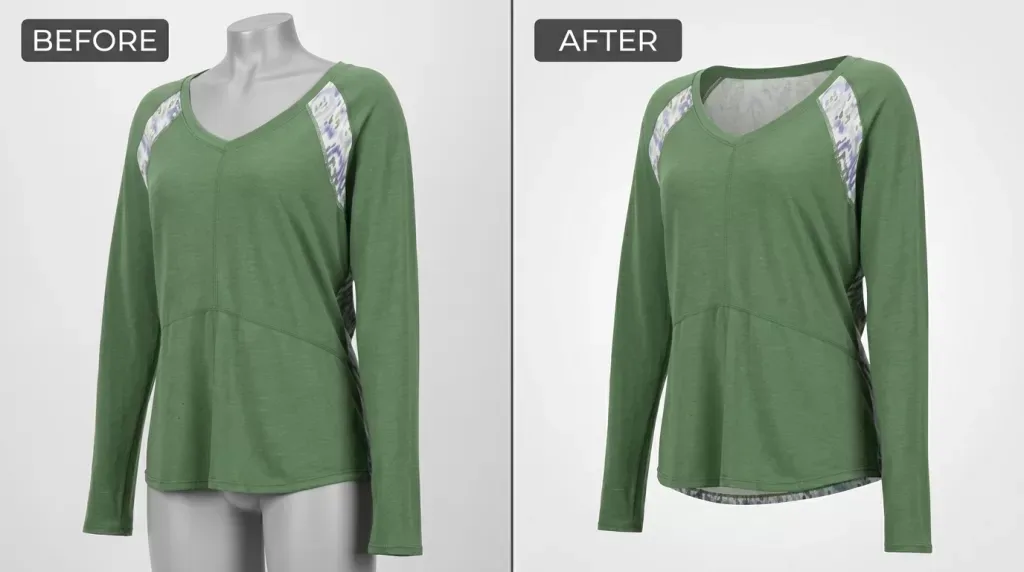
For clothing, the ghost mannequin effect removes the mannequin while preserving the garment’s inner label, neckline, and 3D shape. Photograph the garment once on the mannequin and once on a flat surface for the neck label; composite the two so the piece appears worn by an invisible person. Amazon apparel listings using ghost mannequin consistently outperform flat-lay in click-through and conversion because the garment reads as “wearable” rather than “folded stock.”
Step 11 — Sharpen, Denoise, Fix Perspective
Apply Smart Sharpen or Unsharp Mask to lift micro-detail on leather, weave, knurled metal, and screen-printed logos. When ISO was pushed at capture, reduce noise before sharpening — otherwise you sharpen the noise too. Camera Raw’s Denoise AI, Topaz Photo AI, and DxO PureRAW now rescue files that would have been unusable two years ago. Fix perspective on packaging with Transform → Perspective so labels read square rather than trapezoidal.
Step 12 — Export for the Destination
Different destinations need different files. Choose the container by use case:
- JPEG — universal, small, best for standard marketplace listings; save at quality 80–90.
- PNG-24 — for transparent background cutouts you will composite later.
- WebP — 25–35% smaller than JPEG at similar quality; supported by all modern browsers; ideal for your own storefront.
- AVIF — even smaller than WebP, with growing 2026 browser support.
Our detailed comparison of image formats shows the exact quality-vs-size trade-offs. Always export sRGB, 8-bit, and embed the color profile so browsers render colors correctly. Strip GPS and camera metadata for privacy and file-size savings.
Marketplace Technical Specs (Verified for 2026)
Even a beautifully edited image gets suppressed if it misses the platform rules. Here are the current 2026 specs for the biggest storefronts, verified against each platform’s official documentation.
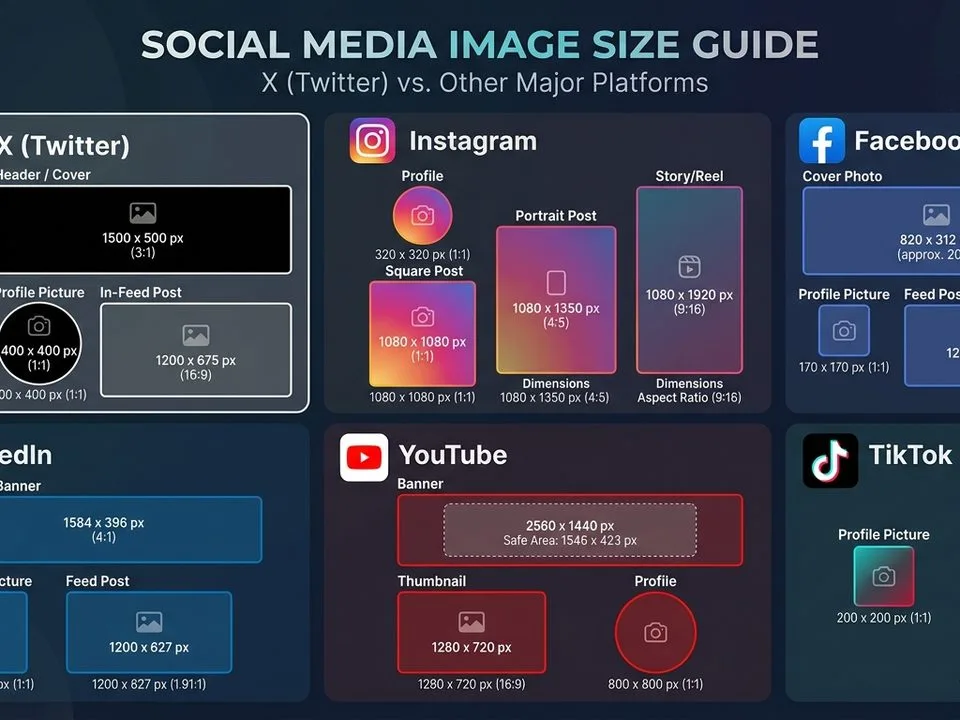
| Platform | Main Image Size | Background | Product Fill | File Size / Format |
|---|---|---|---|---|
| Amazon | Min 500 px longest side; 1,000 px+ enables zoom; 1,600 px+ recommended; 10,000 px max | Pure white RGB (255, 255, 255) | 85%+ of frame | JPEG preferred (also PNG, GIF, TIFF); ≤ 10 MB |
| Shopify | Up to 5,000 × 5,000 px; recommended 2,048 × 2,048 px | Any (white recommended for PDPs) | Any | JPEG / PNG / WebP; ≤ 20 MB; per the Shopify image size guide |
| Walmart | 2,200 × 2,200 px recommended; 1,500 × 1,500 px min for zoom | Seamless pure white for main | 50–75% of canvas | JPEG / PNG / BMP; ≤ 5 MB; 1:1 square required |
| eBay | Min 500 px longest side; 1,600 px+ recommended for zoom | Any (white preferred) | Any | JPEG / PNG / TIFF / BMP / GIF; ≤ 12 MB |
| Etsy | 2,000 px wide minimum | Any (lifestyle common) | Any | JPEG / PNG |
Amazon also forbids watermarks, borders, text overlays, additional graphics, and props on the main image, and the 85% rule triggers algorithmic suppression fast when violated. Walmart requires a strict 1:1 square and rejects transparent PNGs on primary images. Shopify auto-resizes anything above 4,472 × 4,472 px, which can soften textures if you failed to sharpen at export. Bookmark each platform’s own documentation and re-check yearly — the rules move.
Category-Specific Editing Tips
Not every product needs the same edit. Emphasize the details that matter for the buyer’s decision in that category.
Apparel and Fashion
Apparel sells on fit, texture, and drape. Use ghost mannequin for tops, dresses, and jackets to communicate structure without an on-model shoot. Remove fabric wrinkles with Frequency Separation rather than Liquify, because Liquify distorts the seam lines. On-model retouching must stay conservative — never slim bodies or alter skin tone, both of which invite legal exposure and damage brand trust. Shoot the same SKU on hangers, forms, and flat-lay to fill the six-to-eight image slots most PDPs allow.
Jewelry
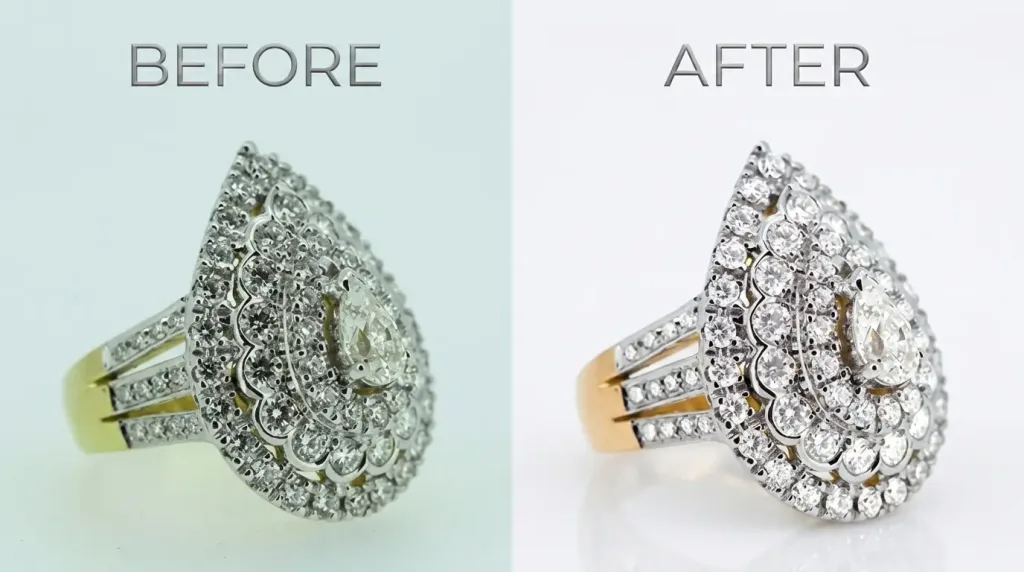
Jewelry photography lives at 200% zoom. Remove dust and scratches meticulously, enhance metal reflections carefully (over-sharpening creates a fake plasticky look), and hold gemstone color accuracy religiously with a ColorChecker on every setup. Gradient reflection shadows underneath the piece communicate premium framing. For pieces on velvet or dark cloth, dodge the highlights with a 5% brush to lift the metal sparkle without blowing the base tone.
Cosmetics and Skincare
Labels sell cosmetics. Use Perspective Warp to square every label so text reads flat, and Clone Stamp on a duplicate layer to remove softbox reflections from glossy tubes and bottles. Match SKU shades to the physical product with Selective Color driven from a ColorChecker reading, never eyeball. For clear bottles with liquid inside, protect the meniscus and liquid line during retouching — buyers notice fill levels.
Food and Beverage
Food photography sells appetite. Push yellows and reds subtly to trigger cravings, sharpen frozen droplets locally, and keep steam and glisten wet-looking. Do not oversaturate — the picture must match the physical product to keep review scores intact. Composite garnishes on separate layers when the shoot cannot rebuild them; this is standard practice and legally defensible when the recipe on the label matches the composite.
Electronics
Electronics reward geometric precision. Straighten every parallel line with Perspective Warp, composite screens from a source file so pixels stay crisp, and reduce glass reflections with polarization at capture. When a hero shot must show the powered-on screen, layer the UI screenshot at native resolution with a soft mask around the bezel — do not photograph the screen directly, because moiré patterns will appear.
The 2026 AI Tool Stack
AI has re-shaped the editing floor. Background removal, denoise, upscaling, generative background extension, and even entire virtual product shoots now happen in seconds. Here is the current 2026 tool stack, grouped by strength:
- Photoroom — fastest single-click background removal, marketplace-ready templates for Amazon and Shopify, strong batch pipelines for high-SKU catalogs.
- Claid.ai — enterprise-grade batch editing with automated color correction and cropping tuned for large catalogs.
- Adobe Photoshop + Firefly — Generative Fill extends backgrounds, removes distractions, and builds lifestyle scenes; per the Adobe documentation, the model now runs commercially safe outputs trained on licensed content.
- Topaz Photo AI — best-in-class denoise, sharpen, and upscale in a single pass; see our roundup of the best AI upscaler options.
- Pebblely / Flair AI — generative product scenes and lifestyle backdrops without physical shoots.
- Remove.bg / Canva Magic Studio — quick single-image cutouts for social and marketing use.
The winning 2026 workflow is AI first, humans for the final 5%. AI handles cutouts, denoise, upscaling, and rough color; humans handle jewelry sparkle, ghost mannequin composites, hero campaign shots, and any image that will run larger than a phone screen.
Preparing Images for the Web: File Names, Alt Text, and Compression
The picture your camera captures is one file; the version Google sees is another. What you name it and how you describe it both matter. Google’s own image documentation recommends descriptive file names and useful alt text to help images appear in relevant searches.
File-name pattern that ranks:
- Use lowercase, hyphens between words, no spaces or underscores.
- Include product name, key attribute (color, size), and angle.
- Example:
nike-air-max-90-black-side-view.jpgbeatsIMG_4032.jpgevery time.
Alt text that ranks and stays accessible:
- Describe the image as if the user cannot see it.
- Include the product name naturally; skip keyword stuffing.
- Aim for 8–15 words per alt attribute.
- Example: “Nike Air Max 90 in black, side profile, on white background.”
Compression that respects Core Web Vitals:
- Target under 200 KB per product image on PDPs, under 100 KB on category grids.
- Serve WebP or AVIF with JPEG fallback via
<picture>element. - Enable lazy-loading below the fold with
loading="lazy". - Cache at the CDN edge so repeat pageviews load instantly.
Every hundred kilobytes shaved off a listing improves mobile Largest Contentful Paint, which Google factors into rankings and shoppers feel as speed.
360°, Video, and Immersive Product Content
Static images are no longer enough for high-consideration products. 360° spin sets let buyers rotate the item themselves, and short product videos communicate scale, movement, and use in seconds. Independent tests have reported conversion lifts of 5–40% for merchants adopting 360° content, especially in apparel, footwear, jewelry, and furniture. Amazon supports 360° spin uploads for Brand Registry sellers, and Shopify accepts native 3D/AR models via .glb and .usdz.
Production is more accessible than ever: a turntable, controlled lighting, and 24–72 frames per rotation deliver a usable spin. Editing a 360° set means batch-processing every frame identically — a single Lightroom preset applied to all 36 or 72 frames — so no flicker appears in the rotation. For video, keep clips under 30 seconds, subtitle key claims for muted mobile viewers, and export in H.264 MP4 for broadest compatibility.
Mobile-First Editing
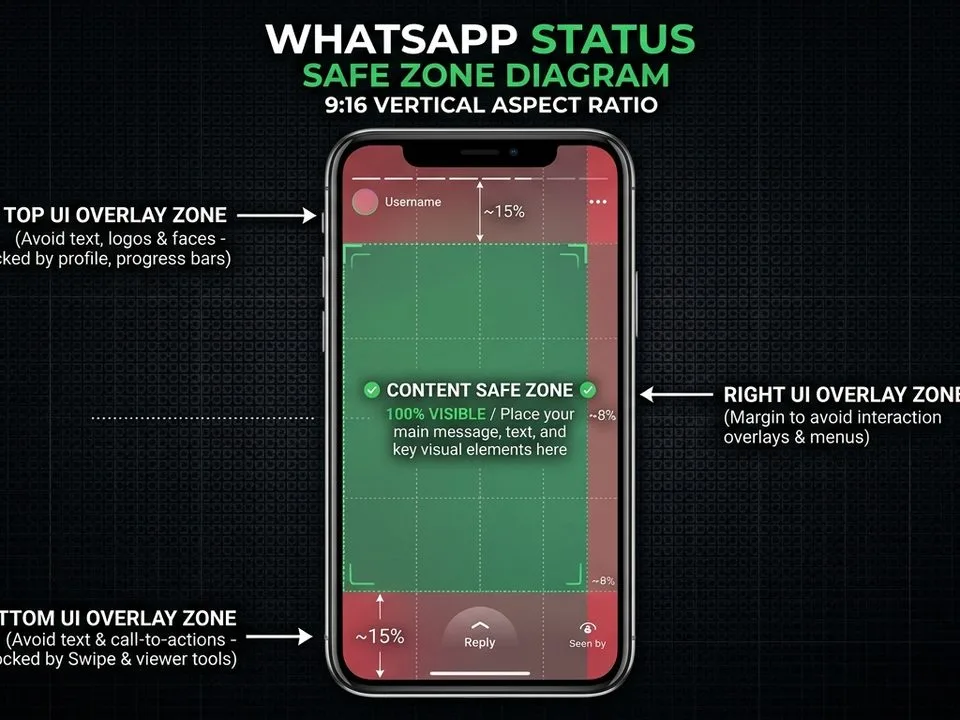
Roughly 78% of ecommerce traffic now arrives on mobile devices, yet mobile still converts about 30% lower than desktop. Bad thumbnails and slow loads carry most of the blame. Edit knowing the primary viewing size is a phone screen: sharpen with mobile in mind (crisp but not crunchy), keep the hero subject in the center 60% of the frame so it survives cropping, and preview every image at 400 px wide before publishing.
Also test text overlays on secondary images at phone size. Type that reads clearly on a 27-inch monitor often disappears at 375 px wide. Bump font weights, shorten copy, and preview on a real device — not just DevTools — before you commit.
Honesty in Retouching: Where to Draw the Line
The line between polish and deception has consequences. Cleaning dust, removing lint, straightening wrinkles, correcting white balance, and evening out lighting all reflect the product as it would appear in ideal viewing conditions — that is honest work. Changing the shape of a bag so it looks larger, adjusting gemstone size, misrepresenting fabric color, or slimming a model’s body crosses into deception. Amazon, Meta, and the FTC have all tightened enforcement in 2026, and platform strikes cost more than any conversion lift a fake edit could deliver. Keep the promise the picture makes; the return rate will thank you.
Common Product Photo Editing Mistakes to Avoid
Most catalog problems trace back to a short list of repeat offenders:
- Over-sharpening that leaves halos and “crunchy” edges.
- Oversaturated colors that misrepresent the physical product.
- Inconsistent backgrounds across SKUs — some off-white, some pure white.
- Missing shadows that leave cutouts floating unnaturally.
- Wrong color profile (Adobe RGB uploaded to a browser expecting sRGB), producing muted colors on the live site.
- Low-resolution primary images that fail Amazon’s 1,000 px zoom threshold.
- Watermarks or overlays on Amazon main images, which trigger auto-suppression within hours.
- Mismatched perspectives across what should be a matched set of angles.
- Uncompressed PNGs pushed to production, tanking mobile page speed.
A five-minute pre-publish QA — open the whole catalog as a grid and eyeball drift — catches roughly 90% of these before they hurt sales.
In-House vs. Outsourced Editing
Small catalogs (under 200 SKUs a month) usually edit in-house with Photoshop, Lightroom, and one AI helper. Mid-sized brands (1,000+ SKUs) hit a labor wall fast and outsource base editing to specialist studios while keeping hero shots internal. Enterprise catalogs (10,000+ SKUs) use hybrid pipelines: AI for cutouts, offshore teams for QA, in-house creatives for seasonal campaigns. The break-even sits roughly at $1.50–$3.00 per basic edit outsourced versus $6–$10 per hour of internal editor time — do the math on your own volumes. Whatever the split, a written style guide (aspect ratio, background hex, shadow type, sharpness, export preset) is what keeps the catalog visually one brand.
Frequently Asked Questions
What is the best software for e-commerce product photo editing in 2026?
Adobe Photoshop and Lightroom remain the industry standard for control and depth, while Photoroom, Claid.ai, and Canva handle bulk cutouts and AI-driven cleanup. Most professional teams combine both — Photoshop for hero and tricky shots, an AI tool for batch background removal and resizing.
Should I shoot on a white background or add one in post?
Shoot on a light grey or off-white sweep to preserve natural shadow detail, then push the background to pure white RGB (255, 255, 255) in post for Amazon and other white-background marketplaces. Shooting on pure white in-camera often blows out product edges and destroys shadow information you cannot recover.
What image format is best for product photos: JPEG, PNG, or WebP?
JPEG for standard product photos on marketplaces, PNG for transparent cutouts you will composite later, and WebP for your own site where load speed matters. WebP delivers roughly 25–35% smaller file sizes than JPEG at equivalent quality, which lifts Core Web Vitals scores directly.
How long should editing one product photo take?
A trained editor completes a basic cutout, color correction, shadow, and export in 2–5 minutes. Complex retouching — jewelry, ghost mannequin, model retouching — runs 15 to 60 minutes per image. AI-first workflows now cut basic edits to under 30 seconds.
Do I really need to edit in sRGB for the web?
Yes. Web browsers assume sRGB by default. If you upload an Adobe RGB or ProPhoto RGB image, browsers ignore the wider gamut and display muted, incorrect colors. Do all wide-gamut work internally, then Convert to Profile → sRGB IEC61966-2.1 as the final export step.
How many images should I post per product?
Amazon allows up to 9, but the sweet spot is 6–8: hero on white, three-quarter angles, back, close-up detail, lifestyle/in-use, size reference, and a size chart for apparel. More angles reduce return rates and boost time-on-listing.
Can AI fully replace human product photo editors yet?
Not for premium brands. AI handles background removal, denoise, upscaling, and rough color correction reliably in 2026, but subtle retouching, ghost mannequin composites, jewelry sparkle work, and campaign hero shots still need human judgment. The best studios use AI to remove drudgery and reserve human hours for the images that move revenue.
How do I keep my whole catalog visually consistent?
Build a written style guide: exact background color, aspect ratio, product-fill percentage, shadow direction and softness, sharpness settings, and export preset. Then batch-process with Photoshop Actions or Lightroom Presets, and QA the finished catalog as a grid before publishing.