How to Smooth Skin Naturally: Smooth the Tone, Keep the Texture
TL;DR: The Short Answer
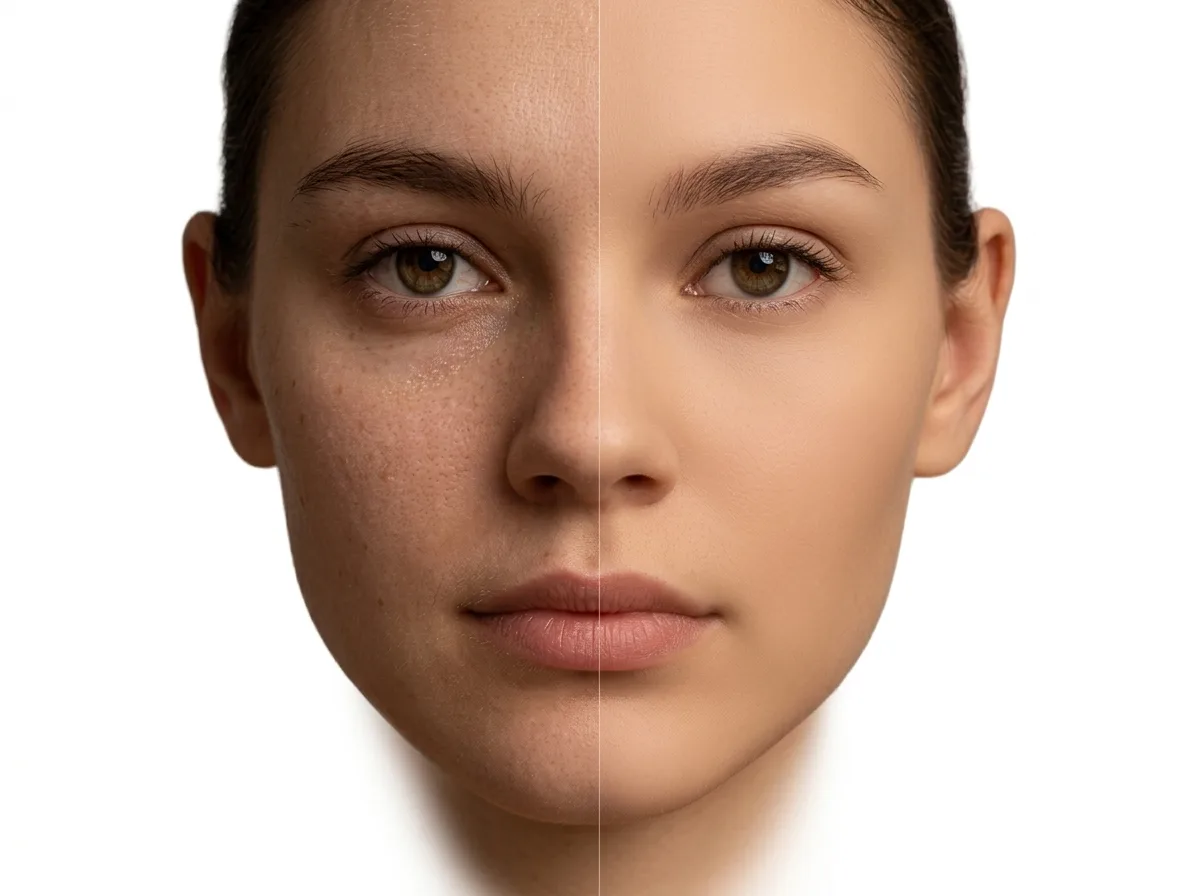
Natural skin smoothing has one golden rule: smooth the tone, preserve the texture. Pores, freckles, and fine lines are what make skin look human — erase them and you get a plastic doll. The pro method is frequency separation: split the image into a low-frequency layer (color and tone, which you smooth) and a high-frequency layer (texture and detail, which you leave alone). Setup: duplicate the layer twice; blur the low layer with Gaussian Blur 4–10px (pores disappear, face shape stays); on the high layer run Image > Apply Image — 8-bit: Layer=Low, Blending=Subtract, Scale=2, Offset=128; 16-bit: Add, Invert checked, Scale=2, Offset=0; set high layer blend mode to Linear Light. Then smooth blotchy tones on the low layer with Clone Stamp/Healing at low opacity, and fix texture artifacts on the high layer.
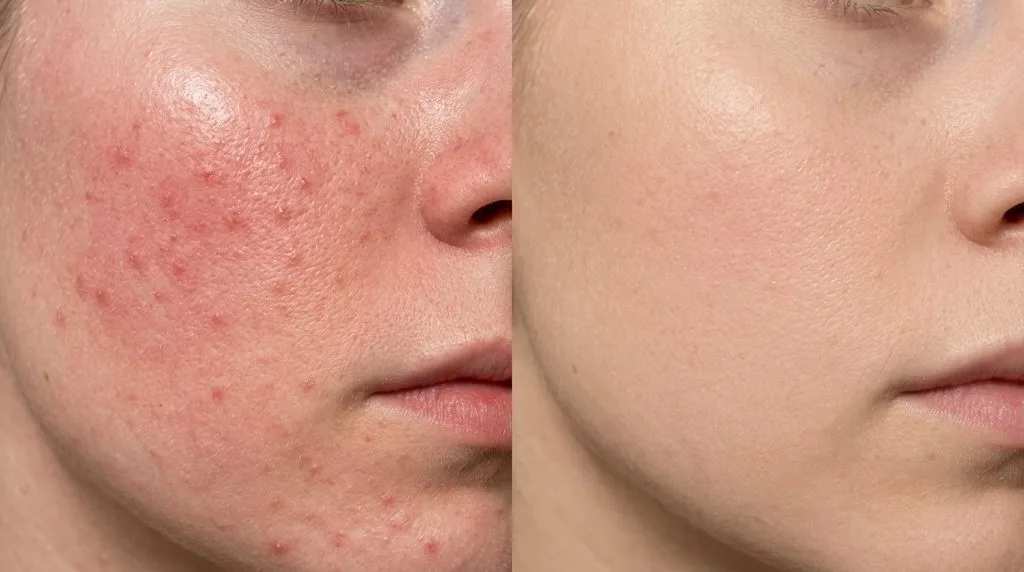
Before that, remove blemishes first with Spot Healing (one click per blemish) — keep freckles and moles (they’re identity). In Lightroom: Mask > People > Face Skin, Texture −20 to −35, Clarity −10 (beyond −40 = plastic). AI tools (Photoshop Neural Filters Skin Smoothing, Evoto, Retouch4me) work great at low opacity. Then dodge & burn to sculpt light, and sharpen eyes/lips/hair separately on masked layers. Less is more — zoom out and check; over-smoothing is visible at normal viewing size. Prevention: soft diffused light (window, shade, softbox) reduces the need for smoothing in the first place.
The Golden Rule: Smooth Tone, Preserve Texture
Amateur skin smoothing = global blur (Surface Blur, Gaussian Blur, or a one-click “smooth skin” filter at full strength). It blurs everything — pores, hair, eyes, lips — and produces the waxy “plastic skin” look. Professional retouching separates the two:
- Tone/color (low frequency): blotchiness, redness, uneven patches, under-eye circles — this is what you smooth.
- Texture/detail (high frequency): pores, fine lines, freckles, hair, eyelashes — this is what you keep.
Frequency separation is the technique that splits them, so you can edit one without touching the other. This guide to removing blemishes in Photoshop covers the cleanup step and this to portrait retouching covers the full workflow.
Step 1: Remove Blemishes First (Before Any Smoothing)
Always remove temporary blemishes before smoothing — if you smooth first, you blend the pimple into surrounding skin and it becomes harder to fix.
- Spot Healing Brush (J): Content-Aware checked, brush slightly larger than the blemish, one click. Works on 90% of pimples and spots.
- Healing Brush (J): Alt-click clean skin nearby, paint over the blemish — more control for spots near edges (jawline, hairline, nostrils).
- Clone Stamp (S): for stubborn spots, 30–50% opacity, soft brush, sample often.
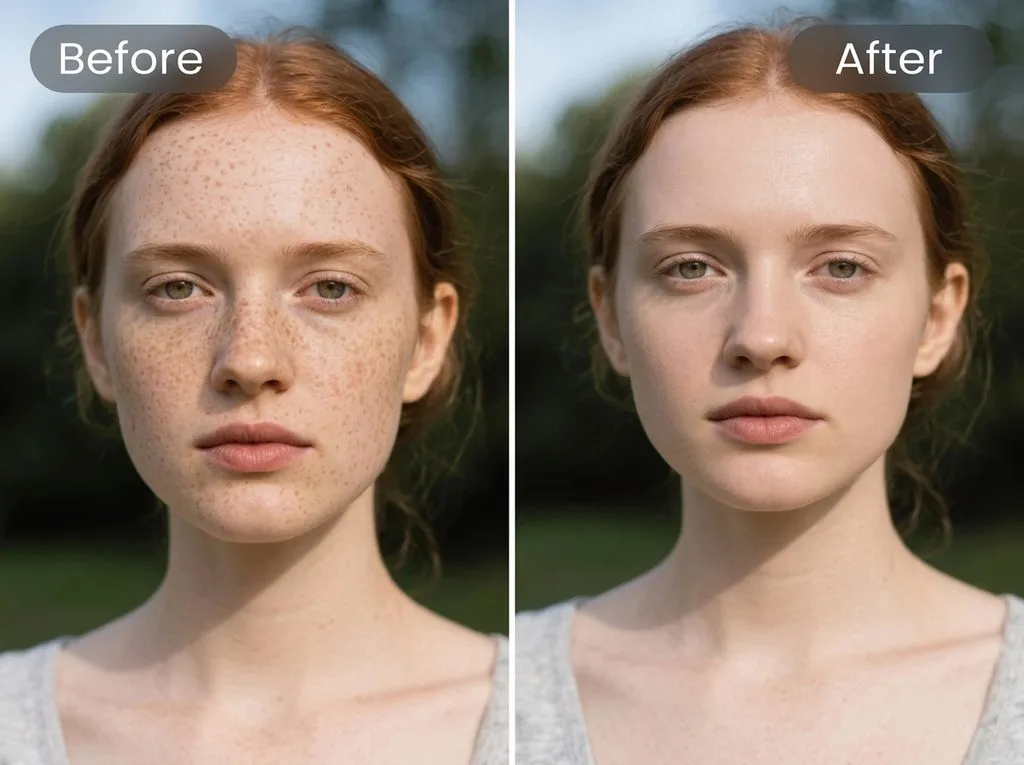
- What to remove: pimples, temporary redness, stray hairs, dust on sensor. What to keep: freckles, moles, beauty marks, scars, wrinkles (they’re identity and character). If the client wants them softened, use the Lightroom Fade slider or low-opacity healing — never erase entirely.
- Work on a new blank layer with Sample: Current & Below (non-destructive).
Step 2: Frequency Separation (The Pro Method, Exact Settings)
This is the gold standard. Exact steps:
- Duplicate your cleaned layer twice (Ctrl+J ×2). Name the bottom one “Low” (tone/color), the top one “High” (texture).
- Hide the High layer (click the eye). Select the Low layer. Filter > Blur > Gaussian Blur. Raise radius until pores just disappear but face shape is still recognizable — 4–10px on high-res files (higher resolution = higher radius). Older subjects with more texture = slightly higher.
- Show and select the High layer. Image > Apply Image. Settings:
- 8-bit file: Layer = Low, Blending = Subtract, Scale = 2, Offset = 128. Click OK. The high layer should look like flat gray with fine texture visible.
- 16-bit file: Layer = Low, Blending = Add, check Invert, Scale = 2, Offset = 0.
- Change the High layer blend mode to Linear Light. The image should look normal again (the two layers recombine to the original).
- Now edit:
- On the Low layer: smooth blotchy tones with Clone Stamp (10–30% opacity) or Healing Brush — you’re painting color/tone, no texture, so it blends perfectly. Fix under-eye circles, red patches, uneven jawline.
- On the High layer: fix texture artifacts (a pore that looks wrong, a stray fiber) with Clone Stamp — you’re painting texture only.
- Lower the High layer opacity slightly (90–95%) for a subtle softening if needed. Never go below 80% — that’s when skin turns plastic.
Step 3: Dodge & Burn (Sculpt the Light)
After smoothing tone, even out light and shadow — this is what makes retouched skin look dimensional, not flat.
- Create a new layer, fill with 50% gray (Edit > Fill > 50% Gray), blend mode Overlay or Soft Light.
- Dodge tool (O): Range = Midtones, Exposure = 5–10%. Paint over dark areas (under-eye shadows, jawline shadow) to lighten.
- Burn tool: same settings, paint over too-bright areas (forehead shine, nose highlight) to darken.
- Subtlety is everything. Toggle the layer visibility — if you can see a difference when it’s on/off, you’re probably doing it right. If the face looks sculpted and fake, reduce opacity.
- AI alternative: Evoto AI or Retouch4me Dodge & Burn plugin does this automatically — then reduce the layer opacity to 30–50%.
Step 4: Lightroom Quick Method (No Photoshop Needed)
For fast, natural smoothing without frequency separation:
- Mask > People > select person > Face Skin (and Body Skin if needed). Lightroom AI auto-masks skin, leaving eyes, lips, eyebrows, nostrils, and hair untouched.
- Texture: −20 to −35. This softens skin texture. Beyond −40 starts looking plastic.
- Clarity: −10 to −20. Reduces micro-contrast (harshness).
- Exposure: +0.10 to +0.20 (skin often benefits from a slight brighten).
- Dehaze: leave at 0 (positive dehaze adds texture — bad for skin).
- Lightroom Mobile AI Blemish Removal: tap to auto-remove, then Fade slider — left preserves freckles/moles, right softens them.
Step 5: AI Smoothing Tools (Fast, Use at Low Opacity)
2026 AI tools are good — but full strength still looks overdone. Use them at 30–60% opacity:
- Photoshop Neural Filters > Skin Smoothing: Smoothness + Blur sliders. Apply to a duplicated layer, lower opacity to 40–60%.
- Evoto AI: batch skin retouching (wedding/event), AI Dodge & Burn, complexion unification. Best for volume.
- Retouch4me plugins: Heal, Dodge & Burn, Skin Tone — precise sliders; professional result lives in the lower half of the slider range.
- Imagen AI: Heal + Dodge & Burn plugins inside Lightroom — mimics manual retouching, preserves pores.
- Portraiture (Imagenomic): classic automated smoothing, has texture-preservation controls.
- Mobile: Facetune, Snapseed (Selective + Portrait), Lightroom Mobile. Facetune’s “Smooth” at low intensity.
- Rule: apply AI smoothing on its own layer, then lower opacity until you can just barely tell it’s there. If you can see the smoothing, it’s too much.
Step 6: Sharpen Eyes, Lips, Hair (Masked — Never Skin)
Smoothing softens the whole image slightly. Put sharpness back where it belongs — and nowhere near skin:
- High Pass filter: duplicate layer, Filter > Other > High Pass (1–2px), blend mode Overlay, fill layer mask with black, paint white with a soft brush ONLY on eyes, eyebrows, eyelashes, lips, teeth, and hair strands.
- Or Lightroom: Mask > People > Eyes (Exposure +0.10, Clarity +10, Sharpening +20), Lips (Clarity +5), Hair (Texture +10).
- Never sharpen skin — it amplifies pores and makes smoothing look fake by contrast.
The Full Natural-Skin Workflow (Step by Step)
- White balance + color first (a color cast makes skin look worse than it is).
- Blemish removal — Spot Healing on a new layer, keep freckles/moles.
- Frequency separation — smooth tone on Low layer, fix texture on High layer.
- Dodge & burn — even light/shadow, sculpt cheekbones subtly.
- AI smoothing (optional) — on its own layer, 30–50% opacity.
- Sharpen eyes/lips/hair — masked, never skin.
- Final color grade — slight Vibrance boost, warm skin tones if needed.
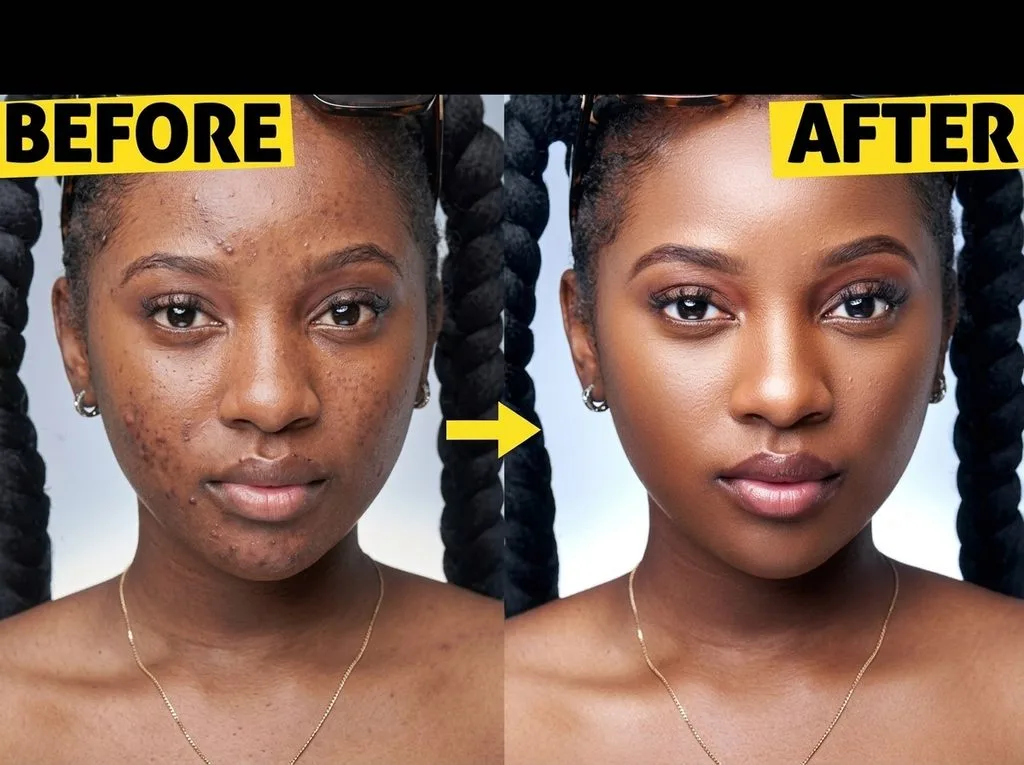
- Check: zoom to 100% (texture check), then zoom out to normal viewing size (over-smoothing check). Toggle all retouch layers on/off — the difference should be “better skin,” not “different person.”
5 Common Skin-Smoothing Mistakes
- Global blur. Surface Blur or Gaussian on the whole image blurs hair, eyes, and lips too. Always mask or use frequency separation.
- Erasing freckles and moles. They’re identity. Soften with low-opacity healing or the Fade slider, never remove entirely without client consent.
- Texture −40+ in Lightroom. Beyond −35 to −40, skin turns plastic. Stay in the −20 to −35 range.
- AI smoothing at full strength. Always apply on a duplicate layer and lower opacity to 30–60%. Full-strength AI = wax figure.
- Forgetting to sharpen eyes/lips. Smooth skin + soft eyes = flat, lifeless portrait. Eyes and lips need sharpness to draw the viewer.
Prevention: Light It Right and You’ll Retouch Half as Much
Soft, diffused light hides blemishes and uneven tone at capture. Window light (side-lit, not direct sun), open shade, a softbox, or an overcast day — all produce flattering light that needs minimal smoothing. Hard direct light (on-camera flash, midday sun) creates harsh shadows and highlights that amplify every skin flaw. Move your subject to shade, shoot near a window, or bounce the flash — and your retouching time drops by half.
Frequently Asked Questions
How do you smooth skin naturally in Photoshop?
Frequency separation: duplicate layer twice; blur the low layer (Gaussian Blur 4–10px, pores gone but face shape visible); on the high layer run Image > Apply Image (8-bit: Subtract, Scale 2, Offset 128; 16-bit: Add, Invert, Scale 2, Offset 0); set high layer to Linear Light blend mode. Smooth blotchy tone on the low layer (Clone Stamp 10–30% opacity), fix texture on the high layer. Remove blemishes first with Spot Healing. Keep pores — lower high-layer opacity to 90–95% max.
What is the best Lightroom setting for smooth skin?
Mask > People > Face Skin (auto-masks skin, leaves eyes/lips/hair). Texture −20 to −35, Clarity −10 to −20, Exposure +0.10 to +0.20. Beyond Texture −40 looks plastic. Use the AI Blemish Removal tool with the Fade slider: left preserves freckles/moles, right softens them.
How do I avoid plastic-looking skin?
Three rules: (1) never use global blur — use frequency separation or masked skin smoothing; (2) keep pores — high-frequency layer opacity 90%+, Lightroom Texture above −40; (3) apply AI smoothing on its own layer at 30–60% opacity, never full strength. Sharpen eyes/lips/hair separately so the face stays dimensional.
Should I remove freckles and moles?
No — they’re identity and character. Remove only temporary blemishes (pimples, redness). If the client wants freckles softened, use low-opacity healing or the Lightroom Fade slider (partial). Erasing all freckles changes the person’s appearance and looks unnatural.
What is dodge & burn in skin retouching?
Dodge & burn evens out light and shadow on skin after smoothing: a 50% gray layer in Overlay/Soft Light blend mode, Dodge tool (5–10% exposure) lightens dark patches (under-eyes, jaw shadow), Burn tool darkens shiny areas (forehead, nose). It sculpts dimension so skin doesn’t look flat. AI tools (Evoto, Retouch4me) automate it — then reduce layer opacity to 30–50%.
What AI skin-smoothing tools look natural in 2026?
Photoshop Neural Filters Skin Smoothing (on a duplicated layer, 40–60% opacity), Evoto AI (batch, wedding/event), Retouch4me (precise sliders, professional result in lower half of range), Imagen AI (Heal + Dodge&Burn inside Lightroom), Portraiture (Imagenomic, classic). Mobile: Facetune at low intensity. All preserve texture when used subtly.
Can I smooth skin on my phone?
Yes — Lightroom Mobile (Mask > People > Skin, Texture −20 to −35), Snapseed (Selective + Portrait blur), Facetune (Smooth at low intensity), Photoshop Express. Mobile tools are good for quick social-media posts; for print or professional work, desktop frequency separation gives more control and better texture preservation.
How can I reduce the need for skin smoothing at capture?
Soft diffused light: window light (side-lit), open shade, overcastcast day, or a softbox. Hard direct light (midday sun, on-camera flash) amplifies every skin flaw. Move subject to shade, shoot near a window, bounce flash off a white wall or ceiling. Good light = half the retouching time and more natural results.
Final Verdict
Natural skin smoothing = smooth the tone, keep the texture. Remove blemishes first (keep freckles/moles), then frequency separation to smooth blotchy color without touching pores, then dodge & burn for dimension, then AI smoothing at low opacity if you want it faster, and sharpen eyes/lips/hair on masked layers. In Lightroom: Face Skin mask, Texture −20 to −35 — never below −40. Less is always more: if you can see the smoothing, you’ve done too much. And prevent it next time: soft diffused light cuts retouching time in half. Get that balance right and the portrait looks like a better version of the person — not a different person.