How to Fix Motion Blur: Camera Shake vs Subject Motion — and Which One You Can Actually Fix
TL;DR: The Short Answer
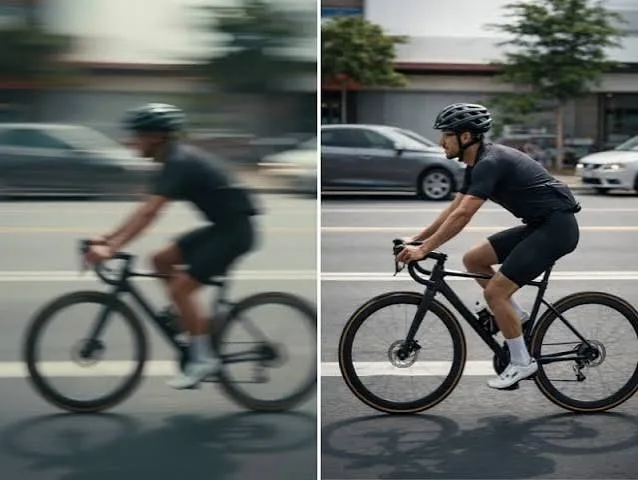
Motion blur happens when the shutter stays open too long and something moves — either your hands (camera shake, whole frame streaked) or the subject (subject motion, subject blurred while background is sharp). Mild-to-moderate blur is fixable in 2026. For camera shake: Photoshop Shake Reduction (Filter > Sharpen > Shake Reduction) auto-detects the blur trace, or Topaz Photo AI (best overall). For directional subject motion: Smart Sharpen > Remove: Motion Blur, set the Angle to match the blur direction, Amount 80–150%, Radius 1–5px. For faces: Remini (mobile) reconstructs facial detail best.
Honest caveat: severe blur — smeared across dozens of pixels — cannot be truly recovered; AI invents plausible detail, it doesn’t restore it. Text, logos, and fine patterns often get mis-rendered. Workflow: denoise first (sharpening amplifies noise), deblur/sharpen, mask out skin and skies, check at 100%. Prevention beats every fix: reciprocal shutter rule — 1/focal length (full frame), 2× for crop sensor or high-res bodies; image stabilization gives 2–4 stops; raise ISO (noise is better than blur), burst mode and pick the sharpest frame, continuous AF for moving subjects.
Identify the Blur Type First (The Master Diagnostic)
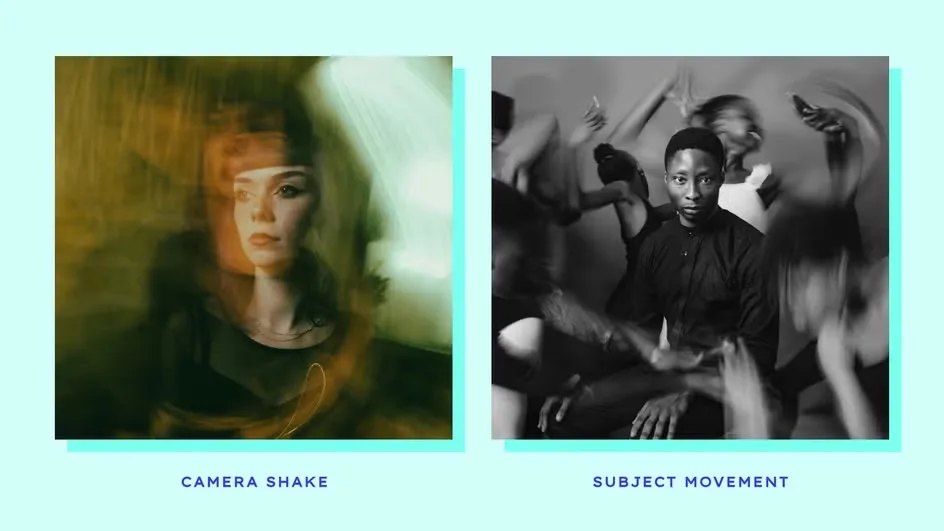
Not all blur is the same, and the wrong tool makes it worse. Three types:
| Blur type | What it looks like | Best fix | Recoverable? |
|---|---|---|---|
| Camera shake | Whole frame streaked/double-imaged; uniform direction | Shake Reduction, Topaz Photo AI | Mild-moderate: yes. Severe: partial |
| Subject motion | Subject streaked in one direction; background sharp | Smart Sharpen > Motion Blur (set angle), AI deblur | Short streaks: yes. Long streaks: partial |
| Out of focus | Soft, round, even discs; something else in frame is sharp | AI sharpen (limited); High Pass/USM mild | Mild: yes. Severe: no (detail never captured) |
| Panning (intentional) | Subject sharp, background motion-streaked | Leave it — it’s a creative effect | N/A |
A guide to best AI upscaler tools covers AI deblur+upscale combos; a guide to fixing grainy photos covers the denoise-first step; a guide to portrait retouching covers skin masking; a guide to photo editing for beginners covers the basic sharpen workflow.
Fix #1: Photoshop Shake Reduction (Best for Camera Shake)
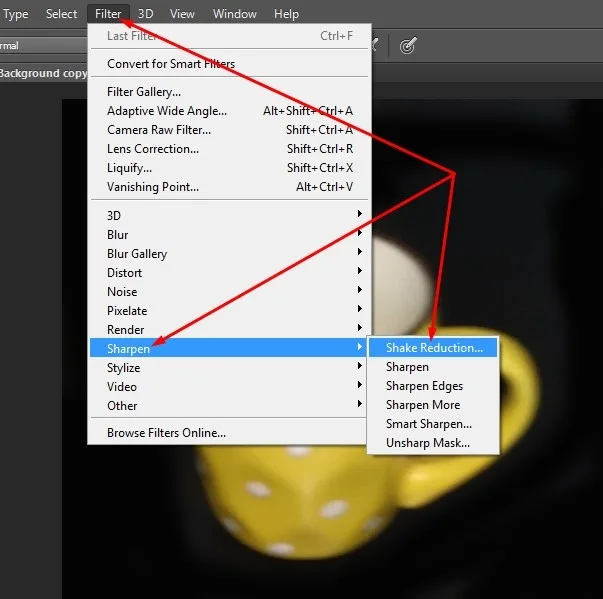
Shake Reduction is purpose-built for whole-frame camera shake. It analyzes the image, estimates a blur trace (a map of how the camera moved), and reverses it.
- Open the image. Duplicate the layer (Ctrl+J) — never edit the original. Convert to Smart Object for non-destructive filtering (right-click layer > Convert to Smart Object).
- Filter > Sharpen > Shake Reduction. Photoshop auto-analyzes (5–15 seconds).
- In Advanced settings: Blur Trace Bounds — increase if shake was large (10–50px), Artifact Suppression — increase if halos appear.
- Preview at 100%. If it over-sharpens, lower the effect via the Smart Filter opacity.
- Mask the result: apply sharpening to edges only, not skin or skies (they look grainy/plastic).
Shake Reduction works best when the blur is small and consistent (1–10 pixels of movement). For larger shake, it introduces halos and ghosting — switch to Topaz Photo AI.
Fix #2: Smart Sharpen Motion-Blur Removal (Best for Directional Streaks)
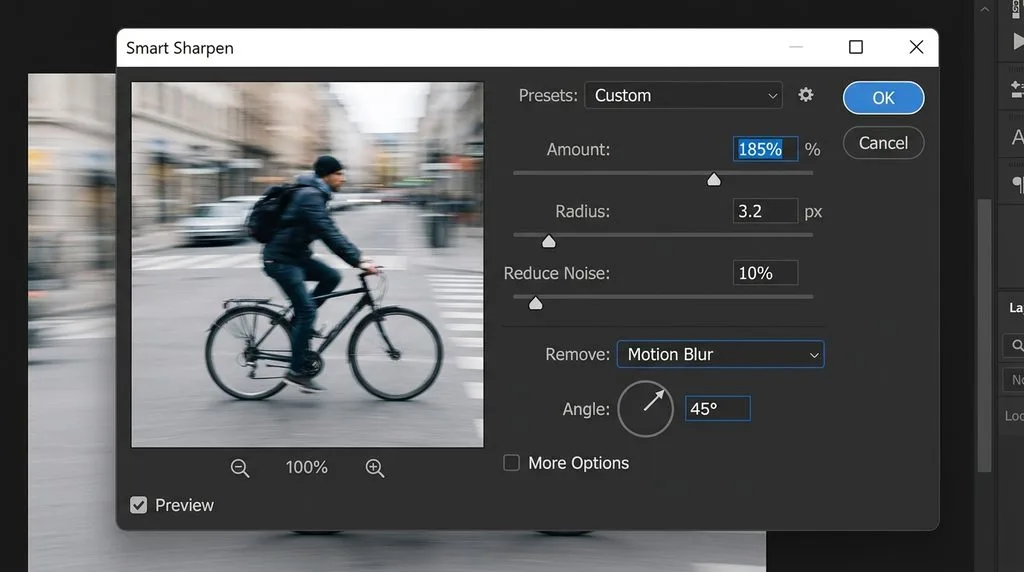
For subject motion — a runner, a car, a waving hand — the blur follows a clear direction. Smart Sharpen can reverse it:
- Duplicate layer. Filter > Sharpen > Smart Sharpen.
- Remove: Motion Blur (not Gaussian or Lens Blur).
- Angle: set to match the blur direction — look at a streaked edge; the angle should be parallel to the streak. Try 0°, 45°, 90° and watch which makes edges snap.
- Amount: 80–150%. Radius: 1–5px (match blur severity — bigger streak = bigger radius). Reduce Noise: 10–20%.
- Mask to the moving subject only — leave the sharp background alone.
This is the most underused motion-blur fix: most people reach for Unsharp Mask (Gaussian) which can’t reverse directional blur.
Fix #3: Topaz Photo AI / Remini (AI Reconstruction)
When Photoshop’s tools hit their limit, AI takes over:
- Topaz Photo AI (desktop, ~$199/yr or one-time): combines denoise + sharpen + upscale in one pass. Best for camera shake and general blur; handles faces, textures, architecture well. Autopilot detects blur type and applies the right model.
- Remini (mobile, ~$9/mo): best-in-class for faces — it reconstructs eyes, lips, skin texture from training data. Free tier limited; results can look “too perfect” (verify identity — AI can change a person’s features).
- VanceAI / Fotor / Hotpot (online): fast, free tiers, good for mild cases; less control.
- Photoshop Generative Upscale / Firefly (2026): upscales 2–4× with AI detail reconstruction, built into CC.
Honest limit: AI fills in what probably belongs there. For a face it’s usually right; for a street sign or a logo it will invent letters. Check text at 100% and re-type if needed.
Fix #4: Traditional Methods (Mild Blur, No AI)
For slight softness, traditional sharpening is enough:
- Unsharp Mask: Amount 50–150%, Radius 0.5–2px, Threshold 2–10. Judge at 100%.
- High Pass filter: duplicate layer, Filter > Other > High Pass (1–2px), blend mode Overlay/Soft Light, mask to edges.
- Lightroom Sharpening: Amount 40–70, Radius 0.8–1.2, Detail 20–40, Masking 60+ (hold Alt/Option while dragging Masking to see where sharpening applies).
- Clarity/Texture sliders (Lightroom): +10 to +25 adds local contrast that mimics sharpness without amplifying noise.
Prevention: The Reciprocal Shutter Rule (Better Than Any Fix)
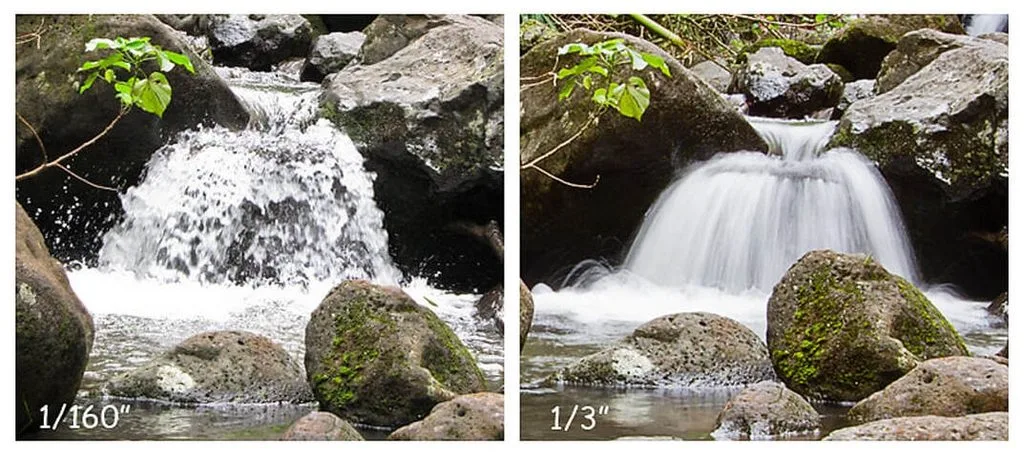
Rule: handheld shutter speed ≥ 1 ÷ focal length. At 50mm → 1/50s or faster. At 200mm → 1/200s or faster. At 24mm → 1/30s or faster.
Adjustments:
- Crop sensor (APS-C 1.5×, MFT 2×): multiply focal length by crop factor first — 50mm on APS-C = 75mm effective → 1/75s minimum.
- High-res bodies (40MP+): double the rule — 50mm → 1/100s. More pixels reveal more shake.
- Image stabilization (IS/VR/OS/VC): gives 2–4 stops of leeway — you can shoot 1/15s at 50mm with good IS. Turn IS OFF on a tripod (it hunts).
- Moving subjects: faster than the reciprocal rule. Walking: 1/250s. Running: 1/1000s. Sports: 1/2000s+. Use continuous AF (AF-C/AI Servo) and burst mode — pick the sharpest frame later.
- Low light: raise ISO. A noisy sharp photo is always better than a clean blurry one — AI denoise fixes noise, nothing fixes severe blur.
- Panning: for a moving subject, pan the camera with it (1/60–1/250s) — subject stays sharp, background blurs creatively.
5 Common Motion-Blur Fix Mistakes
- Sharpening before denoising. You sharpen the noise. Denoise first (Lightroom AI Denoise, Topaz DeNoise), then deblur/sharpen.
- Using Unsharp Mask on directional motion blur. USM is Gaussian — it can’t reverse streaks. Use Smart Sharpen > Motion Blur with the right angle.
- Applying sharpening to the whole image. Skin and skies turn plastic/grainy. Mask sharpening to edges and subjects only.
- Expecting AI to fix severe blur. If a face is smeared across 20+ pixels, AI will invent a plausible face — it may not look like the person. Verify identity.
- Shooting too slow and hoping to fix it later. The reciprocal rule costs nothing; post-fixing costs time and quality. Prevention always wins.
Frequently Asked Questions
Can you fix motion blur in a photo?
Mild-to-moderate motion blur, yes. For camera shake: Photoshop Shake Reduction or Topaz Photo AI. For directional subject motion: Smart Sharpen > Remove: Motion Blur, set the angle to match the streak. For faces: Remini. Severe blur (smeared across dozens of pixels) cannot be truly recovered — AI invents plausible detail but cannot restore what was never captured.
What is the difference between motion blur and camera shake?
Camera shake: the whole frame is streaked or double-imaged because your hands moved — caused by shutter speed too slow for handholding. Subject motion: only the moving subject is streaked (background sharp) — caused by shutter speed too slow to freeze the subject. Both look like directional streaks; out-of-focus blur is soft, round, and even (no direction).
How do you fix motion blur in Photoshop?
Duplicate the layer, then: for camera shake — Filter > Sharpen > Shake Reduction (auto-analyzes blur trace; adjust Blur Trace Bounds and Artifact Suppression). For directional subject motion — Filter > Sharpen > Smart Sharpen > Remove: Motion Blur, set Angle parallel to the streak, Amount 80–150%, Radius 1–5px, Reduce Noise 10–20%. Mask sharpening to edges/subjects only.
What is the best shutter speed to avoid motion blur?
Handheld: at least 1 ÷ focal length (full frame) — 50mm → 1/50s, 200mm → 1/200s. Double it for crop sensors or high-res (40MP+) bodies. Moving subjects: walking 1/250s, running 1/1000s, sports 1/2000s+. Image stabilization gives 2–4 stops of leeway. In low light, raise ISO — a noisy sharp photo beats a clean blurry one.
Does image stabilization prevent motion blur?
It prevents camera shake (your hands moving) — modern IS/VR/OS/VC gives 2–4 stops, letting you shoot handheld at 1/15s instead of 1/125s. It does NOT prevent subject motion (a running person still blurs). Turn IS OFF when on a tripod — it can hunt and introduce micro-blur.
Can AI fix a very blurry face?
Remini (mobile) and Topaz Photo AI do a remarkable job on mildly-to-moderately blurry faces — they reconstruct eyes, lips, and skin texture from training data. But it’s reconstruction, not recovery: the AI invents plausible facial detail, and the result may subtly change a person’s features. Verify identity before using commercially. Severely blurred faces (unrecognizable) cannot be reliably restored.
Should I denoise before or after fixing motion blur?
Always denoise first. Sharpening and deblur amplify noise — if you sharpen a noisy image, the noise becomes crisp and ugly. Run AI denoise (Lightroom AI Denoise, Topaz DeNoise) first, then deblur/sharpen, then mask the sharpening away from skin and skies.
What is panning and does it cause motion blur?
Panning is intentional: you move the camera with a moving subject (1/60–1/250s) so the subject stays sharp while the background streaks — a creative effect. It’s not a flaw. If your subject is also blurry in a panning shot, your pan speed didn’t match the subject, or your shutter was too slow — speed up to 1/250s+ and practice smoother panning.
Final Verdict
Identify the blur type first, then pick the tool: camera shake → Shake Reduction/Topaz; directional subject motion → Smart Sharpen Motion Blur with the right angle; faces → Remini; mild softness → Unsharp Mask/High Pass. Denoise first, sharpen last, mask to edges, check at 100%. Severe blur is beyond any tool — AI invents detail, it doesn’t recover it. And the best fix is prevention: follow the reciprocal shutter rule, use burst mode and continuous AF, raise ISO rather than shoot too slow. A slightly noisy sharp photo is always salvageable; a blurry one rarely is.