Foreground, Middleground, Background: The Three Layers That Make Photos Feel Alive (2026 Guide)
Here’s the Short Version
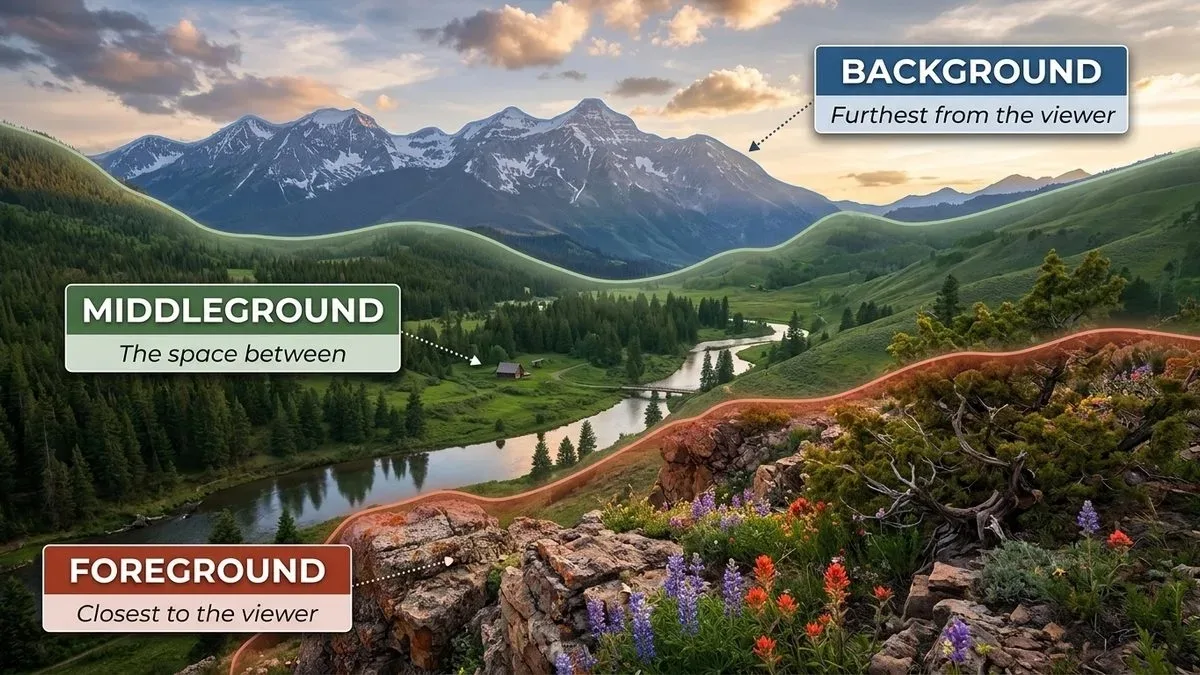
Every photo has layers — even if you never noticed them. The foreground is whatever sits closest to your camera, the middleground is where your main subject usually lives, and the background is everything behind it. When all three are working together, a photo feels deep and three-dimensional. When one is missing — usually the foreground — the photo feels flat, like you’re looking at a poster instead of a window into a real place.
You don’t need all three in every shot. Portraits often skip the middleground. Minimalist landscapes live on just foreground and sky. But if you’ve ever looked at your own photos and thought “this just doesn’t have that wow factor,” nine times out of ten the problem is an empty, wasted foreground. This guide walks through each layer, how they work together, the camera settings that control them, and the mistakes that quietly ruin otherwise good shots.
Why Your Brain Cares About These Layers
Here’s something wild: your brain decides what it’s looking at in about 13 milliseconds. That’s faster than you can blink. In that split second, it performs something psychologists call figure-ground segregation — it instantly sorts the scene into “the thing I’m looking at” and “the stuff behind it.” A good foreground vs background breakdown explains this better than I can, but the short version is: your eyes crave depth. Give them layers to travel through, and they’ll stay longer. Give them a flat wall of sameness, and they’ll move on.
This is why a photo of a mountain taken from the parking lot looks like a postcard, but the same mountain shot with wildflowers in the foreground and a winding path between you and it looks like somewhere you want to be. The mountain hasn’t changed. Your relationship to it has.
The Three Layers, One by One
Think of a stage play. You’ve got downstage (closest to the audience), center stage (where the action happens), and upstage (the backdrop). Photography works the same way. Let’s break each one down.
| Layer | Where It Is | Its Job | Common Elements |
|---|---|---|---|
| Foreground | Closest to the camera | Pull the viewer in, give scale, add texture | Rocks, flowers, paths, water, doorways, branches |
| Middleground | Between foreground and background | Hold the main subject, tell the story | People, buildings, animals, the “hero” of the shot |
| Background | Farthest from the camera | Set the scene, add context, create mood | Sky, mountains, city skylines, distant trees |
The Foreground: Your Welcome Mat
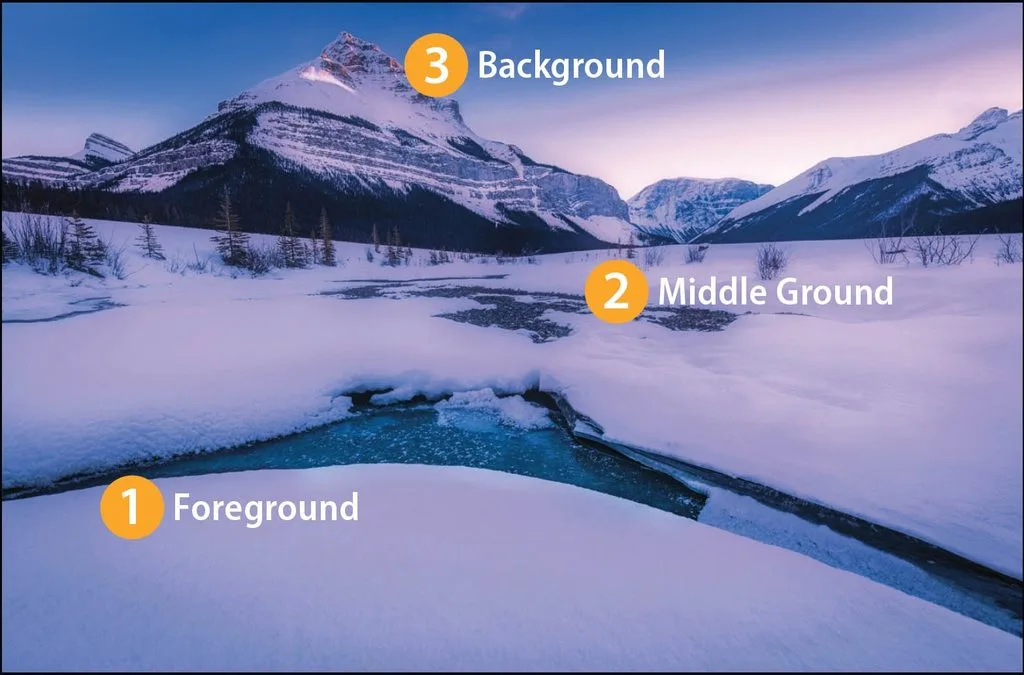
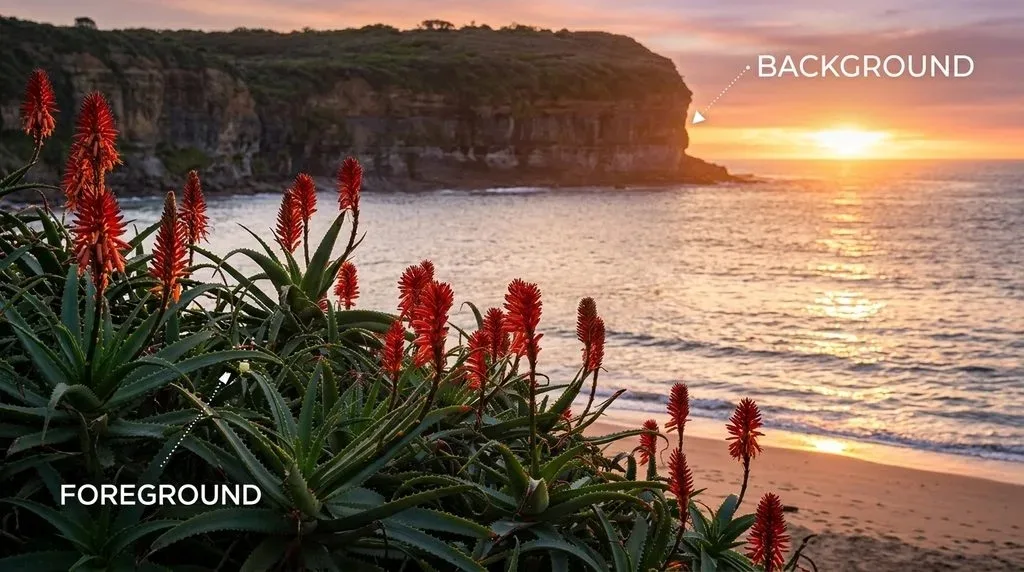
The foreground is the first thing a viewer’s eye lands on. It’s your chance to say “come on in.” A strong foreground does three jobs at once: it adds depth, it gives a sense of scale (that tiny mountain looks huge because the flower in front of it is right there), and it adds texture that makes the photo feel tactile.
The best foregrounds are often the ones you almost step over. Rocks on a shoreline. Wildflowers along a trail. A weathered wooden boardwalk. Driftwood half-buried in sand. The trick is to get low — really low. When you drop the camera down to ankle height, those ordinary ground elements suddenly fill the bottom third of your frame and become the entry point you were missing.
The Middleground: Where the Story Lives
This is where your subject sits. A hiker on a ridge. A barn in a field. A couple standing on a bridge. The middleground is the reason you took the photo in the first place. Its job is to be clear and uncluttered — the foreground leads to it, the background supports it, but neither should compete with it.
A common mistake here is letting the middleground get swallowed by the other two layers. If your foreground is busy and your background is busy, the subject in the middle gets lost. That’s when you change your angle, wait for better light, or use a wider aperture to blur one of the competing layers.
The Background: The Mood Machine
The background sets the emotional temperature. A stormy sky behind a subject feels dramatic. A clean white wall feels calm and editorial. A hazy distant mountain range feels vast and quiet. The background is where you have the least control — you can’t move a mountain — but you have the most control over how much of it shows. Step left or right, change your height, zoom in or out, and that background changes completely. A solid layered composition guide will tell you the same thing: the background is never just “what’s back there.” It’s a deliberate choice.
Five Ways to Make the Layers Work Together
Knowing the layers exists is one thing. Making them sing is another. These five composition techniques are how pros actually put the three layers to work.
1. Leading Lines: The Freeway Into Your Photo
A leading line is anything in the foreground that points toward your subject in the middleground. A winding road. A river. A fence line. Railroad tracks. A shadow. The line starts close to you and carries the viewer’s eye straight to what matters. It’s the single most effective way to tie all three layers together, and it’s why so many iconic landscape photos have a path or a shoreline in the bottom third.
2. Framing (Frame Within a Frame)
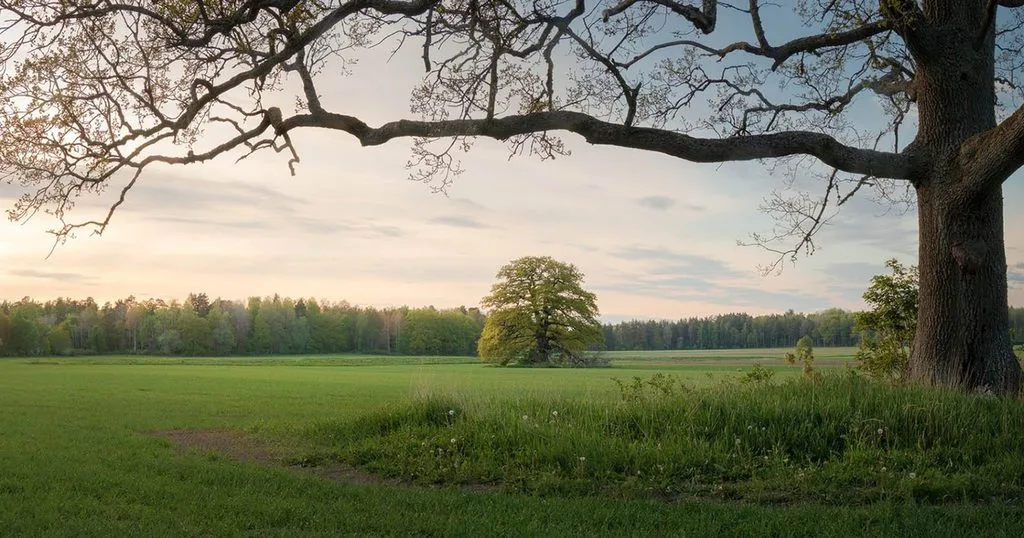
Foreground elements can act as a natural picture frame around your middleground subject. An archway. Overhanging tree branches. A window. A doorway. Two rocks with a gap between them. The frame darkens the edges of the photo and pushes the eye inward toward the subject. It also adds depth — you can feel that you’re standing behind something, looking through it. This is a favorite trick of street and travel photographers, and a good foreground depth tutorial will show you dozens of examples.
3. Rule of Thirds: Don’t Split the Frame in Half
The rule of thirds is basically a reminder not to put the horizon line dead center. If you put the horizon in the middle, your foreground and background get equal weight and the photo feels static. Drop the horizon to the bottom third and you give the sky room to breathe. Push it to the top third and you let the foreground dominate. Either way, you’re making a decision about which layer matters most. A flat, even split between layers is almost never the most interesting choice.
4. Negative Space: Let One Layer Breathe
You don’t have to fill every layer with stuff. Sometimes the most powerful photo has a rich, detailed foreground and a vast, empty sky behind it. Or a tiny subject in the middleground surrounded by huge negative space. Negative space amplifies whatever is in the other layers. A person standing alone in a huge desert feels small and contemplative — put that same person in a cluttered scene and the feeling vanishes.
5. Symmetry and Reflections: Mirror the Layers
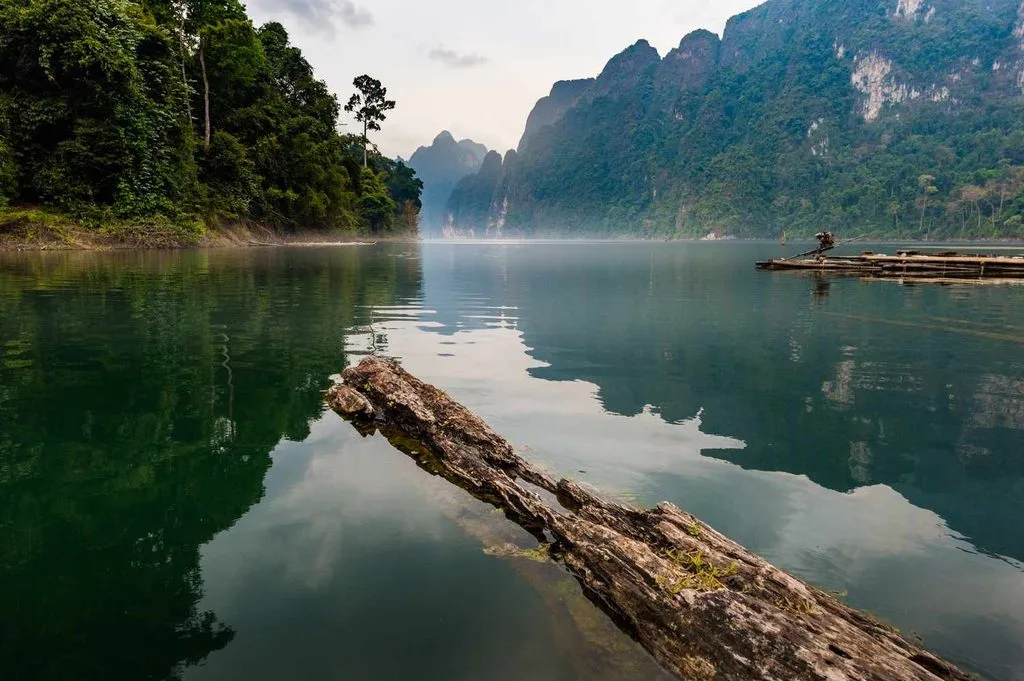
When a foreground reflection mirrors the background — a mountain reflected in a still lake, a building reflected in wet pavement — the layers lock together into one cohesive image. The foreground stops being “the stuff at the bottom” and becomes part of the subject. Reflections are the easiest way to make an ordinary scene feel intentional and designed.
Camera Settings That Control the Layers
Composition is half the battle. The other half is knowing which settings make the layers do what you want.
Aperture is your main lever. Shoot at f/16 or f/22 and everything from the flower at your feet to the mountain on the horizon is sharp. That’s the landscape photographer’s default — you want all three layers crisp so the eye can travel through them. Shoot at f/2.8 or wider and you blur the foreground and background, leaving only the middleground tack-sharp. That’s the portrait photographer’s default — blur away the distractions and let the subject pop.
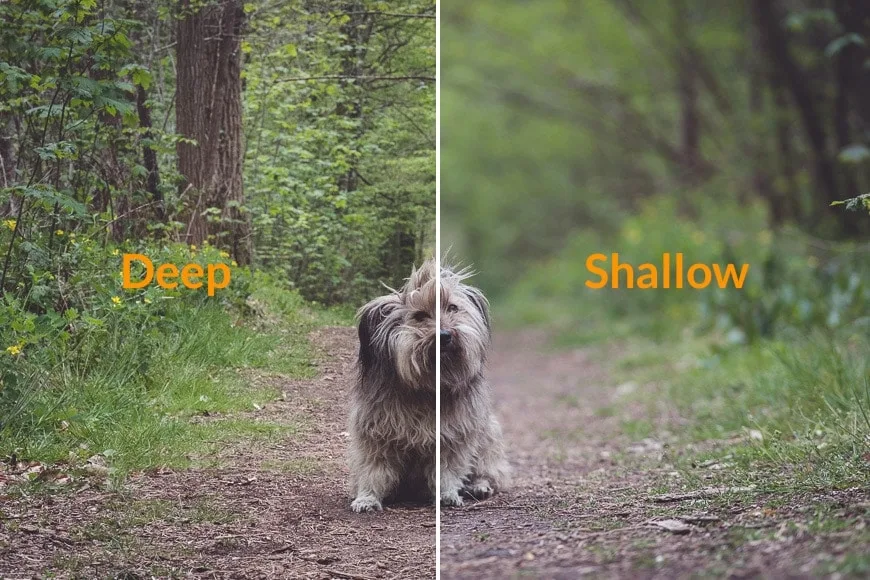
If you want both foreground and background sharp, you need to understand hyperfocal distance — the exact focus distance that maximizes how much of the scene is acceptably sharp. There are apps and charts for it, but the rule of thumb is: with a wide-angle lens at f/11, focus about a third of the way into the scene and you’ll usually get everything from near to far in focus. A solid foreground photography tips guide will walk you through the math, but honestly, chimping your LCD and zooming in to check the corners will teach you faster.
Focal length matters too. A wide-angle lens (16–35mm) exaggerates the foreground — objects close to the lens look huge, which makes depth feel dramatic. That’s why landscape shooters love them. A telephoto lens compresses the layers, making foreground and background feel closer together, which is great for isolating a subject but bad for showing depth. Pick your lens based on which relationship between layers you want.
Layered Composition by Genre
The three layers behave differently depending on what you shoot. Here’s how to think about them in each genre.
- Landscape: All three layers, all the time. Foreground interest is non-negotiable. Get low, find something interesting at your feet, and let a leading line carry the eye to the middleground subject. Use f/11–f/16 and hyperfocal focus to keep everything sharp.
- Portrait: Usually two layers — subject in middleground, blurred background. The foreground is optional but powerful: shoot through flowers, a fence, or a window frame and you add depth and intimacy. If you’ve ever wondered why you look worse in photos than in the mirror, a cluttered or unflattering background layer is often part of the problem.
- Street photography: Layers are everything. A street photo with a foreground subject, a middleground action, and a background sign that comments on it all — that’s the holy grail. Street shooters hunt for scenes where all three layers tell one joke or one story.
- Wildlife: Foreground is often grass or foliage slightly out of focus, which creates a “you are there, hiding in the bushes” feeling. The animal is the middleground. The habitat in the background tells you where it lives.
- Product and ecommerce: Usually just two layers — product in the foreground (sharp, perfect) and a clean white or softly blurred background. No middleground. The goal is zero distraction, which is why layered composition gets thrown out the window here. If you’re shooting with a compact camera with viewfinder, you’ll find it much easier to nail precise framing and focus stacking for product work.
- Architecture: Leading lines from the foreground (steps, a path, converging walls) pull you into the building in the middleground, with sky as background. Symmetry and reflections both work beautifully here.
Five Mistakes That Quietly Ruin Your Photos
Every beginner makes these. Learn them now and skip the frustration.
- The empty foreground. You found a beautiful subject, stood up straight, pointed the camera at it, and clicked. The bottom third of the frame is just… nothing. Fix: take three steps forward, get low, and find something to fill that space.
- The busy background. A gorgeous portrait with a trash can and a parking sign behind the subject. Fix: move two feet to the left. The background changes completely; the subject doesn’t. This is the single fastest fix in photography.
- The even split. Horizon dead center, foreground and background equal weight. The photo feels boring and static. Fix: push the horizon up or down a third.
- Focusing on the wrong layer. You wanted everything sharp but you focused on the background, so the foreground flowers are soft. Or you wanted a blurry background but shot at f/11. Fix: check your aperture and focus point before every shot.
- The foreground that fights the subject. A bright, colorful flower in the foreground pulls the eye away from the subject behind it. A foreground should lead to the subject, not compete with it. Fix: if it’s too loud, change your angle so it’s smaller, darker, or slightly out of focus.
Enhancing the Three Layers in Editing
You can do a lot in camera, but editing is where you really make the layers pop. In Lightroom or Camera Raw, use a gradient filter to darken the sky (background) and a radial filter to brighten the subject (middleground). Add a touch of clarity or dehaze to the foreground to make texture feel more tangible. A subtle vignette darkens the edges and pushes the eye toward the center. Dodge and burn in Photoshop lets you paint light exactly where you want it. The goal isn’t to change the photo — it’s to guide the viewer’s eye through the layers in the order you want them seen. If you’re working with high-res files from a top high-resolution camera, you’ll have plenty of pixel data to push these edits without the image falling apart.
When You Don’t Need All Three Layers
Here’s the secret nobody tells you: you don’t always need all three. Some of the most powerful photos ever made use just two. A minimalist landscape with foreground rocks and a huge sky — no middleground at all. A tight portrait with the subject filling the frame and nothing but blurred color behind them. A macro shot where the flower is both foreground and subject and the background is just soft bokeh. The rule isn’t “use three layers.” The rule is “use as many layers as the story needs, and make each one earn its place.” A good three-layer composition reference will tell you the same thing: layers are a tool, not a law.
Frequently Asked Questions
What is the foreground in a photo?
The foreground is the part of the image closest to the camera. It usually sits in the bottom third of the frame and acts as the viewer’s entry point into the scene. Strong foreground elements — rocks, flowers, paths, water — add depth and scale.
What is the difference between foreground, middleground, and background?
The foreground is closest to the camera and pulls the viewer in. The middleground is between the two and usually holds the main subject. The background is farthest away and provides context and mood. Together they create the illusion of three-dimensional depth in a flat photograph.
Do you always need all three layers?
No. Portraits often use just subject (middleground) and blurred background. Minimalist landscapes sometimes use only foreground and sky. The goal is to make each layer earn its place — if a layer doesn’t add anything, it’s fine to leave it out.
How do you make the foreground interesting?
Get low. Drop the camera to ankle height so ground-level elements — rocks, flowers, grass, water — fill the bottom of the frame. Look for leading lines, textures, and natural frames. Move around until something in the foreground points toward your subject.
What aperture keeps foreground and background both sharp?
For landscape work, f/11 to f/16 is the sweet spot. Focus about a third of the way into the scene (hyperfocal distance) and you’ll usually get everything from the near foreground to the distant background acceptably sharp. Avoid f/22 if you can — diffraction softens the image.
How do you blur the background in a photo?
Use a wide aperture (f/1.8 to f/4), get closer to your subject, and use a longer focal length. The farther the background is from the subject, the more it blurs. This isolates the middleground subject and makes it pop.
Why do my photos look flat?
Flat photos almost always have an empty or uninteresting foreground, or a background that competes with the subject. Add a foreground element, use leading lines to connect the layers, and make sure the background supports the subject rather than fighting it.
What is figure-ground perception?
It’s the brain’s automatic ability to separate a subject (the “figure”) from its surroundings (the “ground”). It happens in about 13 milliseconds. Photographers use foreground, middleground, and background to make that separation clear and intentional.
One Last Thought
The next time you’re out shooting and the scene feels like it’s missing something, don’t look up at the subject — look down at your feet. The difference between a snapshot and a photo that pulls people in is often right there, waiting to be included in the foreground. Get low, find a line that leads somewhere, and let the layers do the work.