Remove a Color From an Image in Photoshop: Step-by-Step
Introduction — Why Removing a Color in Photoshop Trips Up So Many Users
Every Photoshop user hits the same wall eventually. You open a photo, and one stubborn color is derailing the whole composition — a lime-green backdrop from a rushed studio shoot, a red hoodie you wish were charcoal, or a “white” background that clings to hair strands like static. The obvious move is to reach for the Eraser, drag across the pixels, and hope for the best. That approach almost always ends in jagged silhouettes, ghost halos, or a file so damaged it can’t be rescued.
The good news is that Photoshop hides a compact toolkit built specifically for surgical color removal. Most beginners never discover it because tutorials keep pushing the same one-click gimmick. This guide fixes that. Below, seven battle-tested methods are ranked by scenario so you can match the right tool to solid backgrounds, gradients, tricky hair edges, or CMYK print conflicts. Every walkthrough uses active steps, keyboard shortcuts, and non-destructive habits so your originals stay editable months from now.
One theme threads through everything: precise selection plus non-destructive masking equals clean color removal. Once that principle clicks, the seven methods below stop feeling like separate techniques and start feeling like variations on a single idea. If softness, noise, or over-editing also creeps into your workflow, our companion tutorial on grainy photos pairs neatly with the color-removal techniques you’re about to learn.
What Does “Remove a Color in Photoshop” Actually Mean?
Before diving into methods, it’s worth defining the phrase, because “remove a color” can mean three very different things depending on the goal. Understanding the distinction saves hours of frustration.
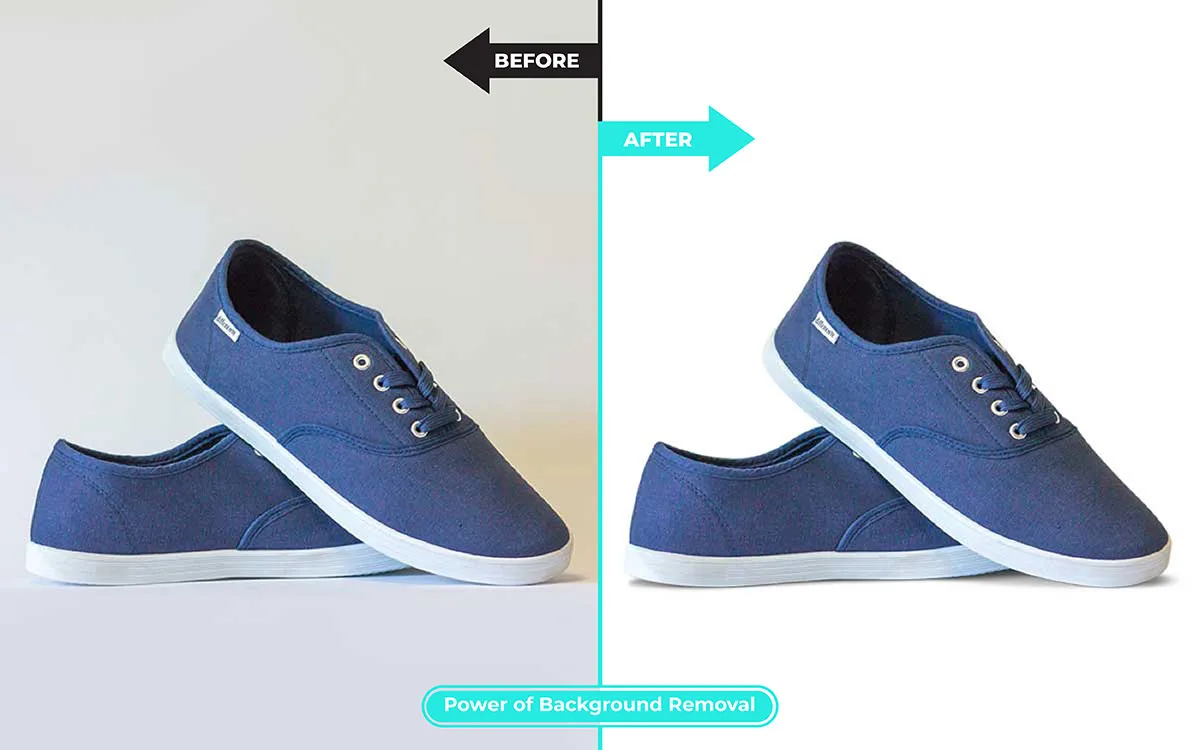
- Delete the color entirely — replace it with transparency so you can drop the subject onto a new background. This is what most e-commerce and design work needs.
- Neutralize the color — desaturate a hue into gray without removing pixels, useful for portraits with reflected color casts or overly saturated skin tones.
- Swap the color — replace it with a different hue while keeping the underlying pixels intact, common in product mockups and clothing recolors.
The techniques below cover all three interpretations. Read the “Which Method Should You Choose?” section next to figure out which one your image needs.
TL;DR — The Fastest Way to Remove a Color in Photoshop
If you landed here from a search and just need the direct answer, here it is. The rest of the article explains why this works and when to reach for something smarter.
- Open your image and duplicate the background layer with Ctrl/Cmd + J.
- Go to Select > Color Range.
- Click the color you want to remove with the eyedropper.
- Drag the Fuzziness slider between 20 and 80 until the preview shows only that color highlighted in white.
- Click OK, then click the Add Layer Mask icon at the bottom of the Layers panel.
- Save as PNG-24 to preserve transparency.
This six-step routine handles roughly 80% of real-world jobs. The remaining 20% — semi-transparent hair, gradient shadows, glass, mixed lighting, and bulk product shots — is where the alternate methods below earn their keep.
Which Method Should You Choose? A Quick Decision Framework
Ninety percent of bad color removals happen because someone reached for the Magic Wand when the image needed Blend If, or leaned on Channels when a two-click Color Range would have solved the problem. Before touching a single slider, match your image to the table below.
| Your Situation | Best Method | Why It Wins |
|---|---|---|
| Solid white or single-color background | Magic Wand or Remove Background | One click, minimal cleanup |
| Gradient sky or soft-lit backdrop | Blend If sliders | Preserves smooth transitions |
| Removing one color across an entire image | Color Range | Non-contiguous, hue-based sampling |
| Making a color vanish without deleting pixels | Hue/Saturation adjustment layer | Fully non-destructive |
| Hair, fur, glass, translucent edges | Channels + Select and Mask | Preserves anti-aliasing pixel-for-pixel |
| Total beginner needing one dialog | Replace Color | Selection and adjustment combined |
| Batch product shots (dozens of files) | Color Range + saved preset + Action | Repeatable at scale |
Keep this chart open in a second tab. It cuts every future color-removal decision down to about ten seconds.
Method 1 — Color Range: The Workhorse of Professional Color Removal
What Makes Color Range Different From the Magic Wand
Color Range is the tool that separates hobbyists from working retouchers. Where the Magic Wand only grabs connected pixels of similar color, Color Range samples the entire image based on hue, saturation, and luminance similarity, no matter where those pixels sit. Adobe engineered the command specifically for selection work, and the dialog exposes a Fuzziness slider plus a Localized Color Clusters checkbox that together give you pixel-level control. Adobe’s own Color Range documentation also lists lesser-known modes like Skin Tones, Out of Gamut, and preset color selectors — worth exploring once you outgrow the basics.
Step-by-Step Walkthrough
Follow this sequence and Color Range will handle almost any single-color removal job you throw at it.
- Duplicate your background layer with Ctrl/Cmd + J so the original stays untouched.
- Navigate to Select > Color Range from the top menu.
- With the default eyedropper, click the exact color you want to remove.
- Hold Shift and click again to add similar shades; hold Alt/Option and click to subtract colors you caught by accident.
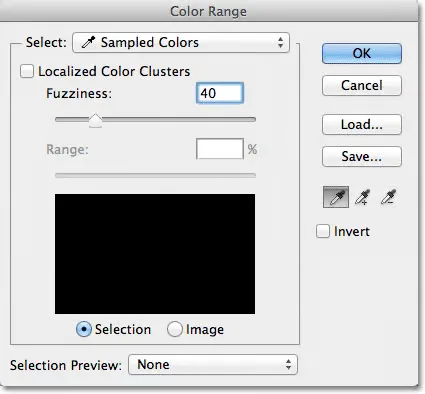
- Drag the Fuzziness slider — values from 20 to 40 stay conservative, while 60 to 100 grab wider tonal variation. The Photoshop Essentials Color Range guide explains that a Fuzziness of 40 selects every pixel within 40 brightness levels lighter or darker than your sample point.
- Check Localized Color Clusters when your target color appears in multiple regions, then use the Range slider to limit the selection to areas physically close to where you clicked.
- Toggle the Selection Preview dropdown to “Black Matte” or “White Matte” to see exactly what will be removed.
- Click OK to load the selection, then click the Add Layer Mask icon at the bottom of the Layers panel. This hides the color without destroying a single pixel.
Pro Tips That Elevate Color Range
Three habits will noticeably improve your results once you’re comfortable with the basics. First, tap Ctrl/Cmd while hovering over the preview to switch between the selection map and the actual image — invaluable when you’re refining fuzziness. Second, hit the Save button inside the dialog to store your settings; loading that preset later saves five to ten minutes per file when you’re processing brand-consistent product shots. Third, always follow Color Range with a trip through Select > Select and Mask so hair, fur, and translucent edges get the feathering they deserve rather than a hard cutoff.
When NOT to Use Color Range
Color Range struggles with two scenarios. It over-selects when your subject shares color with the background (a white shirt against a white wall), and it under-selects on soft gradients where the target hue fades gradually into another tone. For those cases, jump straight to Method 5 (Blend If) or Method 6 (Channels).
Method 2 — Magic Wand Tool: Fastest Path for Flat Backgrounds
The Magic Wand has shipped with Photoshop since version 1.0, and it still holds its ground when your image has flat, uniform color zones. Product shots against seamless white paper, cartoon-style illustrations, and logos on solid backdrops all fall to the wand in under ten seconds.
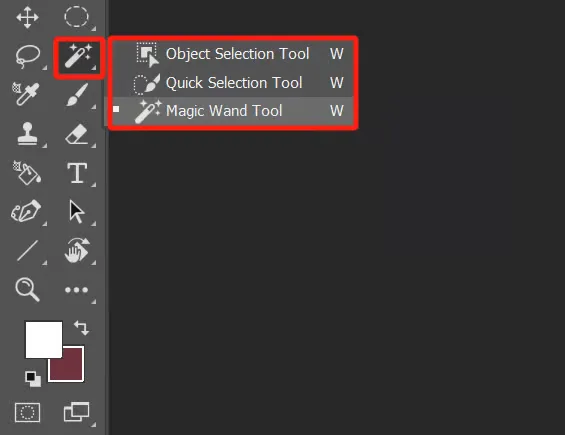
Grab it by pressing W (or Shift + W to cycle from Quick Selection), then dial in the options bar at the top of the screen. Set Tolerance to 20 or 30 for clean, solid backgrounds and raise it to 50 or higher for gradient-tinged whites. Uncheck Contiguous when the color appears in disconnected patches, and keep Anti-alias enabled so edges stay smooth. Click the color, Shift-click to add more regions, and either press Delete on a rasterized layer or click Add Layer Mask followed by Ctrl/Cmd + I to invert the mask non-destructively. Finish with a one- or two-pixel feather via Select > Modify > Feather so edges don’t look like they were cut with scissors.
The Magic Wand’s biggest weakness is anti-aliased edges — the semi-transparent pixels where your subject blends into the color you’re removing. Follow up with Select and Mask and nudge Shift Edge to a slightly negative value (-5 to -10) to eat back one or two pixels of color contamination. Product photographers shooting against seamless paper get near-perfect cutouts this way, especially when the source image was captured cleanly to begin with — which is exactly why our guide to the best compact camera picks focuses on models known for consistent exposure and sharp edge rendition.
Method 3 — Hue/Saturation Adjustment Layer: Precision Without Destruction
The Editor’s Go-To for Color Isolation
The Hue/Saturation adjustment layer is the safest way to remove a color because it never touches the original pixels. You target a specific color channel — reds, yellows, greens, cyans, blues, or magentas — and either desaturate that range into gray or push its lightness to +100 so it vanishes into white. Adobe recently modernized the dialog with a Prominent Colours feature and an Adjust Colors panel in the Contextual Task Bar, both of which let you click a color chip directly on the image instead of hunting through a dropdown. The Photoshop Training Channel walkthrough runs through the new workflow end to end with practical examples.
The Workflow
Click the half-black, half-white circle at the bottom of the Layers panel and choose Hue/Saturation. In the Properties panel, switch the Master dropdown to the color family you want to target — say, Reds for a red T-shirt. From there you have two paths. Drag Saturation to -100 to turn the color into a neutral gray, or push Lightness to +100 to blow it out to white. Fine-tune the two color-range sliders at the bottom of the panel to narrow which hues get affected, then toggle the adjustment layer’s visibility to compare before and after. If the effect feels too heavy, drop the layer’s Opacity for a partial result.
Because this is an adjustment layer, you can add a mask and paint back any areas where the effect went too far. That flexibility is why editors reach for this method when a client circles back three days later and says, “Actually, can we put the red back in?” With a Hue/Saturation layer, the answer is yes, in about ten seconds.
Method 4 — Replace Color Command: The Beginner-Friendly Hybrid
Replace Color merges the Color Range dialog with a Hue/Saturation panel into a single window. It’s not non-destructive by default, but its instant preview makes it ideal for beginners still learning how selections and adjustments interact.
Head to Image > Adjustments > Replace Color, click the color you want to remove with the eyedropper, and add matching shades with Shift-click. Subtract stray hits with Alt/Option-click. Nudge Fuzziness between 30 and 120 until the black-and-white preview covers only your target color. From there, drop Saturation to -100 to strip the color completely, drag Lightness to -100 for pure black, or shift the Hue slider if you’d rather swap the color than erase it. Click OK to commit.
To keep this method non-destructive, right-click the layer first and choose Convert to Smart Object. Replace Color then behaves like a re-editable filter you can revisit weeks later. Anyone building a portfolio of color-corrected product shots will also find our roundup of photo printing software helpful once the edits are locked in and it’s time to send files to print.
Method 5 — Blend If Sliders: Surgical Precision on Gradients
When Color Range and Magic Wand Both Fail
Some images are stubborn. A subject standing in front of a sky that shifts from cyan to white, a bottle photographed against a soft-lit gradient, or smoke drifting across a dark backdrop will not respond cleanly to selection-based tools. That’s where Blend If — arguably the most underrated feature in the entire Layer Style panel — earns its keep. Blend If tells Photoshop, “Only show pixels on this layer that fall inside these luminance or color-channel ranges. Hide everything else.” The system is fully non-destructive and math-driven, so edges stay razor sharp even under heavy zoom.
The Walkthrough
Double-click the layer thumbnail (not the name) to open Layer Style. Scroll to the bottom, where you’ll find Blend If: Gray. Change Gray to the color channel closest to the tone you want to remove — pick Gray for a white background, Red for a red backdrop, Blue for a sky. On the This Layer slider, drag the right (white) triangle inward to hide bright pixels or the left (black) triangle inward to hide dark ones. Here’s the pro move that makes Blend If look magical: hold Alt/Option and click a triangle to split it into two halves. A wider gap between the halves creates a smooth, feathered transition instead of a hard cutoff, which is exactly how you dissolve gradient backgrounds without shredding edges.
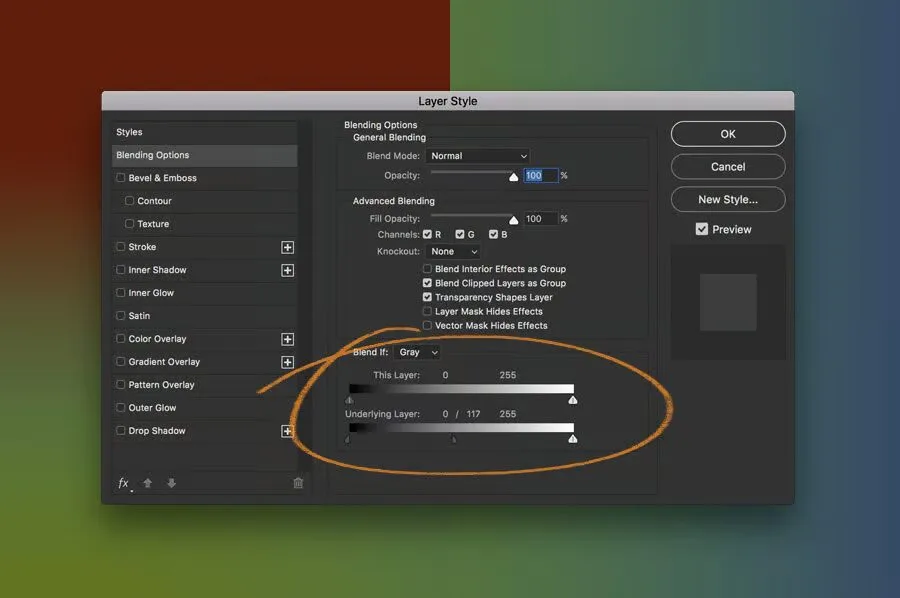
Once you’re happy with the result, convert the layer to a Smart Object to lock in the blend without losing editability. Educator Damien Symonds breaks down the split-slider technique in detail, showing how the feature preserves subtle detail on glass, smoke, and hair edges that no automated selection could ever capture cleanly.
Method 6 — Channels: The Nuclear Option for Hair and Fine Edges
Channels are what separate weekend Photoshop users from working retouchers. When the color you want to remove wraps around delicate edges — a model’s flyaway hair against a studio backdrop, or a wedding veil against a bright window — the RGB channels themselves already contain the cleanest possible selection data. Community editors in the Reddit Photoshop thread on color removal repeatedly steer beginners toward this method because it preserves anti-aliasing pixel-for-pixel.
Open the Channels panel through Window > Channels and click through the Red, Green, and Blue channels one by one. You’re hunting for the channel where your subject and the color to remove show the highest contrast — typically the channel that’s opposite on the color wheel from the color you’re erasing. Drag that channel onto the Create New Channel icon at the bottom of the panel to duplicate it. Press Ctrl/Cmd + L to open Levels, then drag the black-point and white-point sliders inward to push contrast to extremes without clipping your subject. Paint any remaining subject areas pure white with a hard brush and paint your unwanted color pure black. Ctrl/Cmd-click the duplicated channel thumbnail to load it as a selection, click back to the RGB composite channel, return to the Layers panel, and click Add Layer Mask.
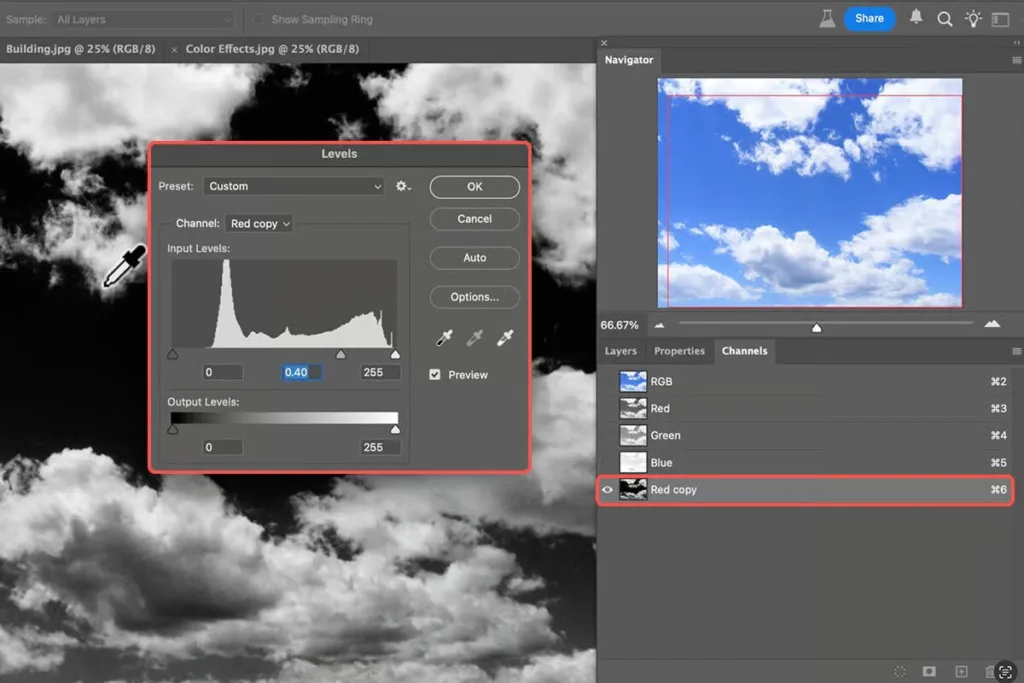
The result is a mask so precise it retains individual hair strands — something no one-click AI remover matches yet. It takes practice to nail, but once mastered, this technique is what pushes a portfolio from “good enough” to genuinely professional.
Method 7 — Select Subject and Remove Background: The 2026 One-Click Path
Photoshop’s neural filters and the Remove Background quick action have matured enormously since 2024. According to Adobe’s official Remove Background reference, a single click now handles most simple compositions in seconds, powered by the same Adobe Sensei machine-learning models that drive Select Subject and Generative Fill.
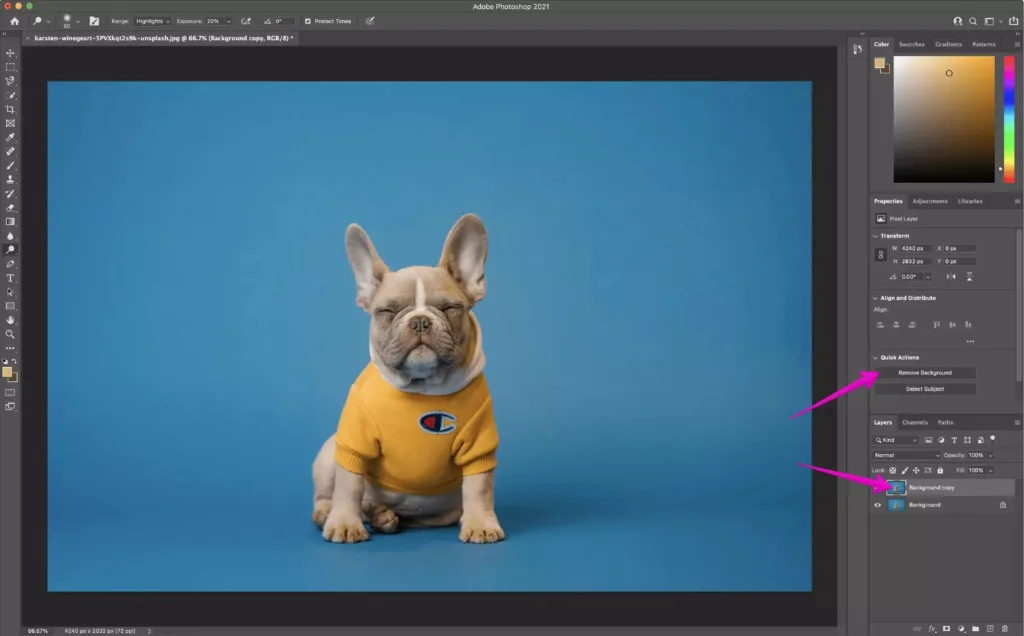
Select your layer in the Layers panel, open the Properties panel through Window > Properties, and click Remove Background under Quick Actions. Alternatively, go to Select > Subject to isolate the main figure, then Select > Inverse and hit Delete — or better, click Add Layer Mask to keep the workflow non-destructive. Refine with Select and Mask, smooth hair edges, and save as PNG-24 to preserve transparency.
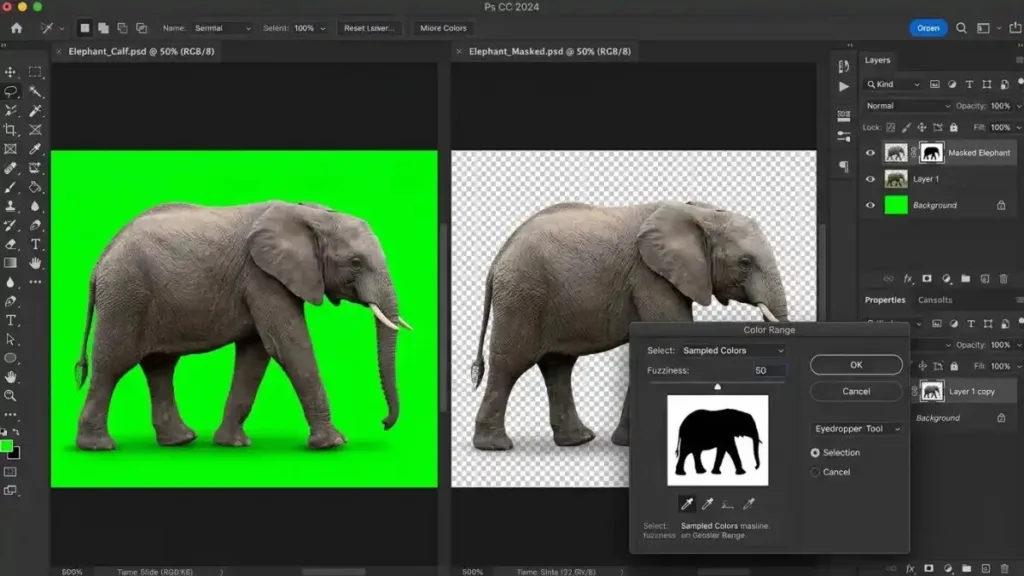
The AI approach isn’t perfect for every image, but it wins on raw speed. When it stumbles on glass, smoke, or delicate hair, fall back to Channels (Method 6) or Blend If (Method 5). Designers who cycle through hundreds of assets a day should also think about backups — a lost PSD is a special kind of pain — which is why our guide to cloud storage options is worth a read before your next big project starts.
Advanced Refinement: How to Get Perfect Edges Every Time
Every selection benefits from a trip through Select > Select and Mask. The dedicated workspace bundles refinement sliders that would otherwise take twenty separate steps to replicate manually, and it works with any selection method above — Color Range, Magic Wand, Channels, or Select Subject.
Choose the Onion Skin view to see your subject over transparency. Increase Smooth to 3 or 5 to iron out staircase edges. Bump Feather to 0.5 or 1 pixel for a natural soft edge. Slide Contrast to +20 for crisper silhouettes. Move Shift Edge to -10 to pull the mask inward and eliminate color halos. Finally, enable Decontaminate Colors and set the amount to 40–60% for hair and fur shots — this rewrites the color of edge pixels to remove residual background contamination.
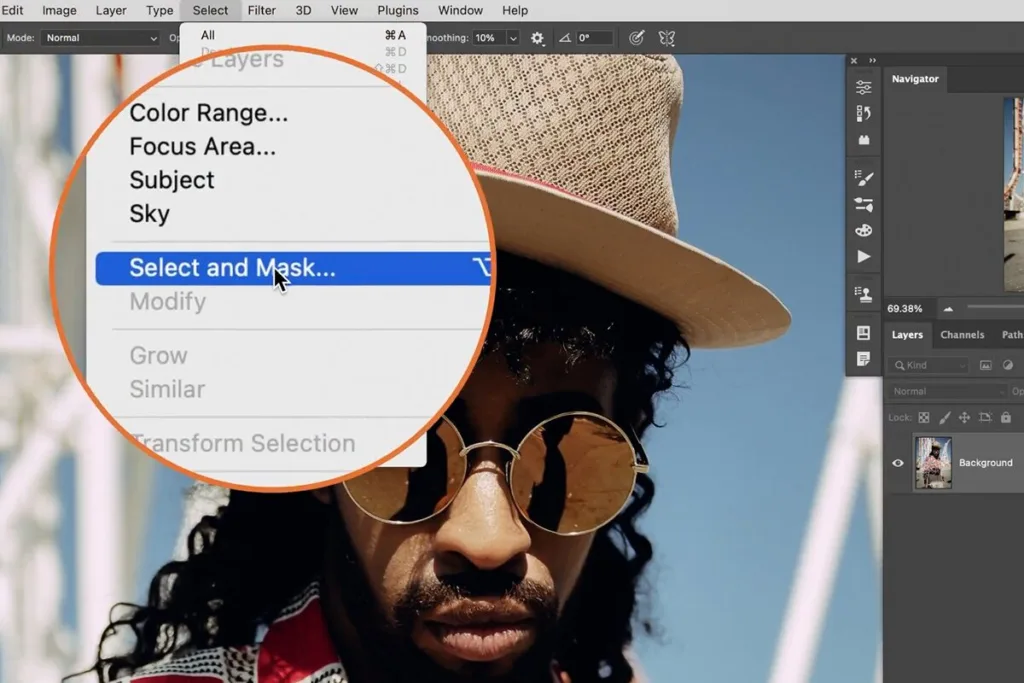
Once you commit the refinements, Photoshop can drop a mask on your existing layer or spin up a brand-new masked layer if you set Output To to “New Layer with Layer Mask.” Choose the new-layer output for anything client-facing, since it keeps your original selection editable indefinitely.
Common Mistakes That Ruin a Color Removal Job
Even seasoned editors slip on the same rakes. Watching for these five pitfalls will smooth your workflow immediately.
- Editing the background layer directly. Always duplicate first or convert to a Smart Object. One accidental save flattens your only original.
- Ignoring color fringing. Leftover halos of the removed color cling to your subject’s edges. Adobe’s Defringe reference walks through the fix — head to Layer > Matting > Defringe and enter 1 or 2 pixels to eliminate the halo instantly.
- Cranking Fuzziness too high. Aggressive Fuzziness eats into your subject. Start at 20 and creep upward.
- Skipping Select and Mask. A quick Select and Mask pass with a small Feather and slight negative Shift Edge produces professional-grade edges after any selection.
- Saving as JPEG. JPEG doesn’t carry transparency, and the transparent pixels will fill with white on save. Our JPEG vs PNG breakdown explains which format to use for which scenario, so you never lose transparency by accident again.
The Golden Rule: Mask, Don’t Delete
Every method above works better when you follow one simple rule: never delete pixels if you can mask them. A layer mask is a grayscale image sitting next to your photo that tells Photoshop which pixels to show and which to hide. Painting white on the mask reveals; painting black conceals. Nothing is destroyed, and nothing is permanent.
Combined with Smart Objects, layer masks give you infinite undo. A month from now you can reopen an old PSD, tweak the mask, and rescue a client edit without redoing a single step. This is the workflow professional retouchers use — not because it looks impressive but because it protects your originals and future-proofs your edits. If you commit to only one habit from this article, make it this one.
Real-World Use Cases: Which Method Wins for Which Job
Product Photography
E-commerce sellers depend on flawless white backgrounds. For those shots, the winning workflow is almost always Magic Wand → Select and Mask → Layer Mask. Batch the process across a folder using Actions and you’ll save hours per week. Anyone whose studio kit is due for an upgrade can start with our guide to the highest resolution cameras currently on the market — sharper source files always mean cleaner cutouts down the line.
Portrait Retouching
Skin retouchers rely on a Hue/Saturation adjustment layer to knock down over-saturated reds or yellow shadows without touching underlying tone. Combined with a mask, this trick fixes color casts caused by mixed indoor lighting, painted walls, or reflected clothing.
Graphic Design and Logo Cleanup
Designers who receive JPEG logos from clients turn to the Channels method by default. Because logos are usually pure color on white or black, one channel almost always contains a perfect selection ready to load with a single Ctrl/Cmd-click.
Video Frame Grabs and Screenshots
For screenshots pulled from video — including footage from action cams and camcorders — the Blend If workflow is invaluable. Compressed footage introduces noise that makes selections messy, and Blend If sidesteps the problem entirely by working on luminance and color channels rather than pixel boundaries. Video creators who want a solid capture-to-edit pipeline can also check our budget camcorder reviews for gear that plays nicely with post-production workflows.
Keyboard Shortcuts That Cut Editing Time in Half
Speed is a habit, and habits stick faster once shortcuts hit muscle memory. These ten matter most for color-removal work.
- W — Magic Wand / Quick Selection
- B — Brush (for painting masks)
- X — Swap foreground and background colors
- D — Reset foreground/background to default black and white
- Ctrl/Cmd + J — Duplicate the current layer
- Ctrl/Cmd + I — Invert selection or mask
- Ctrl/Cmd + D — Deselect
- Alt/Option + click layer mask — View the mask directly
- Ctrl/Cmd + Alt/Option + R — Open Select and Mask
- Shift + click — Add to selection; Alt/Option + click — Subtract from selection
Rehearse these on a single practice image for twenty minutes and they’ll feel automatic by the end of the session.
Exporting the Result: File Format Matters
Once the color is gone and the edges are clean, export the file correctly or watch the transparency you fought for disappear on save. Use File > Export > Export As for the fastest modern output, and choose PNG-24 to preserve full transparency. Send TIFFs with layers intact when the client needs to revisit the file. For web deployments, WebP delivers PNG-quality transparency at roughly 30% smaller file sizes and now enjoys support across every major browser. Always keep the layered PSD alongside your exports — that’s your master, and it’s the file you’ll thank yourself for saving six months from now.
Anyone new to sizing exports across different platforms will benefit from our KB vs MB explainer, a surprisingly useful primer on file-size units before you start batch-exporting large PNG collections.
Key Takeaways
- Precise selection plus non-destructive masking is the formula for every professional color removal.
- Color Range handles 80% of jobs; Magic Wand is fastest for solid backgrounds; Blend If rules gradients; Channels wins for hair.
- Layer masks and Smart Objects protect your originals forever — always mask instead of delete.
- Select and Mask with negative Shift Edge and Decontaminate Colors eliminates halos and fringing.
- Export as PNG-24 or TIFF to preserve transparency, and always keep the layered PSD as a master.
Frequently Asked Questions
1. How do I remove only one specific color in Photoshop without affecting the rest of the image?
Use Select > Color Range, click the target color with the eyedropper, and adjust the Fuzziness slider until only that color shows white in the preview. Confirm with OK, then click Add Layer Mask instead of pressing Delete. This isolates one hue while leaving every other pixel untouched and keeps the edit fully reversible.
2. What is the difference between Color Range and the Magic Wand?
The Magic Wand selects connected pixels of similar color by default and works best on flat backgrounds. Color Range samples color globally across the entire image, includes a Fuzziness slider for tonal control, and offers Localized Color Clusters for regional refinement. Color Range is more powerful; the Magic Wand is faster for simple shapes.
3. Can I remove a color without permanently deleting pixels?
Yes. Use a Hue/Saturation adjustment layer to desaturate the target color, or make a selection with Color Range and click Add Layer Mask instead of pressing Delete. Both approaches preserve the original pixels and let you revert or refine the edit at any time.
4. Why does my edge look jagged or have a colored halo after removing a background?
Jagged edges come from missing anti-aliasing, and colored halos come from residual background pixels. Run Select > Select and Mask, feather by 0.5 to 1 pixel, shift the edge by -5 to -10, and enable Decontaminate Colors. That combination eliminates both problems in a single pass.
5. Does Photoshop have a one-click background removal tool?
Yes. Open the Properties panel with your layer selected and click Remove Background under Quick Actions, or use Select > Subject followed by Select > Inverse. Both features rely on Adobe Sensei AI and work well on portraits and clean subjects. Complex hair or transparent objects still need manual refinement.
6. How do I remove white from a JPEG background?
Duplicate the layer, grab the Magic Wand with Tolerance around 25 and Anti-alias enabled, click the white area, and press Delete. For cleaner edges, add a layer mask instead of deleting. Save the result as PNG-24 to preserve transparency, since JPEG cannot store an alpha channel.
7. What is the best method for removing a color from an image with a gradient background?
Use the Blend If sliders inside Layer Style. Double-click the layer, choose the appropriate color channel, and drag the sliders while holding Alt/Option to split them for smooth blending. Gradients defeat the Magic Wand and often Color Range, but Blend If handles them mathematically and preserves subtle transitions.
8. Can I automate color removal for hundreds of images?
Yes. Record an Action while performing your Color Range or Magic Wand workflow, then apply it in batch through File > Automate > Batch. This is the standard workflow for e-commerce photographers processing dozens of product shots per day. Save your Color Range settings as a preset for consistent results across the whole batch.
Final Thoughts
Color removal in Photoshop looks intimidating until you realize it’s really just three ideas layered on top of each other: select the color precisely, hide it non-destructively, and refine the edge. Every method above — from the beginner-friendly Magic Wand to the surgical Blend If sliders — is a variation on that trio. Once the pattern clicks, you stop hunting for the “perfect” tool and start choosing the right one for the image in front of you.
The single biggest habit that will change your work is committing to layer masks and Smart Objects. Destructive editing is fast, but non-destructive editing is professional. Every working retoucher, every Adobe Certified Expert, and every serious hobbyist works this way — not because it looks impressive but because it protects the file and keeps future edits open. Start small: mask instead of delete on your next project. In a week the habit will feel natural, and your files will start behaving.
Photoshop rewards patience and curiosity in equal measure. Bookmark this guide, keep experimenting, and revisit the FAQ whenever a stubborn image surprises you. The tools are already inside your copy of Photoshop — the only thing left is practice.