Parts of a Camera: Every Component Explained in Plain English (2026 Guide)
Here’s the Short Version
A camera is, at heart, a lightproof box with a hole in one end and a light-sensitive chip at the other. Light comes through the lens, passes through an adjustable opening called the aperture, gets past a curtain called the shutter, and hits the sensor, which turns that light into digital data. Everything else — the dials, the viewfinder, the flash, the memory card — exists to help you control that basic process or store the result.
The parts that actually matter for your photos are the lens, the aperture, the shutter, the sensor, and the ISO setting. Master those five and you are 90% of the way to shooting in manual mode. The rest is convenience. This guide walks through every part — inside and out — what it does, why it matters, and which ones to learn first.
How a Camera Actually Works (In 10 Seconds)
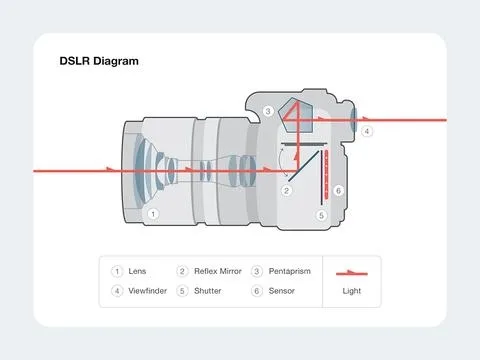
Before we name parts, let’s trace the path of light from the scene to your memory card. It makes everything else click.
- Light bounces off your subject and hits the lens, which focuses it into a sharp image.
- Inside the lens, the aperture — a ring of overlapping blades — opens or closes to control how much light gets through.
- The light reaches the shutter, a fast curtain that stays closed until you press the button. When you press it, the shutter opens for a precise fraction of a second.
- Light hits the image sensor, a silicon chip covered in millions of tiny light-sensitive wells. Each well records how much light hit it.
- The image processor reads that data, applies color and noise reduction, and writes a file to the memory card.
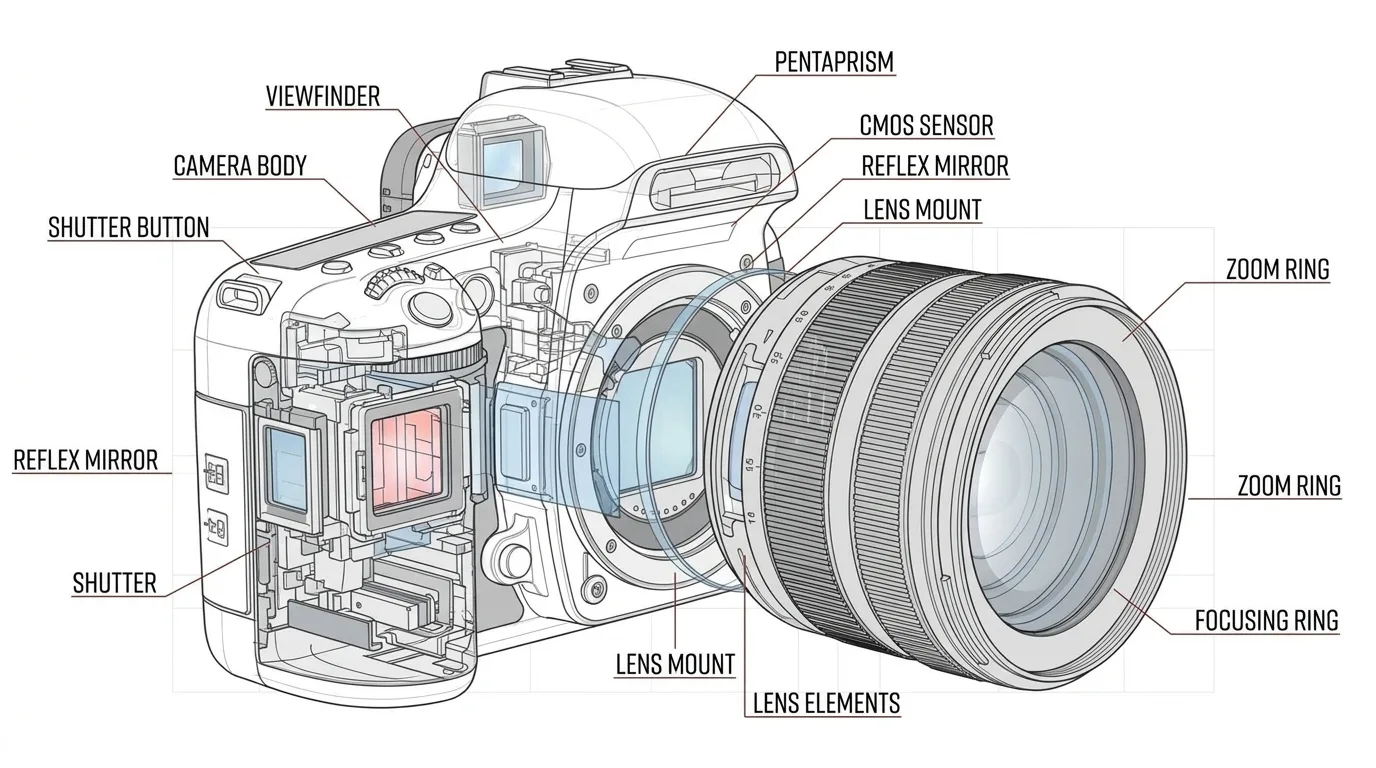
That’s it. Every other part of the camera is there to let you control, preview, or store that chain of events. A thorough camera anatomy guide will show you the same path with labeled diagrams — the principle has not changed since the first digital SLR.
The Big Four: The Parts That Actually Make Your Photo
These are the only parts that directly change what your photo looks like. Learn these first.
1. The Lens — Your Camera’s Eye
Without a lens, your camera sees nothing but a blurry glow. The lens gathers light and bends it into a sharp focus on the sensor. Two numbers define any lens: focal length (how zoomed-in the view is) and maximum aperture (how wide it can open).
- Prime lenses have one fixed focal length (like 50mm). They’re usually sharper and open wider, but you zoom with your feet.
- Zoom lenses cover a range (like 18–55mm). They’re flexible and great for travel, but often a little softer and slower.
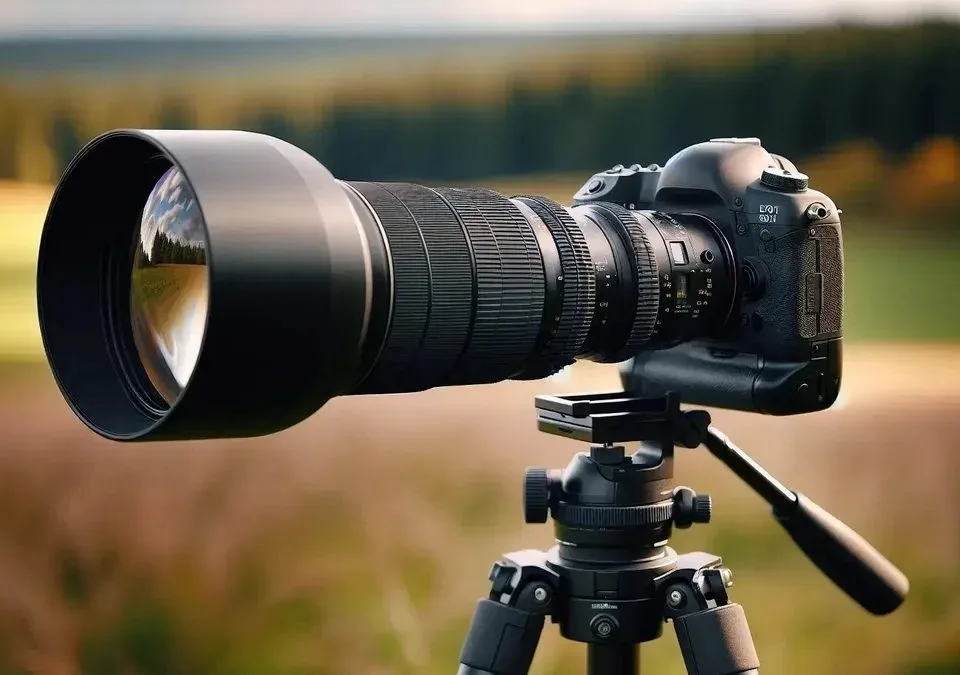
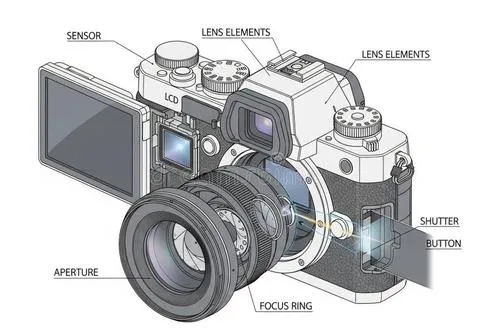
If you want to reach distant subjects, a telephoto lens is the tool for the job — the longer the focal length, the closer faraway things appear. On the front of most lenses you’ll find a focus ring (twist to sharpen) and, on zooms, a zoom ring (twist to change focal length). The back of the lens has metal contacts that talk to the camera body, and a lens mount that locks it in place.
2. The Aperture — The Pupil of the Lens
The aperture is an adjustable hole inside the lens made of overlapping metal blades. You control it in f-stops: f/1.8, f/2.8, f/5.6, f/8, f/16. Counterintuitively, a lower f-number means a wider opening and more light. Think of your eye’s pupil — it opens wide in the dark and shrinks in bright sun.
Aperture does two jobs at once:
- Controls how much light reaches the sensor (exposure).
- Controls depth of field — how much of the photo is sharp from front to back. Wide apertures (f/1.8) blur the background beautifully. Narrow apertures (f/16) keep everything sharp.
3. The Shutter — The Curtain That Times the Light
The shutter is a set of tiny mechanical (or electronic) curtains sitting right in front of the sensor. It stays closed until you press the shutter button. Then it opens for a precise length of time — from 1/8000th of a second to 30 seconds or more — and closes again. That length is your shutter speed.
- Fast shutter speeds (1/500 and up) freeze motion — a bird in flight, a splashing wave.
- Slow shutter speeds (1/30 and below) blur motion — silky waterfalls, car light trails, star trails.
Most shutters are rated for 100,000 to 300,000 actuations, which sounds like a lot until you realize you’ll probably upgrade your camera long before the shutter dies.
4. The Image Sensor — Where Light Becomes Data
The sensor is the silicon chip at the back of the camera that replaces the film of old cameras. It’s covered in millions of tiny light-sensitive wells called photosites. Each one records how much light hit it, and the camera’s processor stitches that data into an image.
Sensor size matters more than megapixels. From largest to smallest:
- Full-frame (about the size of a 35mm film frame) — best low-light performance, shallowest depth of field.
- APS-C (cropped) — smaller, lighter, cheaper, with more reach for wildlife and sports.
- Micro Four Thirds — even smaller, with the most compact lens systems.
- 1-inch and smaller — found in compact cameras and high-end phones.
If you’re shopping for a body and megapixel count is your main concern, these highest resolution cameras show where the market is in 2026 — but for most people, 24 megapixels is plenty.
Inside the Body: The Parts You Can’t See (But Should Know)
Pop the lens off and look inside. Here’s what’s behind that mount.
The Mirror and Pentaprism (DSLRs Only)
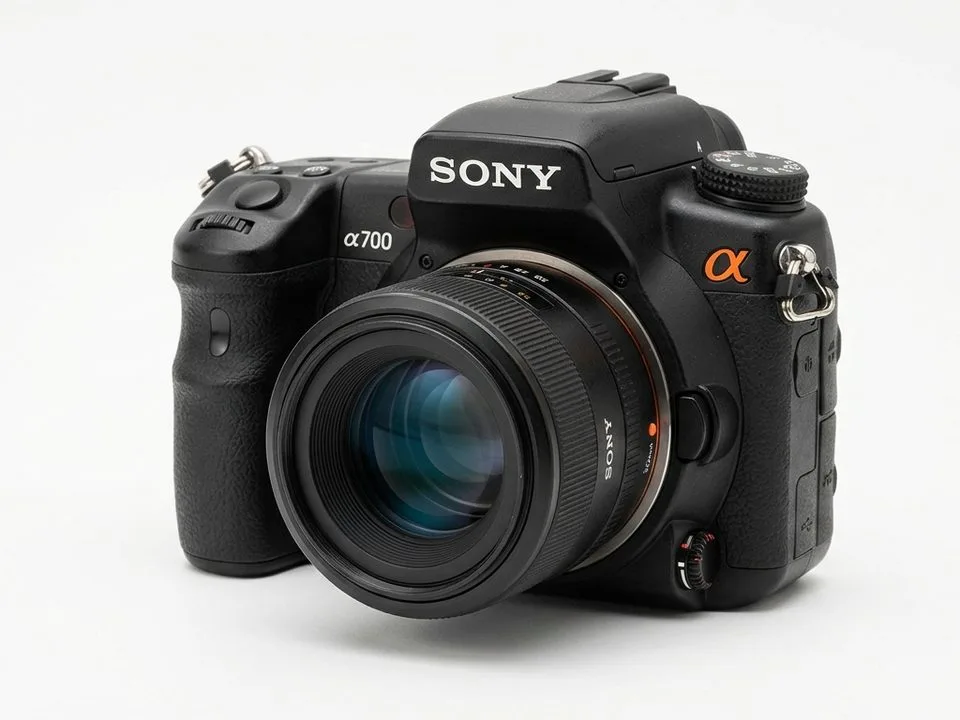
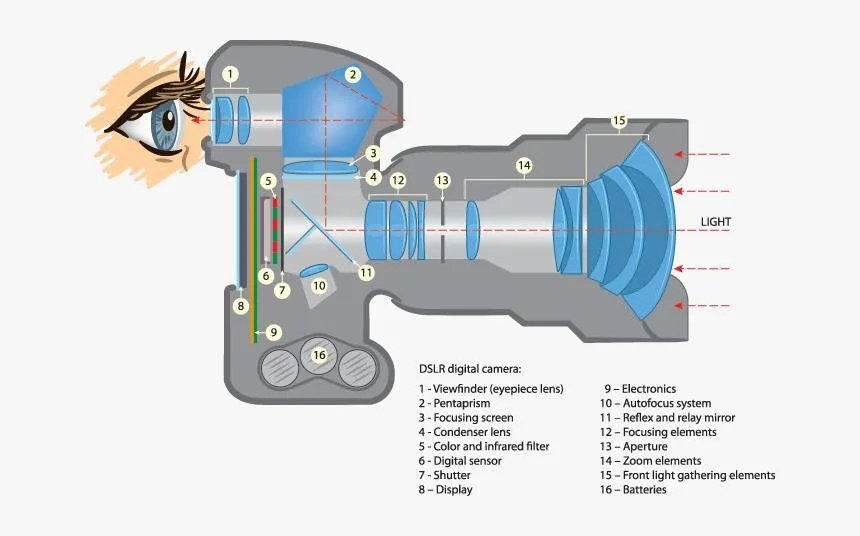
In a DSLR, a mirror sits at a 45-degree angle in front of the sensor. It bounces light upward into a five-sided prism called a pentaprism, which corrects the image and sends it to the optical viewfinder (OVF). When you press the shutter, the mirror flips up, the shutter opens, and light hits the sensor. That mirror flip is the “click” you hear — and the slight vibration that can soften images at slow shutter speeds.
Mirrorless cameras removed the mirror and pentaprism entirely. Light goes straight to the sensor, and you preview the shot on an electronic viewfinder (EVF) or the rear LCD. That’s why mirrorless bodies are smaller and quieter. If you’re weighing your options, these compact cameras with a viewfinder show how small the category has gotten.
The Image Processor — The Camera’s Brain
The processor (Canon calls it DIGIC, Nikon EXPEED, Sony BIONZ) reads the sensor’s raw data and turns it into a viewable photo. It handles noise reduction, color rendering, face detection, autofocus calculations, and video encoding. A faster processor means quicker burst shooting, better autofocus tracking, and less time waiting for the buffer to clear.
The Buffer — Temporary Storage for Burst Shooting
When you hold down the shutter and shoot 10 frames per second, those images don’t write instantly to the memory card. They pile up in a temporary high-speed memory called the buffer. Once the buffer fills, the camera slows down until it can offload photos to the card. Bigger buffers and faster cards let you shoot longer bursts — critical for sports and wildlife.
Autofocus Sensors and Stabilization
Dedicated autofocus sensors (in DSLRs) or on-sensor phase-detection pixels (in mirrorless) measure distance and tell the lens where to focus. Image stabilization — either in the lens or in the body (IBIS) — counteracts shaky hands, giving you 2–5 extra stops of usable shutter speed. Turn it off when you’re on a tripod; it can actually introduce tiny vibrations otherwise.
Outside the Body: The Controls You Actually Press
Now let’s look at the buttons and dials. You don’t need to memorize all of them — just the ones you’ll use every shoot.
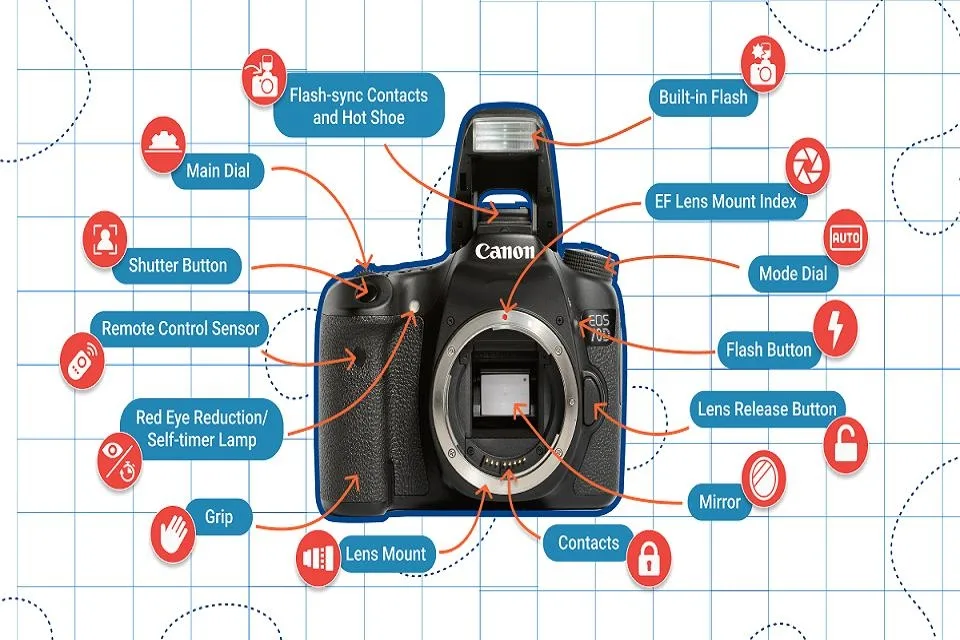
The Shutter Button — The Most Important Button
Press it halfway and the camera focuses and meters the light. Press it all the way and it takes the photo. That two-stage design is why you should never jab the button — half-press, wait for focus confirmation, then squeeze.
The Mode Dial — Your Creative Control Switch
Usually on the top right, this dial switches the camera’s brain between modes:
- Auto / Scene — the camera decides everything. Great for snapshots, zero learning.
- P (Program) — camera picks aperture and shutter, you pick everything else.
- A / Av (Aperture Priority) — you pick the f-stop, camera picks the shutter speed. Most photographers live here.
- S / Tv (Shutter Priority) — you pick the shutter speed, camera picks the aperture.
- M (Manual) — you pick everything. Scary at first, liberating later.
Command Dials, ISO Button, and Exposure Compensation
Most cameras have two command dials — front and back — that adjust aperture and shutter speed depending on mode. The ISO button (often combined with a dial) controls the sensor’s light sensitivity: low ISO (100–400) for bright days and clean images, high ISO (3200+) for dark rooms but with more noise. Exposure compensation (+/− dial) tells the camera to brighten or darken the shot from what its meter thinks is right — essential for backlit scenes or snow (which cameras always underexpose to gray).
The Hot Shoe — Not Just for Flashes
The hot shoe is the metal bracket on top of the camera. It holds an external flash, but also radio triggers, microphones, LED lights, and even viewfinder accessories. A built-in pop-up flash exists on many entry-level bodies, but it produces harsh, flat light — treat it as a last resort. An external flash you can bounce off the ceiling is night-and-day better.
The Rear LCD and Viewfinder
The rear LCD screen lets you review photos, navigate menus, and shoot video. Tilting or articulating screens flip out for low or high angles. The viewfinder — optical on DSLRs, electronic on mirrorless — is how you frame the shot. Electronic viewfinders show you a live preview of exposure, which is a huge advantage; optical ones show the real scene with zero lag and no battery drain.
Power and Storage: The Parts That Keep You Shooting
Battery and Battery Grip
Lithium-ion batteries live in a compartment on the bottom. Mirrorless cameras drain batteries faster than DSLRs because the EVF and LCD are always on — carry at least one spare. A battery grip attaches to the bottom, doubles your battery life, and adds a second shutter button for vertical shooting.
Memory Card Slot
The memory card slot holds SD, CFexpress, or XQD cards. Faster cards clear the buffer quicker during bursts and video. Always format the card in the camera, not on your computer — it prevents file corruption. If you’ve ever wondered how much a card actually holds, here’s how many photos a 32GB memory card holds at different megapixel counts.
Ports and Tripod Mount
On the side you’ll find a USB port (for transferring photos or tethering), an HDMI port (for viewing on a TV or monitor), and a 3.5mm microphone jack (for better audio on video). On the bottom, a standard 1/4-inch tripod thread lets you attach the camera to a tripod, monopod, or gimbal. A tripod is the single cheapest way to instantly sharper photos in low light.
DSLR vs Mirrorless: What’s Different Inside
| Part | DSLR | Mirrorless |
|---|---|---|
| Mirror & pentaprism | Yes — flips up when shooting | No — light goes straight to sensor |
| Viewfinder | Optical (real scene, no lag) | Electronic (live exposure preview) |
| Size & weight | Larger, heavier | Smaller, lighter |
| Battery life | Better (optical finder uses no power) | Worse (EVF + LCD always on) |
| Autofocus | Dedicated AF sensor | On-sensor phase detection (often faster) |
| Shutter sound | Loud mirror slap | Quieter — some have fully silent electronic shutter |
Both take excellent photos. The choice comes down to whether you prefer the optical viewfinder and battery life of a DSLR, or the compact size and live-preview advantages of mirrorless.
Quick Reference: Every Camera Part in One Table
Use this as a cheat sheet when you’re holding your camera and wondering what a button does.
| Part | Where It Is | What It Does |
|---|---|---|
| Lens | Front, on the mount | Focuses light onto the sensor; sets focal length and max aperture |
| Aperture | Inside the lens | Adjustable opening; controls light and depth of field |
| Shutter | In front of sensor | Curtain that opens for a set time; controls motion blur |
| Image sensor | Back of body, behind shutter | Converts light into digital data |
| Mirror | Inside DSLR only | Reflects light up to the viewfinder; flips up when shooting |
| Pentaprism | Top of DSLR | Corrects the mirrored image to the viewfinder |
| Viewfinder | Back, top | Lets you frame the shot (optical or electronic) |
| Mode dial | Top right | Switches between Auto, P, A, S, M modes |
| Shutter button | Top front, under index finger | Half-press to focus, full press to shoot |
| Command dials | Front and back | Adjust aperture, shutter speed, ISO |
| Hot shoe | Top center | Mount for external flash, mic, triggers |
| LCD screen | Back | Review photos, menus, live view, video |
| Memory card slot | Side or bottom | Stores photos (SD, CFexpress, XQD) |
| Battery | Bottom compartment | Powers everything |
| Lens mount | Front of body | Locks lens to body; passes data between them |
| Image processor | Inside | Converts sensor data into image files |
| Buffer | Inside | Temporary storage during burst shooting |
| Tripod thread | Bottom | 1/4-inch mount for tripods and gimbals |
| Ports | Side | USB, HDMI, microphone, headphone |
| Grip | Right side | Curved, textured area for secure handheld shooting |
A visual parts of a camera breakdown with front/top/back views can help you match each name to its location on your specific body — button placement varies a lot between brands.
Which Parts to Learn First (If You’re a Beginner)
Don’t try to memorize everything. Start here, in this order:
- The exposure triangle — aperture, shutter speed, and ISO. These three settings determine brightness and creative look. Spend one shoot changing only one at a time.
- Focus modes — single AF for still subjects, continuous AF for moving ones. A blurry photo is unrecoverable; a slightly wrong exposure can be fixed.
- White balance — keeps colors from looking too orange or blue. Auto works most of the time, but learn to override it under weird indoor lighting.
- RAW vs JPEG — shoot RAW if you want to edit later. It preserves far more data. If you’re not sure about color spaces, here’s sRGB vs Adobe RGB explained simply.
- The self-timer or remote — for sharp tripod shots, use a 2-second timer so you don’t shake the camera when you press the button.
Once those feel automatic, the rest of the buttons will start to make sense on their own.
Frequently Asked Questions
What are the basic parts of a camera?
The seven essential parts are the lens, aperture, shutter, image sensor, viewfinder, camera body, and memory card. Everything else — dials, flash, ports, image stabilization — is a refinement of those core seven.
What is the most important part of a camera?
If you care about image quality, the lens and the sensor matter most. A great lens on an average body outperforms a bad lens on a great body almost every time. That’s why experienced photographers invest in glass before upgrading bodies.
What’s the difference between a DSLR and a mirrorless camera?
A DSLR uses a mirror and pentaprism to send light to an optical viewfinder. The mirror flips up when you take a photo. A mirrorless camera has no mirror — light goes straight to the sensor, and you preview the shot on an electronic viewfinder or LCD. Mirrorless bodies are smaller and often have faster autofocus; DSLRs have better battery life and optical viewfinders.
What does f-stop mean?
F-stop measures the aperture size. A small number like f/1.8 means a wide opening — more light and a blurry background. A large number like f/16 means a narrow opening — less light and everything sharp from front to back.
How many megapixels do I really need?
For most people, 24 megapixels is plenty. It prints sharp A3-sized posters and lets you crop aggressively. 50+ megapixels only matters if you shoot large-format landscapes, studio work, or need to crop heavily.
Should I shoot in RAW or JPEG?
Shoot RAW if you plan to edit your photos — it preserves all the sensor’s data and gives you far more flexibility in post. Shoot JPEG if you want files ready to share immediately with no editing. Many cameras offer both at once.
How do I clean my camera sensor safely?
First use a rocket blower to remove loose dust — never use compressed air or your breath. For stubborn spots, use a sensor swab designed for your exact sensor size. If you’re nervous, any camera shop will do it for a small fee. Dust shows up most at narrow apertures like f/16.
Why are my photos blurry even when focus looks right?
Three usual suspects: shutter speed too slow (hand shake), subject moving faster than the shutter can freeze, or a dirty lens. A good rule of thumb: use a shutter speed at least as fast as 1 divided by your focal length. On a 50mm lens, that’s 1/50th of a second or faster. Add image stabilization and you can go slower.
One Last Thought
A camera is just a tool — a fancy, precision-engineered light box. The parts don’t make the photo; you do. But knowing what each button and dial does means you stop fighting the camera and start making deliberate choices. Half the battle is simply knowing that the blurry background you love comes from a wide aperture, the frozen waterfall comes from a slow shutter, and the grain in your night shot comes from high ISO. Learn those three, and the rest is just refinement.