What Is Metering in Photography? The Complete Guide to Every Camera Metering Mode (2026)
TL;DR: Metering is how your camera measures light to calculate exposure. It assumes everything in the world is 18% middle gray, which is why snow comes out gray and black cats come out too bright. Every camera offers multiple modes — matrix/evaluative, center-weighted, spot, partial, highlight-weighted, and average — plus face-detection-linked metering on modern bodies. Start with matrix, learn exposure compensation (+1 to +2 for snow, -1 to -2 for dark scenes), check the histogram instead of the LCD preview, and use spot metering + AE lock for backlit or high-contrast shots. If you still get it wrong, you can fix underexposed photos and fix overexposed photos in post — but nailing it in camera is always better.
1. What Is Metering, Exactly?
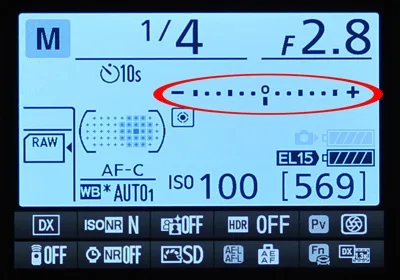
If you’ve ever wondered what is metering in photography, here’s the short answer: metering is how your camera measures the light in a scene to figure out the correct exposure. When you half-press the shutter button, a sensor inside the camera reads the light bouncing off your subject and crunches a number for aperture, shutter speed, and ISO. You see the result as a little scale in your viewfinder or on the rear screen — zero in the middle, plus and minus marks on either side. That’s the meter talking.
Here’s the detail that changes everything. Your camera doesn’t know what you’re pointing at. It doesn’t know if you’re shooting a white wedding dress, a black tuxedo, or a gray rock. All it knows is that it wants the average brightness of the scene to land on 18% middle gray — a specific tone it was calibrated to. Point it at something brighter than middle gray (snow, a beach, a white wall) and it darkens the exposure until that bright thing is gray. Point it at something darker (a black dog in shadows, a dark suit on a dark stage) and it brightens the exposure until that dark thing is gray. That’s why your snowy landscapes look dull straight out of camera — the camera is literally trying to turn the snow gray.
One more distinction: your camera uses reflective metering — it measures light bouncing off the scene. A handheld incident meter, the kind studio photographers still use, measures light falling onto the subject. That’s why incident meters never get fooled by snow or black cats — they skip the 18% gray assumption entirely. If you’re curious how the meter sensor fits into the body, our guide to the parts of a camera walks through the hardware.
2. How Your Camera’s Meter Actually Works
The meter runs every time you half-press the shutter. In Program (P), Aperture Priority (Av/A), and Shutter Priority (Tv/S) modes, it actively changes settings to hit that zero mark. In Manual (M), it doesn’t change anything — it just tells you how far off zero you are, and you turn the dials.
You can find the meter in three places:
- Through the viewfinder: a horizontal bar at the bottom, usually with a tick mark or needle showing current exposure.
- On the top LCD screen (pro bodies): same bar, always visible.
- On the rear screen in Live View: a live, real-time meter that updates as you move the camera.
The scale is marked in stops. Each mark is usually 1/3 of a stop; a whole stop is three clicks. One stop means double or half the light. That’s all you need to know to read it. A detailed metering guide covers the math if you want it.
3. Every Camera Metering Mode, Explained
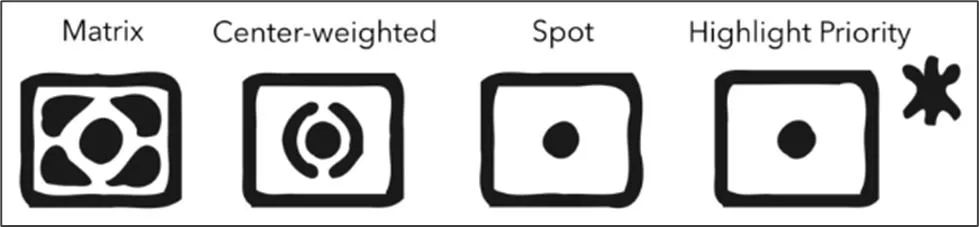
Metering modes are just different ways of asking the camera, “which part of the frame should you pay attention to?” Different brands give them different names, and some brands have modes others don’t. Here’s the complete list.
3.1 Matrix / Evaluative / Multi-Zone Metering — The Smart Default
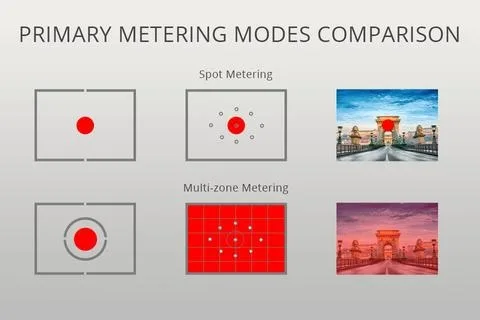
This is the mode your camera ships with, and for good reason — it’s the most sophisticated. The camera divides the frame into dozens (sometimes hundreds) of zones, measures light in each, and crunches all the data together. Modern versions use machine learning trained on thousands of photos to guess what kind of scene you’re shooting — landscape, portrait, backlit — and bias the exposure accordingly. They also give extra weight to whatever’s under your active focus point, on the theory that that’s the thing you care about.
Brand-specific variants matter:
- Canon: Evaluative metering, using iFCL (Intelligent Focus, Color, Luminance) on higher-end bodies — it factors in focus distance, color, and brightness.
- Nikon: Matrix metering, specifically 3D Color Matrix Metering III on pro bodies — it uses scene recognition, color data, and distance information from the lens.
- Sony: Multi-pattern (also called Multi-segment).
- Minolta/Pentax: Honeycomb pattern metering — the original multi-zone design.
- Fuji, Olympus/OM, Panasonic: Multi or ESP metering.
It’s great for landscapes, travel, street, and anything with even light. Most of the time it just works. It gets fooled in high-contrast scenes or when your subject is much brighter or darker than the background.
3.2 Center-Weighted Metering — The Predictable Classic
Center-weighted metering does exactly what it sounds like: it measures the whole frame but gives roughly 60–80% of its attention to the middle of the image. The corners barely matter. It’s the oldest mode — it originally existed because the meter cell in old SLRs sat in the center of the viewfinder and couldn’t see the edges well. It stuck around because it’s predictable.
On Nikon bodies you can even change the size of the center circle — 6mm, 8mm, 10mm, 12mm, or “average” (more on that below). It shines when your subject is in the middle and you don’t want a bright sky or dark corner messing up the exposure. Classic portraits, macro, and any composition where the important stuff is dead center all work well here. It doesn’t care where your focus point is — it always weights the center.
3.3 Spot Metering — The Precision Tool
Spot metering is the surgeon of the group. It reads light from a tiny spot — usually 1–5% of the frame, around 3.5% on most cameras — and ignores literally everything else. On Nikon and Sony bodies it follows your active focus point. On Canon it’s locked to the center of the frame, so you meter, lock exposure with the AE-L button, then recompose.
This is the mode you reach for in high-contrast situations. Backlit portraits? Spot meter off the face. The moon against a black sky? Spot meter off the moon. A bride in white against a dark background? Spot meter off the dress, then dial in positive exposure compensation. Concert photography with a spotlight on a singer? Spot meter off the performer. It’s the favorite of a lot of experienced photographers because it puts you, not the camera, in charge of what “correct exposure” means. A solid introduction to metering walks through the spot-meter-and-recompose technique step by step.

3.4 Partial Metering — Canon’s “Big Spot”
Partial metering is essentially a larger spot. It covers about 8–10% of the frame (vs. 1–5% for true spot) and is available almost exclusively on Canon bodies. Think of it as spot metering with a safety margin — you get most of the precision of spot without being so sensitive to exactly where you point it. It’s useful when your subject fills a bit more of the frame or when you find true spot too twitchy. Nikon shooters get the same effect by shrinking the center-weighted circle.
3.5 Highlight-Weighted / Highlight Priority Metering — The Clipping Protector
Highlight-weighted (Nikon, Sony) or Highlight Priority (Fuji) metering aggressively protects the brightest parts of your image from clipping — blowing out to pure white with no detail. It’s useful for scenes where highlights matter most: a white wedding dress, a stage performer in a spotlight, a landscape with bright clouds. The tradeoff is that it can underexpose the rest of the frame pretty aggressively, so you’ll often need to lift shadows in post. Some bodies let you set a highlight alert (blinking “zebra” stripes on the LCD) so you can see exactly what’s clipping.
3.6 Average / Entire-Screen Average Metering — The Simple One
Average metering (Sony calls it Entire Screen Average) just takes a flat average of every pixel in the frame. No zones, no weighting, no smarts. It’s the simplest mode, and the one most easily fooled — point it at a bright sky and the whole scene goes dark. It’s mostly a legacy mode today, but it has its fans: because it’s completely predictable and doesn’t second-guess you, some landscape and studio shooters use it with a gray card or manual exposure. It’s also the mode old film cameras used, so if you learned on film it may feel like home.
3.7 Face-Detection / Subject-Detection Metering — The Modern One
Most mirrorless cameras and recent DSLRs link metering to face- and eye-detection. When the camera recognizes a face, it biases exposure toward that face regardless of where it is in the frame. This is effectively a smart, auto-tracking spot meter that follows your subject. It’s fantastic for candid portraits, events, and any situation where people are moving around the frame. It’s usually on by default when face detection is active, and you generally don’t need to think about it — but it’s worth knowing it’s there, because it means matrix metering on a 2026 camera behaves very differently than matrix metering on a 2010 DSLR.
3.8 Scene / Auto Metering — The “Camera Knows Best” Mode
In full Auto or scene modes (Portrait, Landscape, Night Portrait, etc.), the camera doesn’t just meter — it also applies scene recognition. It’ll try to detect backlighting and boost fill, detect snow and brighten it, detect a sunset and warm it up. It’s convenient but opaque — you never quite know what it’s doing. Once you understand metering, you’ll usually get better, more consistent results taking back control yourself.
4. Brand-by-Brand: What Each Mode Is Called
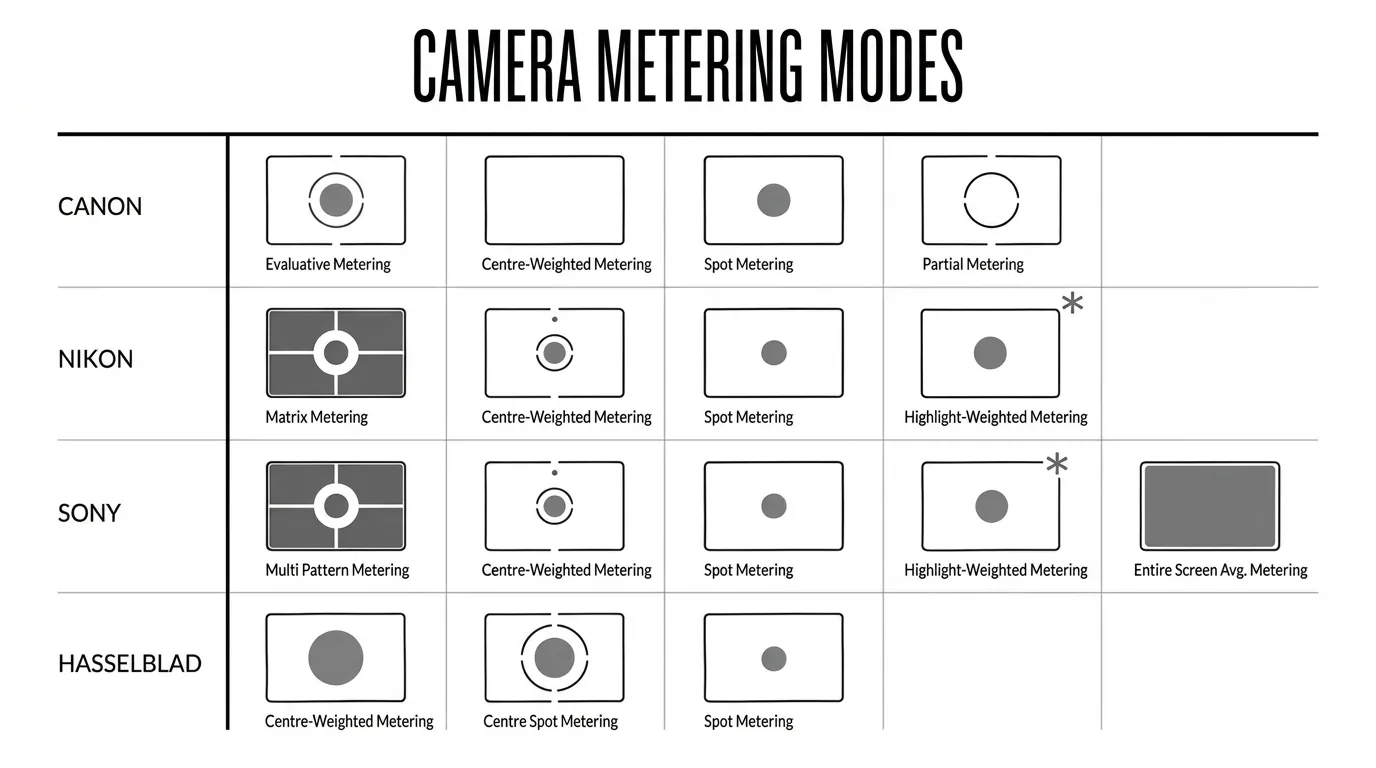
The same thing has a different name depending on who made your camera. Here’s the complete cross-reference — bookmark it.
| Mode Type | Canon | Nikon | Sony | Fuji | Olympus/OM | Panasonic | Pentax |
|---|---|---|---|---|---|---|---|
| Whole-frame smart | Evaluative (iFCL) | Matrix (3D Color) | Multi / Multi-pattern | Multi | ESP | Multi | Multi-segment |
| Center-priority | Center-weighted Avg | Center-weighted (adjustable) | Center-weighted | Average | Center-weighted | Center-weighted | Center-weighted |
| Tiny spot | Spot | Spot (AF-linked) | Spot (AF-linked) | Spot | Spot | Spot | Spot |
| Larger spot | Partial (~8%) | — (use small CW) | — | — | — | — | — |
| Protect highlights | — (use partial + comp) | Highlight-weighted | Highlight | Highlight Priority | — | — | — |
| Flat whole-frame | — | Average (CW setting) | Entire Screen Avg | — | — | — | Average |
| Face-linked | Auto (with Face AF) | Auto (with Face AF) | Auto (with Face AF) | Auto (with Face AF) | Auto | Auto | Auto |
5. Which Mode Should You Actually Use?
Here’s the practical cheat sheet — the part most articles skip.
| Situation | Best Mode | Why |
|---|---|---|
| Landscapes, travel, everyday | Matrix / Evaluative | Even light, whole frame matters |
| Portraits, subject in center | Center-weighted | Prioritizes face, ignores bright edges |
| Candid people, moving subjects | Matrix + face detection | Camera tracks and exposes faces automatically |
| Backlit portraits, moon, concerts | Spot | Precise reading off the subject only |
| Weddings, white dresses, stage | Highlight-weighted | Protects critical highlights from clipping |
| Sports, fast action | Matrix + exposure comp | Camera tracks subject, adjusts fast |
| Snow, beach, bright sand | Matrix + +1 to +2 EV comp | Camera underexposes otherwise |
| Black-on-black, dark scenes | Matrix + -1 to -2 EV comp | Camera overexposes otherwise |
| Street, documentary, unpredictable | Matrix | Most flexible, fastest to work with |
| Studio, controlled lighting | Manual + gray card | Meter becomes irrelevant; you set it |
| High contrast, can’t decide | Any mode + bracket ±1 EV | You’ll pick the best one later |
Notice a pattern? Most working photographers don’t switch modes that often. They pick one — usually matrix, sometimes spot — and use exposure compensation to fine-tune. That’s the real pro secret: the mode gets you in the ballpark, but exposure compensation gets you exactly where you want to be.
6. Exposure Compensation: The Dial That Fixes Everything
If you only learn one thing from this guide, learn this. Exposure compensation — usually a button marked ±, or a dial you turn in aperture/shutter priority — tells the camera, “I know you think zero is correct, but I want it brighter/darker by this much.” Dial in +1 EV and the camera brightens by one full stop. Dial in -2 and it darkens by two stops. It works in every automatic and semi-automatic mode (P, Av/A, Tv/S). In full manual, you just adjust the settings yourself.
Here’s the exact compensation for the classic tricky scenes:
| Scene | Compensation | Why |
|---|---|---|
| Snow, bright sand | +1.3 to +2 EV | Camera wants gray snow; you want white |
| Backlit portrait (spot on face) | 0 to +0.7 EV | Face is mid-tone; slight boost for skin glow |
| Black suit on dark background | -1 to -2 EV | Camera wants gray suit; you want black |
| Fog, mist, haze | +0.7 to +1.3 EV | Bright fog fools meter into underexposing |
| Sunset / sunrise | -0.3 to -0.7 EV | Protects color saturation in the sky |
| Concert / spotlight on singer | -0.7 to -1.3 EV | Bright spotlight blows out otherwise |
| Moon against dark sky | 0 (spot on moon) | Spot meter reads moon correctly |
| Bright sky, dark foreground | Expose for sky, lift shadows later | Highlights can’t be recovered; shadows can |
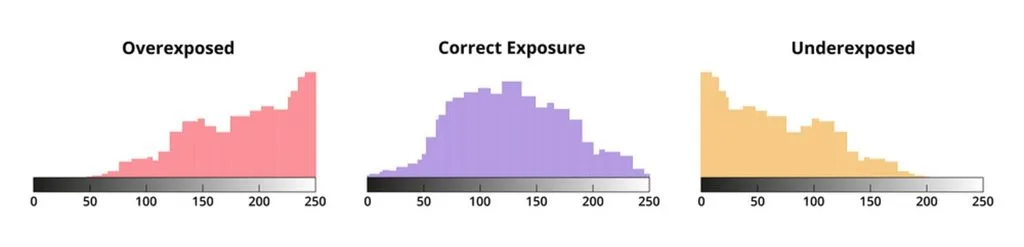
And when you do get it wrong — we all do — fixing grainy photos after lifting underexposed shadows is a whole skill of its own. Underexposure is the #1 cause of noisy photos.
7. AE Lock: The Recompose Trick
AE lock (usually a button marked AE-L or AF-ON on the back of the camera) freezes the exposure reading so you can point the camera somewhere else without it changing. Combined with spot metering, this is how you handle tricky situations: point the spot at the thing you want correctly exposed (a face, a wedding dress), half-press to meter, hit AE-L to lock, then recompose and shoot. Your subject stays correctly exposed no matter how bright or dark the rest of the frame is. Most cameras let you set AE-L to hold for a few seconds or until you press it again.
8. Does Metering Matter in Manual Mode?
Short answer: yes, but differently. In full manual (M), you set aperture, shutter speed, and ISO yourself. The camera changes nothing. But the meter is still running — it’s just telling you what it thinks of your settings. That little needle or bar in the viewfinder shows how far your chosen settings are from what the meter considers “correct.” And which part of the frame it measures to make that call? Your metering mode.
So in manual, spot metering means the meter tells you whether your exposure is correct for the spot under your focus point. Matrix means it’s averaging the whole frame. It’s still useful — you’re just the one turning the dials. A solid camera metering explainer walks through exactly how the meter scale behaves in each mode.
And if you’re balancing ISO against aperture and shutter, our guide to what ISO does explains why ISO is the cleanup hitter, not the leadoff batter.
9. Flash Metering: It’s a Completely Separate System
Here’s something almost every guide misses: flash exposure is metered by a completely separate system. Your ambient metering mode controls the available-light exposure. The flash is controlled by TTL (Through-The-Lens) flash metering, which fires a pre-flash, measures how much light comes back, and sets the flash power accordingly.
TTL flash has its own modes:
- Evaluative TTL: measures flash across the whole frame, biases toward the focus point. The default, and usually what you want.
- Average TTL: averages the whole frame. More predictable in tricky lighting but more likely to overexpose bright subjects.
- Flash exposure compensation: just like ambient compensation, but for the flash only. Dial it in separately. If your subject is too bright but the background is fine, reduce flash comp. If the background is too dark but the subject is fine, slow down the shutter (ambient) instead.
So when you’re shooting with flash, you’re managing two exposures at once: ambient (controlled by your metering mode + shutter/aperture/ISO) and flash (controlled by TTL + flash compensation). They’re independent, and you can balance them however you want.
10. Phone Camera Metering: Tap to Expose
If you shoot on a phone, the metering modes we’ve been discussing don’t exist — but the principle is exactly the same. Tap the screen where you want the camera to expose (that’s spot metering, essentially), and the little sun icon that appears lets you slide up and down to adjust exposure compensation (that’s EV comp). Hold your finger down to lock AE/AF — that’s the phone version of AE lock. Modern phones also use computational photography to bracket multiple exposures automatically and merge them, which is why phone cameras handle backlit scenes so much better than they used to. The 18% gray problem still exists underneath — it’s just hidden behind software.
11. Video Metering and Zebra Stripes
If you shoot video, metering works a little differently. The camera meters continuously (not just at half-press), and many bodies let you enable zebra stripes — a blinking overlay that shows exactly which parts of the frame are clipping. The convention is to set zebras to 70–80% for skin tones (so you expose faces correctly) or 100% to show pure-white clipping. Log profiles and HDR video change the game entirely — you intentionally underexpose to preserve highlights, then grade in post. For stills, the histogram is your truth; for video, zebras are.
12. The Histogram: Your Real Exposure Truth
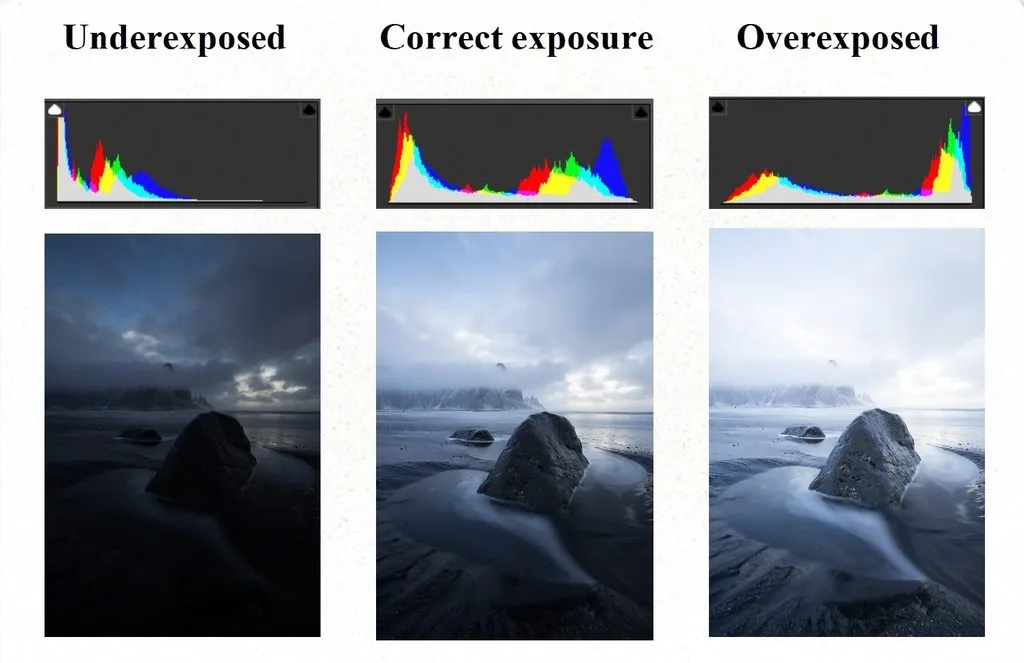
Get in the habit of glancing at the histogram after every tricky shot. The preview on the back of your camera lies — it’s too bright, viewed in a dim environment, and your eye adjusts. The histogram doesn’t. Here’s how to read it in ten seconds:
- Data piled on the left edge: underexposed. Shadows are clipped (pure black, no detail). Brighten in post and you’ll get noise.
- Data piled on the right edge: overexposed. Highlights are clipped (pure white, no detail). You can’t recover this — it’s gone.
- Data touching both edges but not spiking off them: ideal. You’ve captured the full tonal range.
- A big gap on either side: you have headroom — could have exposed brighter (left gap) or darker (right gap).
The single most important rule: you can recover shadows, but you can’t recover blown highlights. If you have to choose, underexpose slightly rather than overexpose. (We’ll qualify this in the ETTR section below.)
13. Expose to the Right (ETTR) and Bracketing
ETTR is the idea that you should expose as brightly as possible without clipping highlights — push the histogram as far to the right as it’ll go — because digital sensors capture more detail in the highlights than the shadows. Brighten in post and you get less noise. It’s real, it works, and it’s debated endlessly. The practical version: in RAW, err slightly on the bright side (without clipping), because you can recover highlights but noisy shadows are noisy forever. In JPEG, don’t bother — the in-camera processing will punish you. If you’re weighing the file format choice, our RAW vs JPEG guide lays out exactly what you’re trading.
When one exposure can’t hold the scene, bracket. Take three shots at -1, 0, and +1 EV (most cameras do this automatically), merge them in post as an HDR, or just pick the best single frame. A metering mode reference covers the technical background if you want to go deeper.
14. Five Metering Myths That Won’t Die
- “Spot metering is for pros; matrix is for beginners.” No. Most working pros shoot matrix + exposure compensation because it’s faster. Spot is a tool for specific high-contrast situations, not a badge of skill.
- “You should always meter off a gray card.” Only in studio or perfectly controlled lighting. Out in the real world, a gray card slows you down and the light changes between when you meter and when you shoot.
- “The camera’s meter is always right at zero.” Zero is the meter’s opinion, not the truth. Snow at zero is gray. Black velvet at zero is gray. You decide what’s correct.
- “Manual mode means metering doesn’t matter.” Wrong — the meter still tells you how far off “correct” you are, and the mode decides which part of the frame it measures.
- “If you shoot RAW, exposure doesn’t matter.” Wrong. RAW gives you 2–3 stops of recovery, not 10. Bad exposure still costs you noise and dynamic range. A good photo editing guide can fix a lot, but it can’t fix clipped highlights.
15. Pro Tips and Quick Cheat Sheet
- The two-dial setup. Put exposure compensation on the rear thumb dial. Put aperture or shutter on the front dial. You’ll adjust both without taking your eye from the viewfinder.
- Memorize your compensation. Snow = +1.7. Black suit = -1.3. Backlit face = spot + 0. These become muscle memory.
- Bracket by default in high contrast. -1, 0, +1. You’ll use the middle one 90% of the time, but the 10% makes it worth it.
- Reset to matrix. If you switch to spot for a tricky shot, switch back. The #1 cause of a whole day of ruined photos is leaving the camera in spot metering.
- Check the histogram, not the screen. The LCD lies. The histogram doesn’t.
- Quick cheat sheet: Matrix for 90% of situations. Spot + AE lock for backlit/high-contrast. Center-weighted for centered subjects. Highlight-weighted for weddings/stage. Exposure compensation for everything else.
16. Frequently Asked Questions
What is metering in photography?
Metering is how your camera measures light to calculate the correct exposure. It uses a built-in reflective light sensor calibrated to 18% middle gray. Your metering mode tells the camera which part of the frame to prioritize when taking that measurement.
How many metering modes are there?
Most cameras offer 3–4 standard modes: matrix/evaluative, center-weighted, spot, and highlight-weighted or partial. Some add average/entire-screen, face-detection-linked metering, or scene-recognition auto metering. Brand-specific variants include Canon’s iFCL evaluative, Nikon’s 3D Color Matrix, and Fuji’s Highlight Priority.
What is the difference between matrix, center-weighted, spot, and partial?
Matrix reads the whole frame in zones and biases toward your focus point. Center-weighted reads the whole frame but prioritizes the center. Spot reads only 1–5% of the frame around your focus point. Partial (Canon only) is a larger spot covering about 8–10% of the frame.
Which metering mode should I use for portraits?
For evenly lit portraits, matrix or center-weighted work well. For backlit or high-contrast portraits, spot metering off the face gives the most consistent results. On modern cameras with face detection, matrix + face-detection metering handles it automatically.
What is 18% gray and why does it matter?
Camera meters assume the scene reflects 18% of the light hitting it — a medium gray. That’s why snow comes out gray (the camera darkens it) and black subjects come out too bright (the camera lightens them). Override with exposure compensation: positive for bright scenes, negative for dark ones.
Does metering mode matter in manual mode?
Yes, but indirectly. In manual you set the exposure yourself, so the mode doesn’t change settings. But it changes what the in-viewfinder meter is measuring — whole frame, center, or spot — which tells you whether your settings are “correct” for that part of the frame.
What is exposure compensation and how do I use it?
Exposure compensation (EV comp) lets you brighten or darken the exposure relative to what the meter thinks is correct, usually in 1/3-stop increments. Use positive (+) for bright scenes like snow, negative (-) for dark scenes or to preserve highlights. It works in Program, Aperture Priority, and Shutter Priority modes.
Should I use spot metering for landscapes?
Usually not. Landscapes benefit from matrix/evaluative because the whole frame matters. The exception is a very bright sky and dark foreground — spot meter off the brightest part you want to keep (sky just above the horizon), lock exposure, and shoot, or bracket multiple exposures for HDR.
Final Thoughts
Metering is one of those fundamentals that feels technical and boring until the moment it clicks — and then your keeper rate doubles. You don’t need to master every mode this week. Start with matrix, learn the histogram, and get comfortable with exposure compensation. That alone fixes 90% of exposure problems. Then spend one afternoon shooting only in spot metering. You’ll come away understanding light in a way you never did before. And that — not the gear, not the mode — is what actually makes a photographer.